Final Post: Grades

Hi Everyone!

The semester is coming to an end and Summer is right around the corner!

Before I leave you all I want to talk about Grades in D2L. It’s important to check your grades before the semester is over to make sure everything looks correct before professors submit your final grades. Once professors submit your grades they are final, and they cannot be adjusted.

Professors who post final grades to D2L can be found at the top of the Grades page in D2L, as shown below. CaptureNot all professors will use to D2L to post final grades. If you do not see your final grades in D2L they will be posted in WINS.

Also, be aware of a visual change in D2L. This will include icons and font. Nothing too major!

I hope you all have an easy finals week as well as an amazing Summer!

Thanks for your time!

MyDesire2Learn

Hey everyone!

The end of the semester is coming to an end and many of us are scrambling to collect all the work that we have done over the course of the semester! If you are graduating or leaving the University, and have an ePortfolio, then it’s important to know about myDesire2Learn.

myDesire2Learn is a cloud-hosted ePortfolio that lets you import all your information from your ePortfolio in D2L.

To access myDesire2Learn log into D2L and click on the Export myDesire2Learn button on the right side of your D2L homepage.Capture

Next, a screen will appear that gives instructions on how Export your ePortfolio. You will first need to create a EduDentity account. When you have created your account and have returned to the D2L homepage, click on the Export to MyDesire2Learn button.capture 2

On the next page, click on the Add Items box. You can then select all the items you would like to export. After you have selected all the items you want, click Addcapture 4

Login to your EduDentity account on the pop-up screen. After you login the following screen will appear letting you know the status of your ePortfolio.

capturee

After your ePortfolio has a status of complete you can login to your EduDentity account at https://www.mydesire2learn.com/d2l/login and your ePortfolio will be waiting for you, and you never have to worry about it going away!

If you have any questions regarding your ePortfolio please contact UW-W Desire2Learn Support.

Thanks for your time!

Did you know you have an ePortfolio?

Hey everyone!

The end of the semester is coming to an end and many of us are scrambling to collect all the work that we have done over the course of the semester! The D2L ePortfolio is a tool which allows you to collect a number of artifacts and resources into one spot where you can easily view and manage them all.

To access your ePortfolio, go to the right hand side of your D2L homepage and clicks on Tools and then select ePortfolio. From there, you’ll be brought to your ePortfolio home page.tools

On your home page, you have a number of different resources, including a feed which shows you the resources that you’ve updated, worked on, or have been shared with you from other people. You can also Add files and Add links from this page.eportfoilio page

Under My Items, you see a list of the objects you’ve created within your ePortfolio. To view them, simply click on the desired artifact, or you can click on the drop down arrow at the end of their name where you can view them, edit them, copy them, share them, delete them, and add them to presentations or collections.

my items

Under the Explore tab, we can see the artifacts that have been shared with us from other people.

Lastly, under the Sharing Groups tab, you can create a sharing group which allows you to easily share things with multiple people without having to individually add each one. This allows sharing to be much more easy, quick and convenient .

If you have any questions regarding your ePortfolio please contact UW-W Desire2Learn Support.

Thanks for your time!


General Access Labs

Hey Everyone!

This is about the time of the year when people really start to get stressed. Classes are starting to wind down and exams will be here before you know it. With all of this panic and confusion, it’s easy to forget the essentials like, what the school offers to help you in this time of need.

MG_7492 A popular example of forgotten luxuries is the General Access Labs! The general access labs are located in the basement of Andersen, or Andersen 1008 and McGraw room 19. They offer free black and white printing, for all of your end of year assignments. They have a mix of computers with all different types of programs and software to help you with your classroom assignments.

Did you know you can print from your personal computer or mobile device? UW-Whitewater students have the ability to print documents and files from personal computers and mobile devices in general access computer labs, simply use one of the following methods. (NOTE: Files larger than 25 MB cannot be printed using this method)

  1. Smartphone Method: Using your UWW.edu email account, attach your document(s) or file(s) to an email and send it to print@uww.edu. Once complete, you will receive an email with instructions on how to print. Use this method when printing from iOS or Android smartphone or tablet.
  2. PC/Mac Method: Connect the device to the campus network. Using your device’s web browser, go to https://labprint.uww.edu/MyPrintCenter. Login using your Net-ID, then upload your document(s) or file(s). This method allows you to adjust your printing options. Use this this method when printing from a Mac computer, or a Windowstablet or computer.

If you need help with this software or if you would like to print something in color or get it things laminated, the General Access Labs also contain the Media Lab.

This is where you can print in color and get things laminated, this also includes poster printing for anyone who wants to make their presentations as professional as can be. The Media Lab also offers A/V Checkouts where you can check out, projectors, screens, tablets, headphones, microphones and all sorts of other different audio and visual recording equipment.MG_7633

To check out this equipment go to av-checkouts.uww.edu and fill out the online request form. You can pick your equipment up in the Media Lab.

The general access labs also have Collab rooms for all of your group work needs. Rooms can be reserved for a maximum of three hours per use. Time may be extended if there are no other groups waiting to use the room. You can reserve a room by going to: http://www.uww.edu/reserve. See lab attendant upon arrival.

Their hours of operation are as follows:

hours

For more information about the general access labs/media lab please visit their website!

Thanks for your time!

D2L Account Settings and Profile

Hey Everyone!

Did you know you can create a personal profile through the Profile tool in D2L? This feature is a great way to get to know other students that are in your class.

To access your profile click on your name in the top right corner and then click on Profile
Profile”. Here you can enter information about your social networks, contact information, education and work, and personal details such as your birth date, hobbies, favorite things, and download a profile picture.

You can also edit your account settings. To access your account settings click on your name in the top right corner then click “Account Settings“. Here you can change account settings, Discussion settings and Emails settings.

Capture


For more information or if you have any questions, contact UW-W Desire2Learn Support.

Thanks for your time!


Media Lab Specialty Printing

Hey Everyone!

Today I’m going to talk about color printing, large poster printing and laminating that can be done here on campus!

We have produced a short video that explains some general information about the general printing process and where it is located!

We ask that large poster prints be saved as a PDF. We are also able to print Photoshop (PSD), Illustrator (AI) and any image file. Price of the prints depends on the size of the paper and the type of paper used. You can also purchase Poster Tubes to protect your posters for only $5!

The Media Lab only accepts Purple Points and are able to charge departmental and project org codes. They cannot accept cash payments or add the payment to your student bill.

The Media Lab is not responsible for any grammatical or design errors discovered in the printed versions, so check over your projects before you print them!

Poster files can be dropped off in the Media Lab or emailed to medialab@uww.edu. Please do not email files larger than 10 megabytes in size. When your poster has completed you will be notified via phone or email.

Any questions regarding this can be directed to: medialab@uww.edu

Additional information is available on the Media Lab website.

Thanks for your time!

D2L Calender

Hi everyone!

Today I want to talk about the Calendar tool in D2L. To access your calendar first go to the D2L homepage.

Next click on the ‘Tools‘ tab located on the far right of the navigation bar. A drop down menu will appear, click on the ‘Calendar‘ link. Capture

This will take you to the calendar homepage. Here you can see what you have due in each of your classes within the month.Capture22

Anything that your professor has chosen to give an opening or closing date to will appear on the calendar. Any changes the professor makes will automatically be updated on your personal calendar.

You can switch to different views of your upcoming events by clicking on the different options at the top; Agenda, Day, Week, Month, and List.Capture2

The month view can be the most useful because you can see what weeks will have more assignments due than others so you can plan accordingly.

Your calendar could potentially contain content from every class that you are currently enrolled in as well as other things like ongoing jobs and general Whitewater content.Capture4

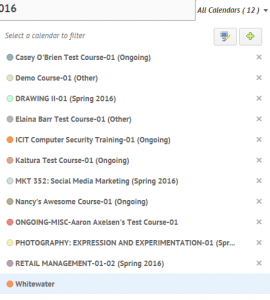
You can manage what you see on the calendar by going to ‘All Calendars’. Here it shows all the calendars that you are subscribed to. You can add and remove any calendar that you want. This means you can add on your work times or club activities if you wanted. The display colors can be also be customized to your liking!

The last and maybe most important aspect of the calendar, is the fact that you can add your own tasks and reminders to it. You can do that by typing them in the bar on the right hand side of the page.

task


You can also export a calendar from D2L.

  1. To do this first access the Calendar from the tools drop down menu.
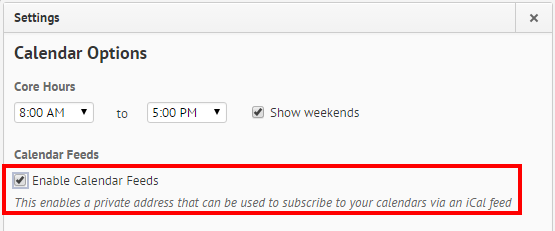
  2. Next click Setting.                               capture 1
  3. In the settings menu, check the Enable Calendar Feeds box. Click Save when you are done.                                           capture 4
  4. A Subscribe option should appear. click Subscribe.Capture.5PNG
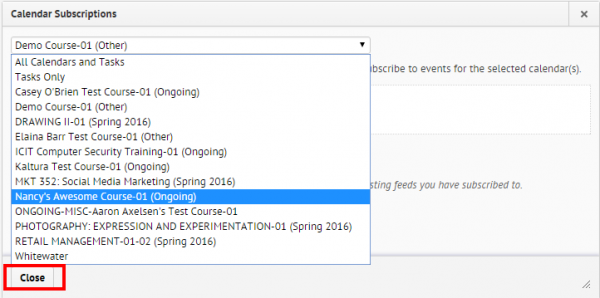
  5. Choose which calendar and/or task to subscribe to. Then, copy and paste the appropriate URL into another calendar application in order to subscribe to events for your chosen calendar.                         Untitled.1png
  6. You can also either click Download to receive an iCal file to import another calendar. Or, you can click Reset to receive a new URL. Note: If you reset your link, it will break the old URL. Make sure to replace any old calendar links with the new one.
  7. Click Close when you are done.

For more information or if you have any questions, contact UW-W Desire2Learn Support.

Thanks for your time!

How well do you know D2L Dropbox?

Hey everyone!

Today we are going to discuss how the Dropbox in D2L works. Many professors use Dropbox as a way to easily collect your assignments so it’s important to understand how the Dropbox works so you don’t forget to turn in your assignments!

To get to the Dropbox page, simply click on your desired class, and click the Dropbox link located in the navigation bar.

Dropbox Icon

The first column that you will notice upon clicking the Dropbox link in the course navigation bar is the Folder column. This holds all of the assignments that need to be turned in. There are different types of symbols that can be found next to the assignment folders.Dropbox Submission

Plagerism Symbol

The symbol to the right means that this assignment is “Originality Check Enabled” so that professors can check and verify that the work you submit is 100% your own.

The second symbol means that the folder contains a group assignment.Group Symbols In a group Dropbox assignment, any one person could submit something to it, but the score and the feedback for that submission will be given to everyone within the group.

The Score column is where the professor enters in your grade in the form of a numeric fraction. If nothing has yet been submitted, or if the professor has yet to enter in your grade, then it will show a dash instead of a number (ex. – / –). In the case displayed below; a perfect score would be 5/5.
capture 3

Under the submissions column you can see how many times you have submitted an assignment, as shown above.

Feedback  is what your professors give you in response to what you have submitted. This might be just your grade or a rubric sheet of the professor’s own creation. It could even be a response to your work; explaining in detail why you got the grade that you did.

feeback-due date

Finally, last but certainly not least, is the Due Date column. Professors are able to choose when assignments are due so pay close attention to the due date column so you don’t forget to turn your assignments in on time!

Submitting something to D2L can be tricky from time to time; so I will go through it step by step.

First you click on the Folder column that you would like to make a submission to.

capture5

Click on the “Add a File” button and then click “upload” to choose your assignment from its saved location, or you can drag and drop your assignment into the box. If you would like to add something that you have saved to your locker or ePortfolio; you may do that as well.

Upload a file

When you are finished choosing, click the blue “Add” button.

You are free to write additional details about the submission or the assignment in the white box below. When you click on it, basic writing and editing tools appear. After you are finished with your message, or if you do not want to write one, click the blue “Submit” button below.

For more information or if you have any questions, contact UW-W Desire2Learn Support.

Thanks for your time!

D2L Discussions

Today we’re going to discuss how to navigate through the discussion tab in D2L. Most teachers utilize discussions in their class so it’s more than likely that you will have to compose your own thread and respond to others in the Discussion tab in D2L.

First to get to the Discussions page click on the link in the course navigation bar.

Discussions

This will take you to your Discussions List Page.disussion list

Here you have the ability to collapse everything, then you have the ability to look at just one discussion forum at a time and collapse past discussion forms.

capture #1

To view a discussion topic click on the discussion post you would like to view or add content too.

On the right side of the page there are announcements on who last posted to the discussion and when. You can also organize the posts by; ‘Unread’, ‘Flagged’, and ‘Drafts’. Posts can be sorted a number of different ways, such as “Most Recent Activity” and “Least Recent Activity”. If you would like an update about these as soon as they happen, there is a ‘Subscribe’ button with a star next to the post.

subscribe

To compose your own thread click on the ‘Start a New Thread‘ button. Here you can create your post and may subscribe to the thread from here if you so choose. You can also upload files under ‘Add attachments‘. If you aren’t ready to post you can save it as a draft or cancel your post.

new thread

To reply to someone else’s post simply click on their post, click ‘Reply to Thread‘, write your response and click ‘Post‘.

If you want more information about Discussions check out our YouTube videos!

For more information or if you have any questions, contact UW-W Desire2Learn Support.

Thanks for your time!


Customize Your D2L Notifications

Did you know you can get D2L notifications sent to your phone? You can easily edit what notifications you want sent to your phone, e-mail, or no notifications at all! Easily know when classes are cancelled, grades are updated, quizzes are due, and more!

Untitled-1

If you don’t like checking your e-mail, or checking D2L, then D2L mobile notification’s is your new best friend! To edit your D2L notifications, click on your name and picture at the top right corner of D2L, and click on Notifications.

Click on “Register your mobile”. Choose your Country, Mobile Carrier and lastly enter in your mobile number. When you enter in your number do not add a 1 at the beginning (ex. (262-123-4567). Click Save when your are done entering in your information. Next a pop up will appear, sending a confirmation code to your phone. Enter the code, then hit Confirm.

Now that your mobile device is connected you can choose which notifications are sent to your e-mail, mobile device, or not at all under Instant Notifications.

You can also exclude classes and groups you do not to receive notification’s from. First, click on “Manage my course exclusions“. Click on the X to the right of the group or class you do not want to receive notification for, and click Close when you are done.

When you are done changing your settings make sure to click Save at the bottom of the page.

Now you can get real time updates about class cancellation’s, grades, new content and more!

For more information or if you have any questions, contact UW-W Desire2Learn Support.

Thanks for your time!