
My previous two posts (Studying the Skeleton, Studying Musculature) are quite lengthy, and may contain an overwhelming amount of information for some of you. Try as I may to keep things simple, drawing the human body is a complex process, with lots of moving parts.
So, with that in mind, I’d like to take a step back with this post, and focus on the basics – concepts that can be understood by everyone, including those who aren’t interested in drawing. Today, we’ll be talking about stick figures.
An Introduction to Stick Figures
In some ways, you could consider the stick figure a sort of baseline for figure drawing. It’s a basic ‘skeleton’ (in terms of a visual framework) for drawing the human figure.
For this reason, stick figures are super common among starting artists and amateurs alike. This is evidenced by a phrase that I’d wager almost every single artist (across various skill levels) has heard at least once.

I’m pretty sure even my mom has said this to me.
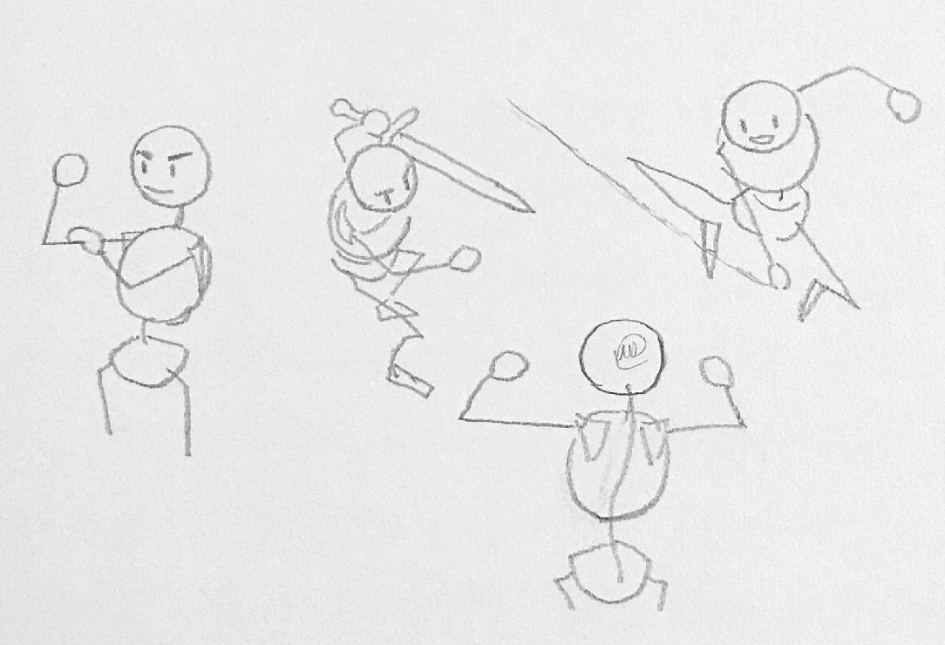
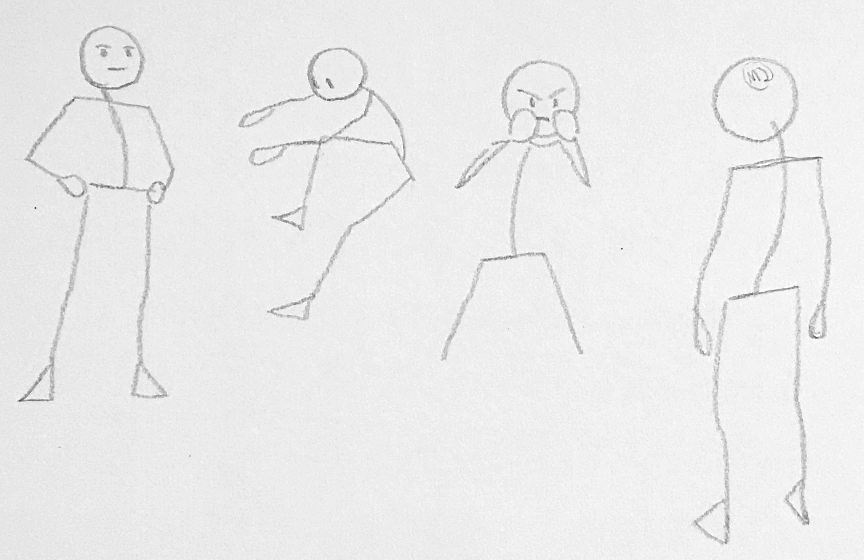
Believe it or not, stick figures are actually quite useful, even as you become better at drawing people. You can achieve a decent amount of expressiveness with basic stick figures, through exaggerated posing.
Like I said, stick figures provide a basic visual framework for posing and drawing the human figure. Rather than thinking about all of the bones, ligaments, muscles, and tendons of a particular body part (like the arm, for example), you can instead represent that complex structure with a single line.
However, by virtue of their simplicity, most stick figures drawn by beginner/amateur artists look unrealistic, and (at times) lifeless.
So, how can we make these stick figures look more realistic, without a ton of extra work?
Remember, our goal here is to keep things simple, while also improving the appearance of our stick figures. If things get too complex, it defeats the purpose of drawing a stick figure: providing that basic visual framework I keep bringing up.
In order to fix these mistakes, we first have to know what they are, so let’s talk about some of the common mistakes people make when drawing stick figures.

Common Mistakes
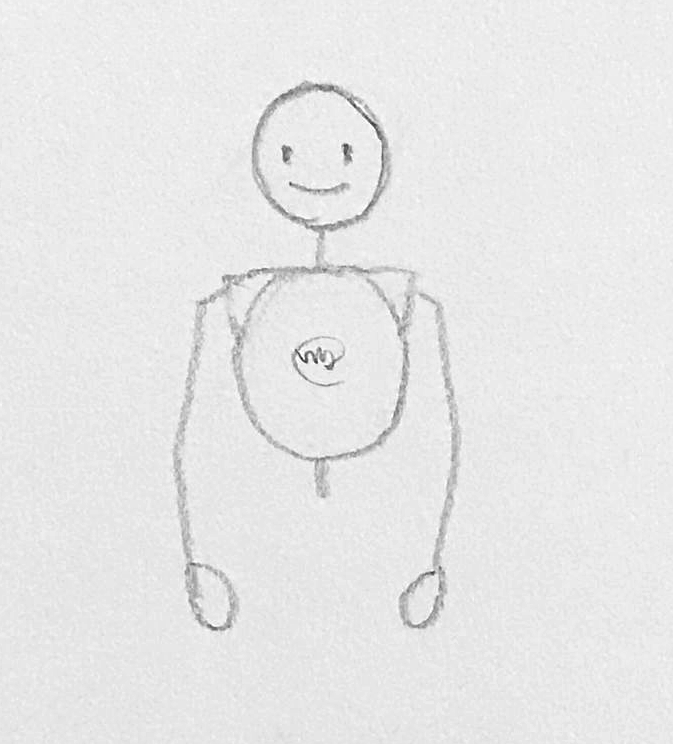
For starters, most stick figures have arms that start at the base of the neck. This is wrong. In some cases, these stick figures may lack a neck entirely.
Another common mistake is the torso being the longest part of the body. This is also incorrect.
Stick figures will also have legs which simply branch out directly from the body, at the base of the torso. The same could be said for the arms, which branch out from the body near the top of the torso.
In addition, these common stick figures will generally represent the arms and legs as singular lines. In reality, our arms can be divided into two sections (upper arm and forearm), and so can our legs (thigh and crus).
Along that train of thought, most stick figures will exclude hands and/or feet. This is, of course, inaccurate – hands and feet are extremely important parts of our anatomy.
For clarity, here’s the aforementioned mistakes written out in a simple list.

- Arms start at the base of the neck
- Neck may be missing entirely
- Torso is the longest part of the body
- Legs (and arms) branch out directly from the torso
- Arms and legs represented by one line
- Missing hands and feet
These mistakes are perfectly understandable, of course – they’re reasonable errors.
When drawing a stick figure, we tend to focus on the most ‘important’ parts of our body. In most cases, these would be the head, arms, and legs.
To that end, the middle portion of a stick figure (which vaguely represents the torso) is simply a place for the head, arms, and legs to originate from. Without that midline, those parts would just be floating in space, attached to nothing.
However, as evidenced by the fact that these are mistakes, they don’t accurately represent the human form.
Fixing those Mistakes
So, how can we fix these mistakes, without giving ourselves a ton of extra work? Well, as always, we should try to think logically.
Head and Neck
You need a neck, because neck muscles allow you to turn your head (among other things, of course). Without a neck, you would have to turn your entire body to look around, or search your environment for potential threats. Having neck muscles allows us to turn our head, without having to turn our body.
Arms and Hands
Along that train of thought, your arms don’t start at your neck. Your arms are attached to your body through a structure called the “shoulder girdle.” Let’s just draw a line for the clavicle (collarbone).

Now, to be clear, arms do not technically ‘start’ at your collarbone. As far as I’m aware, the humerus (upper arm bone) connects to your scapula, which then connects to your clavicle. Even though they’re closely related to one another, your scapula and clavicle are two separate structures.
Obviously, in this situation, that detail isn’t super important. For the sake of simplicity, we’ll draw a line for clavicle, and have our arms start there. Don’t forget to divide the arms into two separate lines – a circle or rectangle representing the hands will suffice.

Already, this is starting to look more realistic.
Torso
Now, we can draw a line for the torso. As mentioned in the previous section, your torso is not the longest part of your body. In reality, your torso is approximately 1/2 the entire length of your body (from head to toe). Please note that your torso should end above your hands.
In this case, the point of termination for our torso is a joint called the “pubic symphysis.” Anatomically, this joint is the half-way point of our body. Please note that the pubic symphysis is actually a part of your pelvis.

Hips and Legs
Much like your arms (which start towards the lateral edge(s) of your collarbone), your legs don’t just branch off from your torso – they start from your pelvis. The pelvis is one of the most complicated forms to draw, but since we’re focusing on simplicity, we’ll just be drawing a line to represent its width – as we did with the clavicle.
That saves us a lot of effort – drawing the pelvis is really hard.
The purpose of these two horizontal lines (representing the clavicle and pelvis) is to fix the ‘branch’ problem with common stick figures. In addition to providing a greater degree of realism to our stick figures, these lines make it easier to accurately render these body parts in perspective.
Now that we have a line representing our pelvis, we can attach the legs. Remember, we’re dividing the legs into two separate lines – just like we did with our arms.
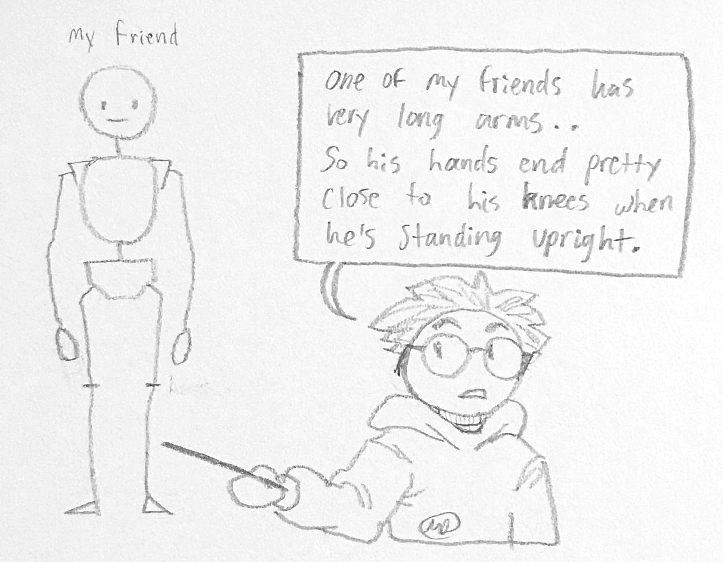
Note that the tip of your middle finger (lowest point of the hand) should end about halfway down your thigh. Keep in mind that this is a general estimate. Arm length varies pretty heavily, so that measurement isn’t going to be accurate for everyone.
Since we’re focusing on simplicity, general estimates are just fine. Once you’ve drawn the lines representing your legs, you can add the feet. Personally, I think triangles are the most accurate representation of your foot’s shape, but you can use rectangles or circles if you want.

All done!
Our New and Improved Stick Figure
And hey, look at that! We’ve got ourselves a finished stick figure. This drawing already feels more realistic than our original stick figure, and more clearly represents that basic visual framework I brought up earlier in the post.
Even though this stick figure already looks pretty good, we can make them look even better through the use of shapes.
Adding Detail through Shapes
At the moment, our stick figure is.. well, pretty stick-like. That is, they’re lacking in mass. Even the skinniest people have what artists refer to as the “three major masses.”
These are important for figure drawing because they’re instantly recognizable, and help give a general idea of what sort of pose a person is in. Understanding the three major masses will make your figure drawings far more realistic.
Now, generally speaking, the three major masses are drawn as forms, which (as I’ve discussed in previous posts) are three-dimensional shapes. Since drawing 3D forms is a lot of work, we’re going to be simplifying them into 2D shapes.
Head (Skull)
Odds are, you’ve already drawn this one. Most stick figures will have at least one shape – a circle representing the head/skull. This circle is perfectly sufficient, so we won’t be adding any more detail to it.
In figure drawing, you’d usually draw a square or rectangle representing the mandible (lower jaw), but that’s not necessary for our stick figure.
Rib cage and Scapulae
We can use an oval to represent the ribs, with a triangle that represents the scapula on either side. Keep in mind that the scapula are located on the posterior (back) side of your body, so they should be slightly obscured by your rib cage.
We can then attach our arms to the scapula on either side, which makes things look a bit more realistic. Don’t forget to add the shapes representing the hands.
In this case, the top line of the ribs is basically just the line we used to represent the clavicle in the previous example. If you’d like, you can draw that clavicular line across the upper portion of the ribs, but that’s not entirely necessary.
Draw a line following your neck, representing your spine, at the bottom of the rib cage. This will connect with the pelvis shape, and helps create the illusion of overlap – which will give your drawing some depth.
Pelvis and Legs
Lastly, we can draw another shape representing the pelvis. Really, it’s up to you which shape you decide to use for this mass. An oval, rectangle, or inverted (upside-down) triangle would look fine.
In my opinion, the most accurate shape for the pelvis is an inverted trapezoid, but again, you can draw whatever shape you’re most comfortable with. I like using a trapezoid, because we can attach the femurs to the sloped edges on either side of the shape.
Now, in addition to adding some detail to the pelvis, we’re going to add some detail to the legs. In our previous drawing, the legs of our stick figure were straight lines. In reality, our femur (upper leg bone) slopes inwards, slightly. Our femur also has a “neck,” which we’ll be representing by a shorter line connecting the femoral line, and pelvis. Don’t forget to add the shapes representing the feet.

All done (again)!
Our New(er) and Improved(er) Stick Figure

With those final adjustments made to our figure, we’re done! (For real this time).
Even with these simple changes, our figure looks much more realistic. If you’ve been drawing along with me, you may find yourself surprised at just how easy it was to draw a more realistic stick figure. Drawing shapes and lines isn’t especially difficult, yet those simple shapes give life to your drawing(s).
Hopefully, you now feel more confident in your ability to draw stick figures. And as always, thanks for reading.
Disclaimer
All information in these posts is my own words, unless explicitly stated otherwise. None of this information is quoted, nor paraphrased, unless explicitly stated otherwise. Any similarities between my own words, and the informative sources/hyperlinks provided is purely coincidental, unless explicitly stated otherwise.
In any case where I am using someone else’s words (or imagery), the source will be cited internally, with a link to that source provided either within the internal citation, at the end of the post under “Sources,” or both.
March 14, 2021 at 4:34 am
I allows believed that the stick figure odd and does not represent a person. I agree that your new stick figure is realistic and practical.
March 14, 2021 at 9:25 pm
That’s good to hear! In truth, the more simplistic (original) stick figure serves a different purpose – being a completely simplified rendition of the human figure that can be drawn in seconds – and in that regard, it is actually more efficient.
My goal with this post was to create a stick figure that more clearly represented the human body and it’s basic anatomy, one that is more useful as an immediate reference for drawing the figure.
May 24, 2024 at 8:18 pm
not good
January 15, 2025 at 10:42 am
play this game its good https://fightshadow2apk.com/
August 17, 2025 at 8:32 am
Matka king – final ank | satta matka | dpboss Matka |
October 27, 2025 at 3:53 am
No
February 17, 2026 at 4:09 am
Thanks For Sharing This Amazing Post! https://thetrafficridersmodapk.org/
October 9, 2024 at 3:15 pm
Argo Door & Window: Repair and Replacement, based at 21005 Watertown Rd, Unit D, Waukesha, WI 53186, is your premier destination for expert home window repair New Berlin, WI. With over eight years of experience, our skilled professionals handle everything from foggy glass to rotted wood, ensuring your windows are in optimal condition. We specialize in high-quality repairs for all American window brands, providing long-lasting solutions. Don’t hesitate to contact us at +12622397971 for a free estimate on your window repair needs. Visit our Waukesha location today to see how we can improve your home’s efficiency and appearance.
July 12, 2025 at 7:16 am
To me the stick figure image has always been a basic figure primarily made of sticks, (lines), and a circle. Your drawings are cool and all, however I wouldn’t consider them “stick” figures, more of a basic human shape figure, having the correct (ish) skeletol structure. Thank you for your ideas and theory.
August 17, 2025 at 8:33 am
Matka satta – indian matka 420 | dpboss matka | satta matka |
October 4, 2024 at 4:47 pm
At Home Window Repair & Replacement Service, we excel as a window repair Mooresville, NC, area, specializing in comprehensive repair solutions for window-related issues. Our team of professionals is adept at diagnosing and fixing problems ranging from simple wear and tear to more complex damage like broken mechanisms and rotted wood. We focus on extending the life of your windows and enhancing your home’s comfort and appearance. Each repair is performed with meticulous care and precision, tailored to fit your property’s unique style and needs. Contact us at 16507-A Northcross Dr, Huntersville, NC 28078, or call +19802383556 to discover how we can assist you.
December 20, 2025 at 7:18 pm
shut the fuck up
July 29, 2025 at 3:39 pm
Yes, I agree. VOS Doors & Windows in Illinois, is your reliable partner for all your window repair in Elmhurst, IL needs. Our team is equipped to handle everything from minor repairs to major renovations, ensuring that each window functions perfectly and enhances your home’s energy efficiency. Our extensive experience with all USA wood and vinyl window brands allows us to provide repairs that are both effective and durable. For expert window repair, call (630) 454-6690.
August 7, 2025 at 10:53 am
Interesting point! I agree — making figures more realistic definitely improves clarity and connection. Thanks for sharing! Also, if you’re in the UK and ever need to check if your car is insured, you can do it quickly at askMID Insurance.
March 15, 2021 at 2:53 am
Stick figures are great to get a starting figure for a drawing. They might just be seen as something children draw, but they really can be the base of a drawing. I think this is a great topic to talk about and it was nice to get a refresher on things even though I have been drawing for quite some time. When I first began drawing I always had a hard time drawing the torso. I did one of the common mistakes you mentioned by making the torso way too long. Overall, this is a great post and it will definitely help people who are getting into drawing.
March 15, 2021 at 3:45 pm
They’re a relatively ubiquitous starting point for drawing people, so I think it’s a good spot to start when it comes to understanding the human form.
Admittedly, this would have been a good post to start with, rather than dumping loads of information and terminology about anatomy on people, but I didn’t even think of this blog topic until I was halfway done writing my post about musculature. At the very least, I’ll be able to go back and reference previous posts about anatomy, if/when I start discussing it more in-depth.
March 16, 2021 at 9:50 pm
I remember drawing stick figures all the time, especially during classes in grade school. However, none were quite as defined or complex as what you’ve shown here. I agree, though, that stick figures can make an excellent base for more complex and detailed art.
March 17, 2021 at 8:02 pm
I used to draw stick figures non-stop as a kid, I drew tons of little comic books with stick figure characters. Honestly, even through high school, you could consider many of my drawings from that time to be elaborations on stick figures, since they lacked proper form(s) and anatomy.
February 26, 2026 at 11:38 pm
The Parivahan Sewa portal is a key digital initiative from the Ministry of Road Transport and Highways (MoRTH). Its goal is to make a wide range of transport-related services modern, easy to access, and transparent for everyone in India. This comprehensive online platform helps you avoid frequent trips to the Regional Transport Office (RTO) for essential tasks.
March 9, 2022 at 3:19 am
Wertuo
Wertuo
October 14, 2023 at 4:58 am
I like it
October 14, 2023 at 4:58 am
Hdudjr
December 27, 2023 at 2:28 pm
Reading idea’s always great for the students and the learners, but bad thing is student not being going to research with specific thing and keep doing sad emoji typically.
January 26, 2024 at 4:41 pm
My Brother is used to play like this
March 22, 2024 at 6:11 pm
Appreciation for really being thoughtful and also for deciding on certain marvelous guides most people really want to be aware of.
April 2, 2024 at 9:18 pm
Helpful.. so W
April 8, 2024 at 12:12 pm
Browser and it is very nice.
fraud
April 16, 2024 at 6:00 pm
Great content.I really appreciate your effort.Thanks
bolly4u
April 19, 2024 at 8:57 am
How you can make dinner even more delicious and special? Homemade rolls! These delicious Copycat Texas Roadhouse Rolls are perfectly fluffy and amazing with any dinner!
https://wordpress.com/tr/forums/topic/wordpress-okey-oyun-temasi-2/
April 24, 2024 at 4:10 pm
this is a good site
May 7, 2024 at 11:55 am
Welcome to Yas Download’s online webpage. iPhone, iPad, iOS & Android video downloader with all features. You may download any video with this shortcut
May 20, 2024 at 1:25 pm
good
https://bolly4u.boats
June 8, 2024 at 5:01 am
Vozol Vista 20000 VZBull Redbull Enerji İçeceği
June 18, 2024 at 9:00 am
What an Article Sir! I am impressed with your content. I wish to be like you. After your article, I have installed Grammarly in my Chrome Browser and it is very nice.
short stories in hindi
July 14, 2024 at 10:58 am
This post is a wonderful resource that I’ll be referring back to again and again. Thank you! Yas Download is a powerful media downloading shortcut specially designed for iPhone or iPad users.
July 27, 2024 at 7:03 am
I am astonished by the level of contemplation and attention to detail you have dedicated to this. I value the motivation you provide me.
space waves game
August 12, 2024 at 2:21 am
Rare Toons IndiaAvails You all Animes, Cartoons, in Hindi – Tamil – Telugu dubbed Episodes in Multiple Quality like 1080p, .
February 26, 2026 at 11:34 pm
bhoomi Online, the Karnataka government’s digital platform, digitises land records, offering easy access to these records online on demand. It is a transformative initiative, simplifying land-related tasks and providing transparent data for property transactions.
August 13, 2024 at 3:38 pm
The new SASSA Scholarship Program is actually benificial for students worldwide especially students from South Africa
August 14, 2024 at 4:52 am
R Download is a magical shortcut designed specifically for iOS users. With it, you can effortlessly download photos, videos, and other media to your device’s gallery with just a single click.
February 26, 2026 at 11:33 pm
The Parivahan Sewa Portal, launched by the Ministry of Road Transport and Highways, brings over 1300 RTO services online for ease of access. From driving licence application and vehicle registration to checking challans and paying road tax, the portal simplifies transport-related tasks for citizens across India. In this article, learn how to register, log in, apply, check status, and download forms using the Parivahan Sewa platform.
August 20, 2024 at 12:21 pm
This article is incredibly insightful. Your thorough analysis and clear explanations really helped me understand the topic better. Thank you for sharing your expertise! Yas Download shortcut is an iOS tool that helps you download social media stuff.
August 21, 2024 at 11:55 am
Argo Glass & Windows is amid top-tier window replacement companies designed to enhance your home’s energy efficiency and comfort. Located in Arlington Heights, Illinois, our team excels in addressing and resolving issues related to old or damaged windows, such as drafts and condensation. We provide seamless replacements that fit perfectly with your home’s existing décor, using only the highest quality materials. Our commitment to excellence is supported by over eight years of experience in window replacement. For a free estimate or to schedule a consultation, please visit us at 317 W Colfax St, Palatine, IL 60067, or call +18476968044.
August 29, 2024 at 11:17 am
For reliable and efficient “best hvac service near me Elgin Illinois” choose Gold Shield Services, your local experts in Elgin. Our professionals are highly trained in the latest HVAC technologies and methods to ensure your system is in perfect condition. We offer comprehensive services that cover everything from initial diagnostics to complete system overhauls. With our focus on customer satisfaction and technical expertise, you can expect the best service and results. Visit our location at Gold Shield Services, 665 Tollgate Rd E, Elgin, IL 60123, or call +18474699934 to schedule your service today.
September 7, 2024 at 2:59 pm
In conclusion, improving stick figures by adding key details like the neck, clavicle, and pelvis can create a more realistic and expressive representation of the human form. By simplifying the structure without sacrificing anatomy, even basic drawings can be more effective. For those interested in sketching, it’s like leveling up your artistic skills, much like advancing in GTA 5 Spot.
September 13, 2024 at 2:59 pm
It was a really amazing guide. It helped me to overcome my fears and I am better than ever. Appreciate it. Please keep writing more such articles.
September 20, 2024 at 3:43 pm
good article
September 20, 2024 at 3:45 pm
Hi everyone
October 2, 2024 at 7:33 pm
.
October 2, 2024 at 7:35 pm
.
October 2, 2024 at 7:35 pm
The Delta Executor is a component in Databricks’ Delta Lake architecture that manages and coordinates the execution of transactions on Delta tables. It ensures atomicity, consistency, isolation, and durability (ACID) properties during write and read operations. By handling complex transaction logic, it optimizes performance and reliability for large-scale data operations.
October 5, 2024 at 3:39 pm
Be a part of an unprecedented and unlimited adventure with GTA San Andreas APK and enjoy the open-world gaming experience on your mobile device. Are you facing problems with the paid application? Then don’t worry about how to enjoy unlimited and smooth gameplay with this GTA San Andreas APK version without any interruption.
October 15, 2024 at 10:29 am
Stiker tetap diminati sampai sekarang, apalagi kita bisa desain sendiri bentuk stiker yang diinginkan
October 23, 2024 at 11:37 am
wep sayfanız gayet güzel tebrik ederim
October 28, 2024 at 7:10 am
I really appreciate the time and effort you put into making your content easy to understand. This post was well-written and very helpful.
If you have any iphone pleae visit this website dtiktok to download and connect this shortcut on your iphone. This shortcut will help you to download any reels from tiktok directly to your device gallery very easily.
February 17, 2026 at 1:28 pm
thanks alot, previusly i was using a webbase tools like “Musicaldown” https://musicaldown.online/. i hav chekc this one by you. now i m free not to use browser frequently.
November 5, 2024 at 3:34 pm
1. Excellent submit. I just stumbled your website dan love to analyzing your good web post. Will subscribe your website for any news coming. King338
November 5, 2024 at 3:35 pm
3. Thank you for completely thrilling web blog and written in perfectly fashion. Looking forward to read your new article. regards King338
November 5, 2024 at 3:35 pm
4. I read all recommendation published and this is good one and I get interesting information and can be useful to write new article. Regards King338
November 5, 2024 at 3:36 pm
6. Been read all your post. have to say, impressive work. keep doing good work King338
November 20, 2024 at 9:59 pm
“Learn how to improve your stick figure drawings with this comprehensive guide, and while you’re at it, check out [hilarious and creative goofy pictures](https://goofyahhpictures.us/) at GoofyAhhPictures.us to spark your artistic imagination!”
November 23, 2024 at 2:58 pm
LOVE YOUR STICK FIGUER BRO/G
DONT LET ANY ONE JUDGE YOU
December 9, 2024 at 7:30 pm
adding stick figures to the gaming guide website for Max the Elf is a great idea. Stick figures can simplify complex game mechanics and make the guide more approachable for players. They provide a clear visual representation of strategies and tips. Read more about the latest max the elf.
December 24, 2024 at 10:11 am
Excellent submit. Must Visit our website for stay goofy > https://goofyahhpictures.net/
January 6, 2025 at 9:03 am
great post
January 10, 2025 at 9:49 pm
great post https://loboflix.in/
January 19, 2025 at 11:14 am
I recently got the latest version of Summertime Saga game from sumsaga and installed it on my phone. The installation process was smooth, and I’m excited to start playing again. The new features and updates are always a great addition to the game, and I’m looking forward to exploring the new content.
January 23, 2025 at 11:52 am
i love Stick Figures
January 29, 2025 at 2:50 pm
FilmBus is an app that allows you to watch any movie web series at your leisure. It has a free and premium version.
February 1, 2025 at 4:26 am
Blox Fruits, scripts can help players unlock new strategies and improve their gameplay.
February 8, 2025 at 5:42 pm
One of the sensational gaming platform Bet PKR vip Game new APK v1.1.6 is an arena of the online gaming industry. Bet pkr Download will be the real and amazing game for real game players who knows to earn with slot games.
February 15, 2025 at 11:56 am
Thank you for providing such valuable information! I truly appreciate the effort you’ve put into sharing these insights. Your post is not only up-to-date but also highly informative. I’ll be bookmarking this page to revisit and explore more of your content in the future.
Keep up the excellent work! dramacool
February 16, 2025 at 9:58 am
thnks…
February 16, 2025 at 9:59 am
Thank you for posting our latest blog. Your support is greatly appreciated and helps us reach more readers. We’re grateful for your commitment to our blog and online community.
February 20, 2025 at 8:01 am
Dramacool | Watch Asian drama, Movies and Shows English Sub HD Without ads
February 21, 2025 at 9:47 am
Dramacool | Watch Asian drama, Movies and Shows English Sub HD Without ads
February 24, 2025 at 4:09 pm
Thank you for posting our latest blog. Your support is greatly appreciated and helps us reach more readers. We’re thankful for your helpful articles and we also wish that you will never stop of providing such informative articles.
March 16, 2025 at 4:54 am
i cant understand by the way………..
March 18, 2025 at 6:26 pm
Great artical thanks for sharing
March 18, 2025 at 6:27 pm
Informative blog post please keep sharing
March 18, 2025 at 6:28 pm
this artical very informative thanks for share
March 25, 2025 at 6:31 am
Thank you for sharing this great information, I loved it.
April 3, 2025 at 6:21 am
Watch, Read, and Explore with Dramanice Your Ultimate Drama Destination!
Enjoy the best Asian dramas with high-quality streaming and English subtitles.
Discover romance, action, and thrilling stories anytime, anywhere!
Drama Nice
April 8, 2025 at 8:29 am
Ennovelas is your exceptional objective for immersive portraying and captivating computerized books. Find a wide grow of sorts counting supposition, dramatization, meander off in daydream arrive, thriller, and more—updated each day with cutting edge scenes from gifted creators around the world.
April 13, 2025 at 5:22 am
Aloha Browser is a web browser that cares almost your security. It’s planned to keep you secure and secure online. To begin with, it has a solid advertisement blocker. https://alohabrowser.tools/
April 14, 2025 at 8:55 am
Absolutely agree—breaking down the human figure is no easy task, and it’s totally normal to feel overwhelmed at first. That’s why simplifying with stick figures is such a smart move—it gives you a solid foundation before diving into the complex stuff like bones and muscles. And hey, if you ever need a break or want to refresh your mind, check out Magis TV Fútbol —a free streaming app where you can watch live sports and more. It’s a great way to relax while still fueling your creativity. Give it a try at the official website!
May 5, 2025 at 4:41 am
Vanced YouTube is a modified version of the official YouTube app, developed by independent developers to add functionalities that are not available in the standard application. It is designed specifically for Android devices and offers a highly personalized and enhanced user experience.
May 5, 2025 at 8:18 am
For families castle app premium offers parental control features, allowing guardians to monitor and restrict content accessible to children.
May 6, 2025 at 5:25 am
Vidmate allows content download from hundreds of websites. Whether it’s a YouTube playlist or an Instagram reel, users can fetch the video with just a few taps.
May 9, 2025 at 3:35 pm
bilgilendirci yaralı bir wep sitesi
May 10, 2025 at 12:54 am
This blog series is interesting. stimulation clickerArticles are coherent with individual highlights. The systematic sharing is great. Looking forward to more great works.
May 10, 2025 at 12:59 am
So much valuable content!The languagecookie clicker style is relaxed and humorous, making it stress free to read
May 10, 2025 at 1:02 am
Great writing skills!It is not only easy to read but crazy cattle 3dalso makes the content more rich and interesting.
May 11, 2025 at 5:16 am
Great article thanks for sharing here.
May 13, 2025 at 1:55 pm
nice
May 13, 2025 at 2:36 pm
This is a pretty neat breakdown on improving stick figures! I never really thought about the anatomy in such a simple way. Makes me wonder if there’s a face symmetry test but for stick figures haha.
May 13, 2025 at 2:41 pm
This article is a great starting point for improving stick figures! Who knew there were so many ways to make them less…stiff? Haha. Makes me wonder if a Doll Generator could even help create better poses from the get-go!
May 13, 2025 at 3:05 pm
This is actually super helpful! I always draw terrible stick figures. Gonna try adding the clavicle thing, it seems easy enough. I wonder if they can make emojimyface ones 🤔 That would be so cool!
https://emojimyface.com
May 14, 2025 at 5:03 pm
This was very holpful thanks
May 14, 2025 at 5:04 pm
I like what you did with the second new improved stickman
May 15, 2025 at 4:20 am
My previous two posts (Studying the Skeleton, Studying Musculature) are quite lengthy, and may contain an overwhelming amount of information for some of you. Try as I may to keep things simple, drawing the human body is a complex process, with lots of moving parts.https://wosgroup.com/
May 15, 2025 at 9:16 pm
Best one so far, bookmarked and will read other articles again.
May 16, 2025 at 3:25 am
I like the stick figure drawings, they really helped me out how to draw people.
May 17, 2025 at 11:32 pm
Best one so far, bookmarked and will read other articles again. !
May 19, 2025 at 4:13 am
Amazing Article admin.
May 19, 2025 at 5:54 am
Good one, & best try.
May 21, 2025 at 6:08 pm
Thanks for the update! It’s always great to stay informed about what’s happening. Appreciate all the effort that goes into making these weeks run smoothly.
May 23, 2025 at 7:51 pm
Best one so far, bookmarked and will read other articles again.
May 27, 2025 at 9:08 am
TD777 Game Download is a newly launched online gaming application in Pakistan that allows users to play skill-based and chance-based games while earning real cash. Once the TD777 Game getting on smartphone, then you can easily play multiple games to get unlimited rewards.
May 28, 2025 at 4:18 pm
Very good article!
May 28, 2025 at 4:18 pm
Moni88 Situs Judi Bola, Parlay Online dan Slot88 Gacor paling gampang maxwin di Indonesia.
June 4, 2025 at 1:14 pm
Delta Executors Official provides a free, cross-platform Roblox script executor for Android, iOS, and Windows. It has a user-friendly interface and a built-in script library to enhance gameplay.
https://deltaexecutorsofficial.com/
June 5, 2025 at 2:04 pm
Good post, thank you.
regardersoustitre facebook page
June 5, 2025 at 2:14 pm
Nice article, thank you.
guardasottotitoli facebook page
June 5, 2025 at 2:29 pm
Good post, thank you bro.
versubtitulos facebook page
June 6, 2025 at 2:31 am
Good post, thank you.
ULTRA HD facebook page
June 6, 2025 at 2:53 am
Good post, thank you bro.
MOVIE HD facebook page
June 9, 2025 at 11:40 am
Good post, thank you bro.
Seriedfilm Subtitulo facebook page
June 9, 2025 at 11:49 am
Good article, thank you bro.
Seriedfilm Subtitulo facebook page photos
June 9, 2025 at 12:52 pm
Good post, thank you admin. Rize is known for its lush green landscapes, tea plantations, and scenic mountains, making it a popular destination for nature lovers and adventure travelers.
June 12, 2025 at 9:50 pm
Recomiendo totalmente Becas Ritacetinas, encontré info súper clara y útil sobre becas.
June 14, 2025 at 4:37 am
Parivahan is one of India’s best government digital services, offering convenient, transparent, and efficient access to transport-related services. It allows users to apply for driving licenses, register vehicles, pay road tax, and check challans online—eliminating long queues at RTOs. Integrated across states, it ensures uniform services and easy tracking of applications. With tools like the mParivahan app, it supports paperless governance and the Digital India initiative. https://sewaparivahan.com/
June 14, 2025 at 11:29 am
Situs Slot Olimpus 1000 Maxwin Super Scatter Terbaru 2025
June 16, 2025 at 10:23 am
GTA 6 APK is an action-packed and adventure mobile game played all over the world. It is known due to its thrilling open world adventures, the Grand Theft Auto Series, which allows players to explore massive cities, drive a wide range of vehicles, complete action-packed missions, and engage in different exciting activities.
June 17, 2025 at 6:11 am
What a great post by you. I love it.
June 20, 2025 at 6:40 am
Without that midline, those parts would just be floating in space, attached to nothing…
June 24, 2025 at 7:14 am
This is actually super helpful! I always struggled with making my stick figures look less…stiff.
June 24, 2025 at 3:48 pm
app, it supports paperless governance and the Digital India initiative. Sso ID is a part of it
June 24, 2025 at 3:49 pm
SSO ID
is a transport and logistics management system designed to streamline vehicle tracking, fleet management, and cargo transportation. It utilizes GPS technology and real-time data to enhance route planning, reduce delays, and improve operational efficiency. Prevahan is especially useful for businesses seeking greater control over their supply chain and transport operations. It helps monitor driver behavior, optimize fuel usage, and ensure compliance with regulatory requirements. This system plays a vital role in making transportation more transparent, accountable, and cost-effective.
like this write a comment so i can post to manuplate google and get ranking
June 25, 2025 at 4:09 pm
Good post, thank you.
Les Film Serie FR facebook page
June 25, 2025 at 4:16 pm
Good article, thank you.
Serie di Film ITA facebook page
June 25, 2025 at 4:22 pm
Good job, thank you.
Series de Película facebook page
June 25, 2025 at 4:29 pm
Good post, thank you bro.
Watch Streaming Seriedfilm facebook page
June 29, 2025 at 4:37 am
Download apk singa8 Mahjong Scatter Hitam Slot Bet Kecil 40 Rupiah Terbaru Indonesia
June 30, 2025 at 6:50 pm
sassa status check for r350 payment dates
Great tips for keeping your SASSA details up to date to avoid any delays in receiving payments.
Make sure to regularly verify your information and stay informed about the latest updates.
July 1, 2025 at 6:43 am
In conclusion, adding simple details like the neck, clavicle, and pelvis can really bring stick figures to life, making them more realistic and expressive. It’s all about keeping things simple while still capturing the basics of human anatomy. If you enjoy sketching, think of it as leveling up your art skills—kind of like progressing in avatar world geeks!
July 5, 2025 at 7:35 am
Do you want to buy unicorn pyjamas ? You can buy them at Maison de la Licorne
July 5, 2025 at 10:04 pm
Appreciate the clear timeline—this is exactly the info aspiring officers need to organize their application process
July 5, 2025 at 10:41 pm
Breaking complex anatomy into simple lines is genius—now I actually understand proportion before diving into details
July 12, 2025 at 10:07 am
Thank you for sharing valuable information. Provided information is upto date & well-structured. I’ve book marked this website for future updates.
July 13, 2025 at 2:55 pm
Thanks for sharing! Enjoy relaxing with the New York Times Connections game. For expert solutions and past puzzles, explore our professional Connections Archive at [Connections Hint Today Answers], the top destination for puzzle fans!
July 14, 2025 at 6:15 am
https://parivahansewa.co/ is India’s digital transport portal by Ministry of Road Transport and Highways, offering online services for driving licenses, vehicle registration, permits, and traffic challans across all states.
July 14, 2025 at 6:18 am
sewa parivahan streamlines India’s transport services through VAHAN and SARATHI systems, enabling citizens to access driving license applications, vehicle registrations, renewals, and eChallan payments online nationwide.
July 15, 2025 at 1:21 am
Hey there! I think it’s so cool that you’re diving into the nitty-gritty of stick figures. It really makes a difference in making them more lifelike, huh? When I was learning to draw, I struggled with proportions too, but focusing on simple shapes like you suggested really helped. By the way, if you’re interested in picking out some fun stationery for your art projects, I found this great resource on trendy stationery that you might like! great resource on trendy stationery
July 15, 2025 at 1:22 am
Wow, this post is super enlightening! I never realized how each body part connects. It’s amazing how simplifying complex shapes can make the stick figures more relatable. When I was getting into art, having a reliable color chart really helped in choosing the right colors. Speaking of colors, I found a comprehensive Pantone Colors Chart that you might find handy for your drawings! comprehensive Pantone Colors Chart
July 15, 2025 at 1:22 am
Oh, I love how you break down the drawing basics! It’s so refreshing to see someone address common mistakes instead of just glossing over them. I remember feeling so lost with details and proportions, but focusing on the essentials transformed my approach completely. Also, for anyone experimenting, I came across this AI color changer that makes it a breeze to tweak your art. You might find it useful! AI color changer that makes it a breeze to tweak your art
July 15, 2025 at 7:08 am
Welcome for this useful information, I have bookmarked and written some things down. I will be checking back, from time to time too.
July 15, 2025 at 1:30 pm
SINGA8 Apk Slot Olympus 1000 Super Scatter Terbaru Bet 40 Terpercaya Di Indonesia
July 15, 2025 at 3:06 pm
“This downloader is a game changer for TikTok fans like me!”
SSSTikTok
February 17, 2026 at 1:32 pm
i was wondering if this work with douyin. but please check i m getting error msg with “An error occurred. Please try again.” i recommend MusicalDown
July 16, 2025 at 3:43 pm
I really enjoyed your breakdown of stick figure anatomy—it’s a great starting point for beginners like me. After practicing my drawings, I like to unwind with some fun games at sansfight.io. It’s cool how art and gaming both let us explore creativity in different ways!
July 17, 2025 at 9:24 am
It’s amazing how shared stories create such connection
July 17, 2025 at 9:26 am
Your efforts are truly appreciated. You have made a real difference in the lives of many
July 21, 2025 at 1:19 pm
Nice post, thank you.
Film Sub ita on X
July 21, 2025 at 2:30 pm
Nice article, thank you.
imovieseries
July 22, 2025 at 11:19 am
Your website is very nice, a fluent article, congratulations
July 24, 2025 at 12:28 pm
FESCO Bill is a convenient online service that lets Faisalabad Electric Supply Company customers quickly check, download, and print their electricity bills. Simply enter your 14-digit reference number on FESCOBilling.pk
to access your latest bill anytime, from anywhere
July 25, 2025 at 8:13 am
Trusted online slots that are ready to give you big jackpots that you can play on the site https://personate.id/
July 26, 2025 at 6:54 am
Great content.I really appreciate your effort.Thanks
https://hdphotoconverter.org/
July 26, 2025 at 8:08 am
Great post! I really enjoyed reading this.
July 27, 2025 at 1:42 pm
The Parivahan Sewa portal, which we briefly evaluate in this blog, has made it possible to complete certification and processes for services related to vehicles and licenses digitally.
July 27, 2025 at 3:57 pm
Gold rates for 24-carat gold in Qatar are influenced by global market conditions and local demand. As the purest form of gold, 24K is highly valued for investment and jewelry. The price tends to fluctuate based on factors like economic conditions, geopolitical events, and the overall demand for precious metals. For more details, check the gold rate in Qatar today 24 carat.
July 28, 2025 at 9:08 am
Platform topcer88 bisa jadi alternatif hiburan digital yang menarik saat ini.
July 29, 2025 at 4:16 am
That is funny, l like it
July 29, 2025 at 4:18 am
Thanks for sharing, very interesting
July 31, 2025 at 2:40 pm
Use Grow a Garden Value Calculator for Roblox’s. Instantly calculate crop values and optimize your strategy.
August 1, 2025 at 1:38 pm
The latest version of Vidmate Apk is amazing. It’s more stable, faster, and even cleaner in terms of design. The integrated search bar makes it easier to find videos directly within the app, and the new dark mode is a nice touch.
August 2, 2025 at 8:18 am
Unlike many platforms, meme sound buttons doesn’t ask you to register or install anything. The entire experience from browsing and searching to playing and sharing is browser-based and fully open. Whether you’re a creator, gamer, or casual meme lover, it works instantly across all your devices.
August 2, 2025 at 10:06 am
The askMID service allows you to confirm if your vehicle is currently showing as insured on the Motor Insurance Database.
August 2, 2025 at 10:06 am
GST stands for Goods and Service Tax and it was introduced to avoid the cascading tax effect that means charging tax on tax. On the other hand, the government has made it easy for individuals to manage their GST online through the GST Login Portal.
August 2, 2025 at 10:07 am
nbm Application Status & Payment Status Check: Andhra Pradesh government has launched NBM GSWS portal at gsws-nbm.ap.gov.in where you can check your NBM application status or payment status for different welfare scheme for the year 2025-26.
August 2, 2025 at 10:08 am
The Employees’ Provident Fund Organisation EPFO is one of the largest social security organisations in India, established under the Employees’ Provident Funds and Miscellaneous Provisions Act, 1952..
August 6, 2025 at 5:11 am
The Privahan Sewa offers a variety of services, including online services, Sarathi Parivahan driving license services, Vahan parivahan vehicle registration permits, Check post tax payments, RTO registration, learner’s license services throughout India.
August 6, 2025 at 7:22 pm
Joining Boys WhatsApp Groups has become very easy with this website.
August 7, 2025 at 1:44 pm
This post is so helpful! It’s true, drawing people is hard, even stick figures can be tricky. Sometimes I wish I had a Photo Prompt to help me get started with poses. It would make things so much easier!
August 8, 2025 at 11:24 am
“Interesting breakdown! I never realized how small tweaks like joint positioning can make stick figures feel more dynamic. It kind of reminds me how in video games, especially in something like Call of Duty: Modern Warfare 2, small tweaks (like aim assist settings or trainer tools) can totally change the way a character moves or reacts. I’ve been diving into that lately fun how both drawing and gaming rely on little adjustments to feel more ‘real.’ Thanks for the tips!”
August 8, 2025 at 12:52 pm
This was actually a really helpful post. I’ve always struggled with getting proportions right when drawing stick figures, especially when trying to use them for planning character movement. I recently started exploring animation mods and character trainers in games like
WWE 2K20. where understanding basic poses and movement flow really makes a difference. Posts like this help bridge the gap between basic drawing and more advanced game design ideas.
August 9, 2025 at 9:03 am
Gamified content keeps Gen Z engaged by blending entertainment with interaction, turning passive consumption into active participation. Features like challenges, quizzes, leaderboards, and rewards tap into their competitive nature and desire for instant feedback. By integrating elements of play into learning, shopping, or social media experiences of Z Engaged, brands and creators capture Gen Z’s short attention span while making the content feel more personal and immersive.
August 9, 2025 at 8:15 pm
If you want to play tough and want to hate this I’ll always show up and make a statement. Everything I do so instinctive and so passionate.
August 11, 2025 at 10:26 am
You are not alone if you are battling inconsistent streaming services or bored of paying for costly cable subscriptions. Many individuals are searching for a fundamental, free way to view live TV from the convenience of their house.
August 11, 2025 at 12:47 pm
The Money Wave Official Website — this guided audio session gently reprograms your subconscious mind to attract wealth naturally and effortlessly.
August 13, 2025 at 10:06 am
“I’ve been testing out script tools for Roblox, and Delta Executor stands out—its clean interface, speedy script injection, and regular updates really impressed me. If you’re into Lua scripting or want reliable custom features, check it out at DeltaExecutors.app!”
delta executors/
August 13, 2025 at 6:38 pm
It’s a favorite among players seeking extra advantages, downloading and usingredz hub blade ball is against Roblox’s terms of service and may result in account warnings or permanent bans.
August 14, 2025 at 12:11 pm
Stick figures are such a simple yet powerful way to break down human anatomy when starting out. They help with proportion and pose before adding any detail, which is why even pros sometimes sketch them first. I use the same approach in other hobbies too — starting simple and building up.
August 14, 2025 at 5:51 pm
Maximize your chances of winning with exclusive strategies that you can apply and take advantage of your luck in online betting. https://theglobaltake.com
August 18, 2025 at 12:33 pm
This article is really informative and well-written. Looking forward to reading more of your valuable posts.
August 18, 2025 at 1:31 pm
Parivahan Sewa
has made transport-related services extremely easy and accessible. Now you can avail driving license application, renewal, obtaining duplicate license, and many other services from the comfort of your home. The portal offers time-saving, transparency, and convenience, which is a major achievement in today’s digital era.
August 19, 2025 at 9:12 am
The Boys WhatsApp Group Links are very popular these days worldwide for fun and entertainment chat.
August 23, 2025 at 3:03 pm
Great tips on drawing stick figures! It reminds me of how step-by-step guides can make things easier, like the video walkthroughs at playcolorblockjam for mastering game levels.
August 24, 2025 at 11:42 pm
You nailed the basics here, but don’t forget those little details like hands and feet, they matter! Check Sprunki out for a fun way to add some flair to your character design
August 26, 2025 at 9:55 am
Snow Rider 3D is an addictive snow racing game where you guide your sled through endless snowy hills.
August 27, 2025 at 6:00 am
Thank you for providing useful and very good information.
August 28, 2025 at 12:31 am
Great breakdown of stick figure fundamentals! Adding the clavicle and pelvis lines really helped me see how to improve my poses without overcomplicating things. Your explanation of fixing common mistakes made the process of drawing stick figures much clearer and more approachable.
August 28, 2025 at 12:40 am
Great breakdown of stick figure basics! I especially appreciate how you highlight the importance of the clavicle and pelvis lines to improve realism without complicating the drawing. This approach really helped me refine my foundational sketches when practicing figure drawing.
August 28, 2025 at 9:40 am
Supermaker GOOD article,It is so useful for me
August 31, 2025 at 10:38 am
https://www.youdao4.com
September 1, 2025 at 6:49 am
Halo, Anda telah melakukan pekerjaan yang fantastis. Saya pasti akan menggalinya dan secara pribadi merekomendasikan kepada teman-teman saya. Saya yakin mereka akan mendapat manfaat dari situs ini.
September 2, 2025 at 4:23 pm
The Government of India has started the e-Shram Card scheme for unorganized workers. You can download the e-Shram Card registration from the e-Shram Card portal.
September 2, 2025 at 4:26 pm
Rajasthan government has started SSO ID for all the teachers and students of the state
September 2, 2025 at 9:48 pm
Amazing
September 5, 2025 at 3:14 pm
This is a helpful tutorial! I always struggled with making my stick figures look right. The tips about the shoulders and dividing the arms/legs are really useful. I’m definitely going to try these out. Anatomy and how to represent it in a simple form is key!
September 6, 2025 at 7:14 pm
Why don’t you join the Latest WhatsApp Groups
September 8, 2025 at 4:45 pm
Information related to MP Bhulekh land map has been made available online by the Madhya Pradesh government on the MP Bhulekh portal
September 10, 2025 at 2:55 am
This post nails the basics on drawing stick figures, but it could use some examples to really drive the points home. Oh, and if you’re into music, check out this Sprunki juego for some creative inspiration.
September 12, 2025 at 4:46 am
Thoughts on “How to Draw: Fixing the Common Flaws with Stick Figures”
This is a friendly, practical guide — perfect for beginners who want to build confidence before moving on to more complex figures. I like how the post breaks down posture, proportion, and gesture into simple steps that actually feel doable. Practicing those small adjustments makes a big difference in bringing stick figures to life.
If you’re using exercises like these in a school or workshop setting, remember to check the consent and data policies for students involved in any published work or portfolios. A useful reference is the parental consent checklist, which explains the permissions schools should gather when handling student records or sharing student-created content.
Overall, great tutorial — simple, clear, and very encouraging for anyone starting to draw.
September 13, 2025 at 8:30 am
I really liked how you explained fixing common flaws with stick figures, it makes drawing much easier for beginners. For more helpful resources, check out this useful site.
September 13, 2025 at 10:55 am
Simply add your Avatar image and audio, and prompt the emotions and expressions to bring your Avatar to life! Kling AI Avatar
September 13, 2025 at 10:56 am
Nano Banana Image Generator: Redefining AI Image Generation,Experience advanced context-aware image generation and editing. Input text, images, or both to create coherent, high-quality visuals tailored to your needs.
September 15, 2025 at 10:14 am
수원출장안마는 고객 편의를 위해 간편한 예약 시스템을 운영합니다. 원하는 시간과 장소에 맞춰 전문 마사지사가 방문해 체계적인 맞춤 마사지를 진행합니다. 수원출장안마
September 16, 2025 at 12:58 am
Such a clever and helpful guide! Love how it makes drawing accessible by fixing simple stick figure flaws. Really fun approach for beginners!
September 16, 2025 at 2:25 am
Enter Nano banana AI built on Google’s cutting-edge AI models This free, intuitive platform empowers you to generate and edit visuals with simple text prompts, making creativity accessible to everyone.
September 17, 2025 at 3:28 pm
Aš labai rekomenduoju MidjourneysRef.com/ko visiems, kurie naudoja MidJourney.
Čia rasite didelę SREF kodų kolekciją su pilnais promptais, paveikslėlių ir vaizdo įrašų pavyzdžiais.
Stiliai suskirstyti į kategorijas (anime, cyberpunk, retro, surreal ir kt.), todėl labai lengva rasti įkvėpimą.
Svetainė nuolat atnaujinama ir rodo populiariausius kodus – patogu tiek pradedantiesiems, tiek pažengusiems kūrėjams!
September 18, 2025 at 1:36 am
Those anatomy posts are deep, so tackling stick figure flaws sounds like a great way to simplify. Speaking of tools, for game dev, you sometimes need to reach out to people. A good Email Extractor can really help streamline finding contacts.
September 18, 2025 at 8:57 am
lsix game is the best place for online players. Come to the official site today and have a look around games, entertain yourself, and begin making real money immediately and in a secure manner.
September 18, 2025 at 9:03 am
I simply love online game platforms, and 1jj game appears to be a great choice. Users can make real money and enjoy a seamless experience by accessing the official website.
September 18, 2025 at 2:23 pm
9P99 game official website is a wonderful destination for those interested in playing thrilling games. It provides entertainment, trustworthiness, and genuine earning possibilities for serious gamblers.
September 18, 2025 at 2:25 pm
If you are on the lookout for an actual money gaming site, seven game is a place to go. The official website gives the users a secure, thrilling, and rewarding experience every single day.
September 21, 2025 at 4:28 pm
Greate!
Welcome to Grow a Garden.ers are hooked!
September 19, 2025 at 3:50 pm
Hi to everyone
September 21, 2025 at 4:23 pm
The shrug emoji ¯\_(ツ)_/¯ (also known as the shrug emoticon or shrug text) is a quick way to express uncertainty, indifference, or “I don’t know.”
September 21, 2025 at 4:23 pm
Play the classic Google Color Tiles and discover more colorful puzzle games. Match colors, eliminate tiles, and challenge yourself with endless fun!
September 21, 2025 at 4:24 pm
Hot Pre-Sale! Tap to draw your Nano Banana Prompt and unlock random pets, crops, and more surprises!
September 21, 2025 at 4:30 pm
There’s a certain grace in the way you approach everything FLUX.1 Kontext.
September 21, 2025 at 4:40 pm
wow! An animated musical fantasy where K-pop meets supernatural adventure.
KPop Demon Hunters Coloring Pages
September 21, 2025 at 4:41 pm
Aadhaar is a 12-digit unique identification number issued to residents of India by the UIDAI. It is based on an individual’s biometric and demographic data and serves as a proof of identity and address.
September 22, 2025 at 5:58 am
Enter Coloring page text on ColorArt Ai Coloring Page generator will be the best Choice for educatonal and Amz KDP Seller.
September 24, 2025 at 1:42 pm
Get personalized help from a MATLAB expert
who understands academic and technical requirements. Whether it’s simulations or debugging, expert solutions make your work easier.
September 25, 2025 at 2:01 am
This was such a helpful breakdown! I never realized how many common mistakes we make with simple stick figures—like starting the arms at the neck or skipping the pelvis. The step-by-step improvements with clavicle, pelvis, and masses really make the figure look more realistic while still keeping it simple. Definitely makes me feel more confident about my doodles!
October 2, 2025 at 6:40 am
This breakdown makes stick figures so much clearer and more practical! I love how you kept it simple while still fixing the biggest mistakes. Adding shapes for mass really takes them to the next level.
September 26, 2025 at 2:54 am
VEOE AI Create stunning videos with audio using Google’s most advanced Veo 3 AI model.
September 26, 2025 at 7:12 pm
Join today and enjoy premium online betting services designed just for you. Register now and join thousands of players who have experienced the thrill of online betting on this site https://hflrzzl.com
September 27, 2025 at 6:40 am
This is exactly what I needed! Your previous posts on anatomy were a bit overwhelming, so I appreciate you breaking things down. Focusing on fixing common flaws with stick figures sounds like a much more manageable starting point for a complex topic. Thanks for sharing this!
September 28, 2025 at 2:46 pm
nice
https://tweetlen.com
October 1, 2025 at 2:17 pm
Really enjoyed this article! 🎨 The tips on correcting common flaws in stick figures are clear and helpful. The advice about proportion and gesture lines especially resonated with me — it’s amazing how small adjustments can make a big difference.
One question: when you recommend refining the joints (elbows, knees) to make them less angular, do you have a trick for maintaining fluidity in movement, especially in dynamic poses?
Thanks for sharing such practical drawing guidance — it’s truly useful for artists at all levels!
October 3, 2025 at 6:55 am
The breakdown of common stick figure mistakes was both practical and easy to follow. Your points on proportions and using gesture lines stood out to me — it’s surprising how even subtle tweaks can completely change the energy of a drawing.
I found this piece really insightful! ✏️ I do have a curiosity though: when you suggest softening the joints like elbows and knees so they don’t appear overly sharp, is there a particular method you use to keep the sense of motion smooth, especially in action-heavy poses?
Appreciate you putting together such actionable tips — they feel relevant for beginners and experienced artists alike
October 3, 2025 at 3:45 pm
Great insights! I’ve been using Nano Banana AI for natural language image editing. Just describe what you want in plain English and it delivers professional results in seconds. Perfect for content creators!
October 6, 2025 at 7:36 pm
If you’re hunting for a place to unwind and play, go here to explore H555 Game — simple to use and full of fun!
October 8, 2025 at 4:56 am
Download the delta app from our facebook group page now
October 8, 2025 at 10:21 pm
Your blog is a goldmine of valuable insights.
October 10, 2025 at 2:03 am
>>>BARCELONA88<<< REKOMENDASI BO NOMOR 1 DI INDONESIA
October 10, 2025 at 11:01 am
Thanks for sharing our latest blog! Your support means the world to us and helps us connect with more readers. We’re truly grateful for your insightful articles and hope you continue creating such valuable content. Keep inspiring and informing others!
October 10, 2025 at 11:41 pm
Great tutorial, your tips on proportion and posture really clear up the common mistakes many beginners make.
I especially liked how you break down the steps into simple, manageable adjustments.
For readers looking into community outreach, public health, or nutrition work in local settings, you might find this resource interesting:
Aahar Jharkhand.
Thanks for sharing your knowledge and making drawing more accessible!
October 11, 2025 at 7:52 am
Wow, this is super helpful! I always struggle with making stick figures look dynamic. Speaking of cool visuals, have you seen Ghostface AI? It turns photos into awesome 90s horror scenes. Might be fun to use those silhouettes for figure practice, too!
October 11, 2025 at 7:52 am
This is super helpful! I always struggle with making stick figures look less stiff. Speaking of professional looks, have you tried Headshot AI? It’s a great way to get a polished headshot without the studio hassle, perfect for LinkedIn or your portfolio!
October 11, 2025 at 7:52 am
This is a great breakdown! Simplifying anatomy is key for beginners. Sometimes I sketch really small and then need to blow it up. I bet an Image Upscaler would be super helpful to clean up those initial rough sketches and make the lines crisp!
October 11, 2025 at 8:36 am
Go to our website for more information about delta executor
October 13, 2025 at 3:34 am
https://sora-video.org/
October 13, 2025 at 3:38 am
https://123d.app/
October 13, 2025 at 3:41 am
https://www.applebanana.org/
October 13, 2025 at 3:56 am
https://imgart.app/
October 13, 2025 at 3:57 am
https://ai3d.cc/
October 13, 2025 at 4:04 am
https://grokimage.org/
October 13, 2025 at 4:06 am
https://www.grokvideo.app/
October 13, 2025 at 4:20 am
https://www.grokimagine.one/
October 13, 2025 at 11:03 am
Parivahan is one of India’s best government digital services, offering convenient, transparent, and efficient access to transport-related services. It allows users to apply for driving licenses, register vehicles, pay road tax, and check challans online—eliminating long queues at RTOs. Integrated across states, it ensures uniform services and easy tracking of applications. With tools like the mParivahan app, it supports paperless governance and the Digital India initiative. https://parivahansewa.uno/
October 16, 2025 at 1:32 am
This post is so helpful! Drawing the human body is definitely tricky, even for stick figures. I bet an AI could help with some of those tricky poses. Have you tried using something like banana ai for inspiration?
October 16, 2025 at 3:20 am
This sounds great! I definitely felt a bit overwhelmed by the last two posts, so a simpler approach to anatomy is much appreciated. Even with stick figures, getting the angles right for limbs can make a huge difference. Sometimes I wish I had an online protractor tool to help with those tricky bends!
October 17, 2025 at 6:42 am
This sounds great! Your previous posts were super insightful, but yeah, anatomy can be a lot. Fixing stick figures is a perfect way to ease into things, especially for game development. Speaking of games, I’ve been really enjoying `pipsnyt` lately – it’s a surprisingly fun little title!!!
October 18, 2025 at 10:36 am
FM WhatsApp is a modified version of the original WhatsApp, created by Fouad Mokdad, that offers advanced privacy options and full customization features. Unlike the official app, FM WhatsApp lets you hide your online status, blue ticks, typing indicator, and even prevent others from deleting messages. It also allows you to apply custom themes, change fonts and icons, and lock specific chats without using a third-party app. Since it’s not on the Play Store, download FM WhatsApp from https://fmwhsapp.com/ to get the latest safe version.
October 19, 2025 at 9:24 am
Funny sticker figure
https://chatgptimage.art
October 20, 2025 at 12:47 pm
I found this post very easy to follow, it clarified some points I wasn’t fully sure about. Recently I’ve also been trying out this tool and it’s been quite helpful: Lipsync AI.
October 20, 2025 at 12:47 pm
This article really helped me understand the basics, appreciate it a lot! By the way, I found this tool very useful: Flux.2 AI.
October 20, 2025 at 12:48 pm
The way everything is laid out here makes it so much easier to understand. I’ve been exploring different resources and found this tool especially practical: ImagetoVideo.
October 21, 2025 at 2:31 pm
Amazing! AI Undress
October 21, 2025 at 4:06 pm
That’s great! Aurealisa stick figure drawings have always been stiff. Focusing on the action line ($Action Line$) really opens up new perspectives. Thanks for sharing this simple yet impactful trick! Give it a try!
October 22, 2025 at 12:10 am
Thank you for this wonderfully accessible approach to drawing fundamentals! As someone who often feels intimidated by complex anatomy tutorials, your focus on stick figures feels like a breath of fresh air. I particularly appreciate how you frame them as a universal visual framework – it’s so true that even professional artists start with these basic structures. Your teaching style makes daunting concepts feel approachable, and the personal touch about your mom’s comment added genuine warmth. Looking forward to applying these insights to my own beginner sketches!
October 22, 2025 at 6:10 am
https://remover.video
October 23, 2025 at 9:02 am
This sounds super helpful! I totally get how daunting anatomy can be. Starting with stick figures for game development is smart. Mastering these basics would be crucial for designing realistic characters, maybe even for a cool purble place online game!!
October 23, 2025 at 9:02 am
This sounds super helpful! I totally get how daunting anatomy can be. Starting with stick figures for game development is smart. Mastering these basics would be crucial for designing realistic characters, maybe even for a cool purble place online game!!!
October 26, 2025 at 7:31 am
best chose Parivahan Sewa
October 26, 2025 at 5:29 pm
This is such a helpful post! Drawing stick figures seems simple, but getting the proportions and balance right can be tricky. Your tips make the process so much easier — thanks for sharing! 🙌
I recently worked on a small creative project where I had to use basic illustrations. If anyone’s interested, you can check it out here</a
October 27, 2025 at 7:53 am
That’s cool! I’ve always loved drawing stick figures, but they always looked a bit weird. These basic anatomy tips are really helpful for improving the drawings. And speaking of fun, has anyone heard of TinyFun?
October 29, 2025 at 10:27 am
This post is a refreshing reminder that even the most complex artistic skills begin with mastering the basics. Stick figures, often overlooked, are actually powerful tools for understanding proportion, gesture, and movement before diving into full anatomy. By learning to fix common stick figure flaws—like stiff poses or uneven proportions—you build the foundation for more dynamic and realistic drawings. For those who want to unwind after sketching sessions, you might also enjoy exploring some visual storytelling through films on desicinemas.app, a free streaming platform where you can watch a wide range of content for inspiration and relaxation.
October 29, 2025 at 10:56 pm
Buy Maplestory mesos Farming Service Cheap and quickly accumulate mesos without the hassle of long grinding sessions. Trusted services offer budget-friendly options, so you can focus on your gameplay while experts handle the resource gathering.
October 31, 2025 at 4:18 am
BASEBALL 9 is an exciting, realistic sports game about baseball. Become the manager of a professional baseball team and lead your team to victory, competing in higher-level tournaments.
October 31, 2025 at 12:52 pm
I’ve heard a lot about ,blookket hacks lately — some say they make the game easier, but I think playing fair keeps it way more fun and challenging! 🎮
November 1, 2025 at 5:37 pm
I’ve always loved games that make you feel the thrill of speed and balance, and seeing how movement is analyzed in drawing tutorials gives a similar sense of focus. For an exciting 3D experience, Snow Rider 3D is a perfect choice to test your reflexes.
November 1, 2025 at 5:37 pm
Simple concepts can be surprisingly addictive when done right, like in puzzles or strategy exercises. The same principle applies to the logic in stick figure drawing. For a sweet and fun brain teaser, try 2048 Cupcakes—it’s both cute and challenging!
November 1, 2025 at 5:38 pm
Learning proper proportions and structure in figure drawing really makes you appreciate attention to detail and strategy. Games that require careful thought feel similarly rewarding. Speaking of strategy, Wordle infinite is an excellent way to challenge your mind with words.
November 2, 2025 at 6:03 am
This is a really helpful reminder that even simple stick figures can be improved with a few tweaks. I remember when I started drawing, my stick figures were so stiff! Focusing on proportions and posing really does make a difference. Thanks for breaking it down!
November 3, 2025 at 6:25 am
The new Gigi Brawler joins Null’s Brawl with elegant moves and powerful attacks. Unlock her instantly and explore exclusive content in the latest server update.
November 5, 2025 at 3:45 am
This post does a great job of reminding us that even the most complex skills, like drawing the human body, start with simple foundations — and stick figures are the perfect place to begin. By breaking things down to their core, the author makes anatomy and movement easier to grasp, even for beginners. If you’re looking for more creative learning breaks or inspiration beyond art, you can check out Dooflix, a free streaming app (iOS version available) that offers a wide range of educational and entertaining content to enjoy while you practice your drawing basics.
November 5, 2025 at 4:59 am
Thanks for this! It’s great you’re addressing the overwhelm from previous posts. I appreciate the focus on simplifying complex anatomy by starting with stick figures. That sounds like a much more approachable way to tackle drawing the human body, especially after all those detailed studies!!
November 6, 2025 at 4:47 am
Seva Sindhu portal launched in 2017 by the Government of Karnataka, is a digital platform that provides easy access to over 880 government services. It aims to simplify administrative processes, reduce the need for physical office visits, and offer a user-friendly interface for various services like applying for certificates and enrolling in welfare schemes.
November 6, 2025 at 6:14 am
IPL 2026 ka Ticket booking will be live soon on this website
November 6, 2025 at 6:15 am
IPL 2026 ka Ticket booking will be live soon on this website
November 10, 2025 at 1:18 pm
HiAnime allows you to stream thousands of anime shows and movies online.
Enjoy HD quality, fast servers, and easy navigation across genres.
No account needed, just open and start watching instantly.
November 12, 2025 at 8:23 am
Great post! I totally agree that stick figures are a fantastic starting point. I used to dismiss them, but now I use them to quickly block out poses before adding detail. It’s a great way to focus on gesture and composition first. Looking forward to the tips on making them more realistic!
November 12, 2025 at 11:47 am
At Credveda, borrowers enjoy the advantage of a low interest rate across all loan categories — personal, home, or business. This ensures affordable EMIs and long-term savings. Transparent pricing and fair policies make Credveda a trustworthy choice for anyone seeking cost-effective financial help.
November 12, 2025 at 6:45 pm
Bhoomi is a flagship e-governance initiative by the Government of Karnataka, launched in the year 2000, to digitize and provide online access to the state’s land records.
November 13, 2025 at 8:19 pm
Parivahan Sewa connects you to essential vehicle services in India. Check application status and manage your vehicle online.
November 14, 2025 at 5:44 am
https://rr88.navy/ là nền tảng trực tuyến cung cấp dịch vụ giải trí kỹ thuật số, hướng đến trải nghiệm tiện ích, tốc độ và bảo mật cho người dùng trên toàn cầu.
November 16, 2025 at 6:16 am
IPL ka Ticket Price will increase after changing GST from 28% to 40%
November 16, 2025 at 12:33 pm
Great tips! I like how you break down the common mistakes in drawing stick figures and show simple ways to fix them — it makes the process feel much more approachable. In the same way, Parivahan Sewa simplifies complex vehicle-related tasks for users, making things easier and more accessible just like your drawing guidance.
November 17, 2025 at 9:29 am
heelo?
November 17, 2025 at 9:30 am
https://intent.app
November 17, 2025 at 9:31 am
https://intent.app
Intent is an AI-driven cross-language messaging app with real-time translation, AI voice cloning, speech-to-text transcription, writing suggestions, and tone guidance—so you can truly connect using your own language.
November 17, 2025 at 9:32 am
Upgrade your Telegram experience with lingogram—AI‑powered tools for translation, smart replies, summaries, voice transcription, and more.https://intentchat.app
November 17, 2025 at 9:32 am
Transform any photo into a Studio Ghibli-inspired anime masterpiece with a single click—no software or design skills required.https://ghibliphotos.com
November 17, 2025 at 9:33 am
Snap any foreign-language menu and get instant AI translation, dish images, allergy filters, calorie info, and group-order suggestions.https://atmealtime.com
November 17, 2025 at 9:38 am
https://intent.app
November 19, 2025 at 12:39 pm
Nice blog i like it.
November 20, 2025 at 10:09 am
This article does a wonderful job breaking down the basics of stick figures and then showing you how to improve them step by step. The way it tackles common errors (like arms starting at the neck or legs branching out incorrectly) is super helpful — I especially liked the clear illustrations and the emphasis on keeping things simple yet accurate. If you’re beginner to figure drawing, this is a solid guide.
And if you work on video edits or creative clips too, you should totally check out soundboardMP3 — it’s full of funny, high-energy sounds that can make your videos way more fun and engaging!
November 22, 2025 at 3:13 am
https://vibeaha.com/ yes
November 22, 2025 at 7:18 am
Otakudesu is a popular anime streaming platform where viewers can watch the latest Japanese anime in smooth HD quality. It offers fast updates for ongoing episodes along with complete subtitle support for an enjoyable experience.
Fans can explore a wide range of genres and discover new titles all in one convenient place.https://otakudesu.pl/
November 22, 2025 at 11:27 am
Looking for Girls Partywear Dress online? We have multiple collection of babies Dresses, girls dresses, Party Dresses and Kids Fashion Clothing Online. Girls Partywear Dress
November 24, 2025 at 1:18 pm
This article effectively serves as a reminder that even the most difficult abilities, such as sketching the human body, begin with basic principles, and stick figures are an ideal starting point. The author simplifies anatomy and movement so that even novices may understand them. You can check out the Cineby App, a free streaming app (iOS version available) that provides a variety of informative and amusing video to enjoy while you practice your drawing fundamentals, if you’re seeking for more creative learning breaks or inspiration outside of painting.
November 24, 2025 at 5:02 pm
Bestehen Sie Ihre Requisitenfirma mit Leichtigkeit! https://propfirmpassnow.com/de/
November 25, 2025 at 5:59 am
thanks for sharing this post i love to read your blog
November 25, 2025 at 8:37 am
This is actually pretty cool! I always draw the most basic stick figures lol. Maybe I’ll actually try adding some of these tips and see if I can improve! It can’t hurt, right?
November 25, 2025 at 8:55 am
This is actually pretty helpful! I always struggled with making my stick figures look less awkward. Gonna try these tips next time I doodle. Thanks for the simple explanations!
November 28, 2025 at 6:11 am
Join the crazy Italian Brainrot meme universe in this wildly chaotic, free, unblocked clicker game—tap your way through an Italian-inspired Brainrot world, unlocking outrageous characters like Bombardino Crocodilo, Tung Tung Tung Sahur, Tralalero Tralala, Bombombini Gusini, and many more as you power up with insane upgrades. Dive deep into the viral clicker madness sweeping TikTok and YouTube, collect every hilarious creation, unlock wild mystery rewards, and dominate the world of Italian Brainrot Clicker today!
November 28, 2025 at 6:12 am
Labubu Wallpaper
November 28, 2025 at 6:14 am
Play the classic Google Color Tiles and discover more colorful puzzle games. Match colors, eliminate tiles, and challenge yourself with endless fun!
November 28, 2025 at 6:33 am
How to free use Flux 2
November 28, 2025 at 6:35 am
Greate! You create comfort and presence in the ways.
[Fish it!](https://fishit.cc)
November 28, 2025 at 6:37 am
Greate! You create comfort and presence in the ways.
[Raise Animals](https://RaiseAnimals.wiki)
November 28, 2025 at 6:39 am
Greate! You create comfort and presence in the ways.
[Nano Banana 2](https://banana2ai.com)
November 28, 2025 at 6:40 am
Greate! You create comfort and presence in the ways.[Plants vs Brainrots](https://plantsbrainrots.net)
November 28, 2025 at 4:36 pm
Discover Morocco Classic Tours with Travel Experts offering customizable journeys from imperial cities to luxury desert camps across this beautiful country.
December 2, 2025 at 2:41 am
I really appreciate this breakdown on improving stick‑figure anatomy — it’s a great reminder that even simple drawings benefit from proper proportions and structure. Using Sovibe AI, I can see this foundation becoming useful for quickly generating reference visuals or drafting scene layouts to guide more polished work. Sovibe AI feels like a neat way to bridge rough sketches and final visuals, especially when experimenting with poses or compositions.
December 2, 2025 at 2:42 am
Wonderful post! Correcting stick‑figure flaws makes a huge difference in realism and motion, and I think that approach pairs really well with NanoBanana AI. By using improved figure logic as a starting point, one could generate more believable animated scenes or character motions with Nano Banana 2/Pro, making the leap from simple doodles to dynamic visuals much smoother.
December 2, 2025 at 6:58 am
I just came across your blog and I’m genuinely impressed! Mens Black Aviator Jacket
December 3, 2025 at 10:27 am
Quiz: Which Zootopia Character Are You? zootopia quiz
December 5, 2025 at 2:34 pm
Download Shadow Fight 2 APK to enjoy the original game with clean graphics and classic gameplay. Perfect for fans who want the standard version.
December 8, 2025 at 6:04 am
https://image-editor.org, Great article — it’s really helpful for me!
December 8, 2025 at 2:15 pm
Business loan lenders supply capital to organizations seeking growth, stability, or operational improvements. They evaluate credit history, financial statements, and projected performance to extend funding. Offering term loans, lines of credit, and industry-specific financing, these lenders play a vital role in supporting business development across various sectors. business loan lenders
December 8, 2025 at 2:21 pm
Business loans lenders help organizations secure essential funding for working capital, expansion projects, or operational improvements. They evaluate financial stability, industry risk, and credit performance before issuing loans. From traditional banks to innovative digital lenders, they offer varied products supporting businesses throughout different stages of development and growth. business loans lenders
December 9, 2025 at 8:34 pm
Great tutorial! Your tips on proportion and posture really help clear up the common mistakes many beginners make.
I especially liked how you break the steps into simple, manageable adjustments.
For readers who are also looking for reliable home care solutions or a trusted Laundry Service, you might find this resource helpful: La Louve Laundry.
Thanks for sharing your knowledge and making drawing more accessible!
December 10, 2025 at 7:56 am
Hot Pre-Sale! Tap to draw your Nano Banana Prompt and unlock random pets, crops, and more surprises!
December 10, 2025 at 7:57 am
Nano Banana Image Generator: Redefining AI Image Generation,Experience advanced context-aware image generation and editing. Input text, images, or both to create coherent, high-quality visuals tailored to your needs.
December 10, 2025 at 10:45 am
I just looked at your recipe for chicken sushi bake, and it looks so good! While I read the post, I also played some funny meme sounds on soundbuttons.com . This made my cooking plans feel more fun and light-hearted.
December 11, 2025 at 5:18 pm
https://mb66ls.com/ là website dịch vụ số với thiết kế đơn giản, truy cập nhanh và các tiện ích đáp ứng nhu cầu giải trí trực tuyến của người dùng.
December 11, 2025 at 7:06 pm
Great explanation of how basic stick figures can be improved by thinking about underlying shapes and anatomy. Your step-by-step approach makes it easier to see how subtle changes add realism without overcomplicating the drawing process. Looking forward to trying this out! piano lessons for adults
December 11, 2025 at 10:59 pm
Situs Taruhan Piala Dunia 2026 yang Pasti Membayar WD
December 12, 2025 at 12:25 am
prediksi bola Piala Dunia 2026 yang disajikan secara lengkap dan informatif
December 12, 2025 at 12:26 am
Pasarliga menyediakan berbagai jenis pasaran taruhan yang bisa dipilih pemain
December 12, 2025 at 2:38 am
This guide on stick figures is amazing breaking down the clavicle, pelvis, and limb divisions really helps beginners.
I’ve noticed that explaining techniques to others improves your own drawing skills.
For those who enjoy sharing tutorials, there are even beauty blogs that accept guest posts where you can write and get feedback.
It’s a great way to practice describing concepts like the three major masses or limb alignment.
Thanks for such a detailed post it’ll help a lot of people make their stick figures more realistic!
December 12, 2025 at 4:49 am
qiuqiu99 is a safe and trusted domino qq gambling site in Asia.
December 13, 2025 at 11:31 am
Find detailed app features, updates, and installation guides when you Learn more about PK 365. Stay informed with accurate details and trusted download resources.
December 14, 2025 at 2:18 pm
https://pixclever.com/ lets you generate polished renderings perfect for campaigns or ads.
December 15, 2025 at 3:37 am
Thanks for sharing, very interesting
December 16, 2025 at 3:53 pm
This is a really helpful breakdown of common stick-figure drawing mistakes and how to fix them. I like how you make drawing fundamentals feel approachable and less intimidating, especially for beginners. And for anyone who wants to keep practicing or relax creatively afterward, AZBoyama.com offers free printable coloring pages that pair nicely with drawing practice.
December 16, 2025 at 7:35 pm
Fantastic post! The stick-figure approach is simple but extremely effective for improving poses. piano lessons for adults
December 16, 2025 at 8:56 pm
I’ve always had trouble with stiff poses, and this method makes a lot of sense. Definitely going to practice this more. saxophone
December 16, 2025 at 9:34 pm
I’ve always had trouble with stiff poses, and this method makes a lot of sense. Definitely going to practice this more. violin instructor
December 19, 2025 at 5:41 pm
SSO ID (Single Sign-On Rajasthan) is a unified online portal created by the Government of Rajasthan designed to provide citizens with access to over 100+ government services using a single user ID and password.
December 20, 2025 at 8:23 am
Train your brain with word connect
December 20, 2025 at 8:27 am
The pelvis stuff really got me thinking. Like, I never considered how important that shape is for balance in my stick figures. A total game-changer!
December 20, 2025 at 8:28 am
Honestly, I thought stick figures were just supposed to be simple. Now I’m like, do I even know how to draw? Ugh, so much pressure.
December 20, 2025 at 8:28 am
I feel you on the over-complicated stuff. Sometimes you just need a simple stick figure to chill out, you know? Life’s too short for perfect anatomy.
December 20, 2025 at 8:29 am
Good tips, but c’mon, who actually draws sticks for realism? I just wanna doodle, not create a masterpiece! 😅
December 20, 2025 at 1:52 pm
Ah, the classic stick figures—where limbs are just suggestions! If you’re diving deeper into art, an AI image generator might help kick those humble figures up a notch: Flux 2.
December 20, 2025 at 3:21 pm
Who knew stick figures could cause such chaos? It’s like a simplified anatomy lesson gone rogue! But hey, for that artistic flair, check out this cool AI tool that might help refine your sketches a bit: SoraVideo.art – AI Video Generator.
December 20, 2025 at 3:23 pm
Honestly, stick figures are the culinary equivalent of a microwaved dinner—quick and deliciously simple. But for those special occasions, you might want to add a personalized touch like a birthday card: Birthday Cards.
December 21, 2025 at 8:35 am
If you want to buy or check Indian IPL Tickets price check it out on – https://iplmatchticketsprice.in/
December 22, 2025 at 2:04 am
Free Online amazon image AI watermark removal
Remove watermarks from photos instantly with our free online AI tool. Achieve clean, high-quality results in seconds-no software download required. Perfect for personal and professional use.
How does the AI watermark remover work?
The system uses segmented machine-learning models to detect watermark regions, rebuild missing pixels, and blend them seamlessly into the background—preserving original detail and texture.
December 22, 2025 at 6:19 am
hianime is a popular free streaming site for anime enthusiasts. It hosts an extensive and ever-growing library of series and movies, from new seasonal hits to beloved classics. Viewers can enjoy content in high-definition with both subtitled and English-dubbed versions available.
The site is known for its simple interface, fast loading times, and relatively low ad intrusion. It’s a go-to destination for convenient, no-cost anime streaming.
https://hianime.pm/
December 22, 2025 at 10:12 am
Download any Sora video without watermark using our free Sora video downloader. Paste video link, download instantly in full quality. https://savesora.com
December 22, 2025 at 3:00 pm
This is really helpful—having a list of healthy Dunkin drinks makes it so much easier to enjoy a treat without feeling guilty while still sticking to better choices.
December 22, 2025 at 3:27 pm
This is really helpful—having a list
December 24, 2025 at 9:05 am
This was incredibly helpful thank you for sharing such a clear guide!
December 25, 2025 at 6:28 am
Nice article
December 25, 2025 at 8:32 am
This is really helpful—having a list
December 26, 2025 at 3:58 pm
PASARLIGA offers a comfortable playing experience for both beginners and professional bettors. We offer a comprehensive selection of betting markets, from international soccer betting, top European leagues, mix parlays, to various other popular sporting events.
December 27, 2025 at 8:27 pm
The Season 19 of the Indian Premier League 2026 Scheduled to play from March 26 to May 31, 2026. However the Official IPL 2026 Schedule has not released by the BCCI.
December 28, 2025 at 4:45 am
Thanks for sharing these insights on drawing stick figures! It’s amazing how complex it can get. I’ve found Blurred Text Online really useful for keeping my notes organized while learning.
December 28, 2025 at 4:46 am
Thanks for breaking down those complex topics! I’ve found Easy Drawings with AI super helpful for simplifying drawings and getting started with stick figures. It’s a great tool for beginners like me.
December 28, 2025 at 4:46 am
Thanks for the detailed insights on drawing stick figures! It’s great to see such thorough explanations. I’ve been exploring Font Generator Page for my own projects and it’s been a fun way to add a personal touch to my designs.
December 29, 2025 at 6:00 pm
Bhoomi RTC (often called Pahani) is the official digital land record document used in the state of Karnataka, India. It serves as the primary legal proof of land ownership and agricultural activity, managed through the government’s “Bhoomi” portal.
December 29, 2025 at 6:02 pm
MeeBhoomi (translating to “Your Land”) is the official digital land records repository launched by the Government of Andhra Pradesh in June 2015. Managed by the Department of Revenue, it serves as a transparent, blockchain-integrated platform that allows citizens to access digitized land data across all 26 districts of the state.
December 30, 2025 at 7:46 pm
Appreciate the well-written content. It’s informative and easy to understand. Thanks for sharing this helpful guide on saxophone from Creative Key Music Lab.
January 1, 2026 at 7:11 am
The Banglarbhumi online portal is a consolidated platform that offers information on land records in West Bengal, which is essential to validate an individual’s ownership. Citizens can access various documents related to mutation, land classification, and certified porcha copies from the official website. 99acres shares a detailed guide on accessing land records on the Banglarbhumi portal.
January 1, 2026 at 7:13 am
Meehoomi AP is the official Andhra Pradesh land records portal. Learn how to view Adangal, 1B, Village Map, FMB, Mutation, and download e-Passbook online
January 1, 2026 at 7:14 am
Meehoomi AP is an online site developed by the Andhra Pradesh government in India to digitize and make land records more accessible to the state’s citizens.
January 1, 2026 at 9:49 am
Welcome to Anoboy Official Download Nonton Online Streaming Anime Subtitle Indonesia Kualitas Tinggi tersedia 240P 360P 480P 720P.
January 1, 2026 at 11:05 am
This guide is so practical. My stick figures used to look stiff. Now I finally see how the pelvis and clavicle lines help.
January 3, 2026 at 11:08 am
APK Slot Terbaru Forwin8 Menangkan Jackpot Setiap Hari!
January 4, 2026 at 5:14 pm
APK Slot Terbaru Forwin8 Menangkan Jackpot Setiap Hari!
January 5, 2026 at 2:10 am
Greate! Create Your Own [Pokepath Tier List](https://pokemontierlist.com)
January 5, 2026 at 2:13 am
Greate! Create Your Own Pokepath Tier List
January 5, 2026 at 2:16 am
Greate! New Model is Now! [pokepath](https://pokepath.app) td game
January 5, 2026 at 2:21 am
Greate! New Model is Now! Flux 2 Max AI AI Image Generator & Editor
January 5, 2026 at 3:56 am
This Prayer
January 5, 2026 at 1:49 pm
The KFC menu in South Africa offers crispy fried chicken, tasty wings, burgers, wraps, and sharing buckets. It also includes popular sides like chips, coleslaw, and mash with gravy. Affordable Streetwise meals, desserts, and cold drinks make KFC a great choice for quick and filling meals. https://kfcmeenu.co.za/
January 5, 2026 at 4:36 pm
Truly exceptional work on delivering such professional and timely updates for the community at Situs Online terpercaya
January 6, 2026 at 6:43 pm
Apne TV was a popular unofficial website that allowed users to stream and download Indian TV shows, movies, and web series for free. It primarily hosted content in Hindi, Punjabi, Tamil, Telugu, and other regional languages.
https://apnetvs.de/
January 7, 2026 at 9:31 am
“This analysis of Dandy’s World lore is fascinating! It’s incredible to see how the character abilities and stats are evolving so rapidly as the game updates. I’ve been trying to balance a few of my own OCs, and the visualization aspect is always what blows me away. I recently started using Dandy’s World OC Maker (https://oc-maker.com/en/dandys-world-oc-maker) for some quick character renders and stat generation—the speed is insane. It’s been a huge help for visualizing complex ability ideas during my creative research. Thanks for the inspiration, definitely looking forward to more!”
February 9, 2026 at 2:42 am
stfu
January 8, 2026 at 4:22 am
Drawing stick figures can be tricky, but your tips make it easier to understand anatomy. Speaking of fun tests, I recently took the My Little Pony test to see which character I am—it was a nice break from art practice!
January 9, 2026 at 3:32 am
Great post on simplifying anatomy!
January 9, 2026 at 1:45 pm
Really helpful breakdown of common stick figure flaws these tips definitely make amateur drawings look way better! Reading this made me think about grabbing some sketch time and coffee. Speaking of coffee, have you tried exploring different dunkin donuts flavors to keep your creativity fueled?
January 10, 2026 at 1:15 am
This is such a refreshing approach! Going back to stick figures really demystifies figure drawing for beginners. I appreciate how you break down complex anatomy into digestible basics. Looking forward to learning how to fix common flaws in my sketches!
February 2, 2026 at 2:12 pm
Patta Chitta
are crucial land ownership documents in Tamil Nadu. The Patta is a revenue record that certifies lawful ownership of a piece of land, including details such as the owner’s name, survey number, and extent of the property bh. On
February 2, 2026 at 2:13 pm
bhoomi RTC (Record of Rights, Tenancy & Crops) is an online land record system of the Karnataka Government. It helps farmers and landowners check land details digitally without visiting government offices.
February 2, 2026 at 2:14 pm
The ABC ID card is a unique 12-digit identifier enabling students to store their academic credit digitally and manage their academic credit. All students in India can easily create and download their ABC ID card online and start using it.
January 10, 2026 at 1:18 am
This is such a refreshing approach! Focusing on stick figures as a foundational tool makes anatomy accessible to everyone, not just artists. I appreciate how you’re breaking down complex concepts into digestible basics. Looking forward to learning how to fix common flaws in my own sketches!
January 10, 2026 at 5:29 am
Thank you for sharing useful material. I will be back for the more great post
January 10, 2026 at 6:07 am
As a trusted UAE vape retailer, we are committed to quality, authenticity, and customer satisfaction. Our growing network of vape shops and online services ensures you always have access to the latest products. Choose My Vapery for a dependable vape store, competitive prices, and a seamless vape online shopping experience in Dubai and the UAE. dubai vape
February 2, 2026 at 2:11 pm
Meehoomi AP is an online site developed by the Andhra Pradesh government in India to digitize and make land records more accessible to the state’s citizens.
February 2, 2026 at 2:12 pm
Digilocker allows access to digital versions of various documents including driver’s licenses, vehicle registration certificates and academic mark sheets.
January 10, 2026 at 6:11 am
As a trusted UAE vape retailer, we are committed to quality, authenticity, and customer satisfaction. Our growing network of vape shops and online services ensures you always have access to the latest products. Choose My Vapery for a dependable vape store, competitive prices, and a seamless vape online shopping experience in Dubai and the UAE. vape online
January 10, 2026 at 9:55 am
Been playing Sand Loop and got stuck on so many levels, so I put together a site with video solutions for every level (1-183). Completely free, no signup needed. https://www.sandloopguide.org – hope it saves you some frustration!
January 10, 2026 at 10:10 am
Stuck on Sand Loop? I made free video walkthroughs for all 183 levels at sandloopguide.org. Hope it helps!
January 10, 2026 at 3:53 pm
Having a great and amazing blog kisskh
January 11, 2026 at 6:36 am
I came across https://puremods.net
while looking for game mod resources, and after spending some time using it, the site left a solid impression. The layout is clean and straightforward, which makes browsing feel relaxed rather than overwhelming. Pages load fast and the overall structure is easy to understand, even for first time visitors.
What I like most about PureMods is the consistency. Mods are organized clearly, updates appear regularly, and the descriptions feel written by real users instead of automated summaries. You can tell the site is being maintained with care rather than just chasing traffic.
January 11, 2026 at 7:27 am
Grok Imagine–based image generator https://grokspicy.org/ enables fast AI visual outputs.
January 12, 2026 at 3:06 am
Drawing stick figures is tricky, but your tips make it easier! It reminds me of how personality quizzes like the ginny and georgia test can simplify complex traits into fun matches. Thanks for sharing!
January 12, 2026 at 8:33 am
Fixing the common flaws with stick figures is really about simplifying without losing structure—much like you mentioned in your earlier posts on studying the skeleton and musculature, where the sheer depth can feel overwhelming at first, yet everything works together as a system. Stick figures help artists focus on balance, proportion, and flow before diving into complex anatomy, just as a simple platform helps you ease into entertainment before exploring deeper content. In that sense, it’s like using a free streaming app such as MovieBox Pro: you start with something accessible and straightforward, then build confidence and understanding before moving on to more detailed, demanding experiences.
January 12, 2026 at 11:13 am
This instruction discusses stick figure drawing in a straightforward and friendly manner, making it simple to see where typical errors occur and how to correct them. The step-by-step approach improves proportions and movement without overthinking the process. The simplicity seems comparable to when you download GUI format and discover how easy it is to use.
January 12, 2026 at 3:06 pm
This article offers a strong and well-supported
January 13, 2026 at 4:08 pm
Hi team, I watch the your website Anitaku he is awesome and good information website.One Piece
January 14, 2026 at 6:11 am
This is a refreshing approach! By returning to stick figures, you make anatomy accessible to everyone. I’ve always struggled with proportions, so focusing on this ‘baseline’ framework is incredibly helpful. Looking forward to learning how to fix common flaws in my sketches.
January 14, 2026 at 9:02 am
This is such a refreshing approach! Going back to stick figures really highlights how foundational they are. As a beginner, I often struggle with proportions, so focusing on these basics first makes the complex anatomy lessons less daunting. Looking forward to the common flaws part – hope it includes tips on dynamic posing!
January 14, 2026 at 7:37 pm
nice blog, thanks.
January 14, 2026 at 7:38 pm
Nice, yes. Akıllı şehir mobilyaları, akıllı bank akıllı kent mobilyaları için web sitemizi ziyaret edebilirsiniz.
January 14, 2026 at 7:52 pm
Very informative content, thanks for sharing! The tips you shared make selecting a quality laundry much easier.
January 16, 2026 at 12:37 am
Få uppehållstillstånd eller biometriskt uppehållstillstånd: https://getdocumentsnow.com/sv/get-biometric-residence-permit/
January 16, 2026 at 3:38 am
Köp körkort i Europa: https://getdocumentsnow.com/sv/buy-any-eu-country-driving-license/
Skaffa körkort i Österrike:
January 16, 2026 at 3:58 am
Su https://getdocumentsnow.com/it/, potrai ordinare un visto adesivo, ottenere un permesso di soggiorno biometrico, ordinare un passaporto autentico o ottenere nuovi passaporti. Inoltre, puoi rinnovare la tua patente di guida o ottenere una patente di guida estera e sostituire la patente di guida. Inoltre, aiutiamo a risolvere i problemi di patente di guida sospesa o revocata. Realizziamo carte tachigrafiche digitali o carte conducente per conducenti di autocarri pesanti
Passaporti originali, nuovo passaporto, acquista passaporto online, rinnova patente di guida, patente di guida sospesa, ottieni patente di guida online, ottieni patente di guida originale, acquista documento d’identità falso, acquista carte d’identità online, acquista un certificato PTE, ottieni certificato PTE originale, acquista un certificato IELTS online, ottieni un permesso di soggiorno, ottieni un visto, ottieni documenti online,
Possiamo anche procurarti una carta tachigrafica digitale o una carta conducente
January 16, 2026 at 4:21 am
Get a foreign driver’s license or exchange driver’s license: https://getdocumentsnow.com/foreign-drivers-license/
Get a visa or visa sticker:
January 16, 2026 at 6:21 am
A https://getdocumentsnow.com/hu/ oldalon vízumbélyeget, biometrikus tartózkodási engedélyt, valódi útlevelet vagy új útleveleket rendelhet. Ezenkívül megújíthatja vezetői engedélyét, vagy külföldi vezetői engedélyt szerezhet, és jogosítványt cserélhet. Ezenkívül segítünk a felfüggesztett jogosítvány vagy a visszavont jogosítvány problémáinak megoldásában. Digitális tachográf kártyát vagy járművezetői kártyát készítünk nehéz tehergépjárművek vezetői számára
Eredeti útlevelek, új útlevél, útlevél vásárlás online, jogosítvány megújítása, felfüggesztett jogosítvány, online jogosítvány beszerzése, eredeti jogosítvány beszerzése, hamis igazolvány vásárlása, személyi igazolvány vásárlása online, PTE-tanúsítvány vásárlása, eredeti PTE-tanúsítvány beszerzése, IELTS-tanúsítvány beszerzése online, tartózkodási engedély beszerzése, vízum beszerzése, dokumentumok online beszerzése,
January 18, 2026 at 2:07 am
Your website is really cool and this is a great inspiring article. Thank you so much
January 19, 2026 at 12:20 am
aadhar card download Access all the aadhaar services on My Aadhaar by UIDAI. Update, Download, Appointment, Order PVC Card, Check Status 2026
January 19, 2026 at 7:29 pm
Nice tutorial. The explanations are simple and helpful, especially for improving proportions in stick figure drawings.
January 20, 2026 at 1:47 am
I really appreciate how you simplified human anatomy! Drawing people is so hard, but these tips help a lot. When I am stuck on a pose or need quick inspiration, I sometimes use Flux2Max to generate reference images. It makes the whole creative process much faster!
January 20, 2026 at 10:39 am
That’s an excellent point about the stick figure being a foundational framework. By the way, for artists looking to practice, you can скачать нулс бравл to find fun, creative community assets to build upon that baseline.
January 21, 2026 at 10:36 am
This is a great breakdown of why stick figures matter and how they help build strong drawing fundamentals. I like how you keep the concepts simple while still explaining realism and movement clearly. The focus on common mistakes makes it very useful for beginners and hobby artists.
Creative learning like this pairs well with casual fun too, similar to enjoying a quick break on pak234 game for android
.
January 22, 2026 at 3:49 am
This sounds like a great follow-up! It’s true, drawing the human body is tough, so tackling stick figure flaws is a smart move. Understanding different body lines and proportions is key, whether you’re sketching or even trying out a structured way to find your kibbe type to figure out your own unique silhouette for fashion!
January 22, 2026 at 7:15 am
Parivahan Sewa is a Government of India digital platform that provides online transport-related services such as vehicle registration, driving licences, and permits.
It aims to simplify, standardize, and make road transport services transparent and accessible across the country.
https://parivahansawa.com/
January 22, 2026 at 8:14 am
The stick figure is a simple yet powerful tool, but even I’ve made the mistake of drawing arms [from the](https://tempmail3.com/) neck. TempMail3 – Instant disposable email with no signup, ads, or tracking really makes me wonder how disposable email can simplify our lives. While sipping coffee, I pondered if artists could use disposable email for quick sketches, huh?
January 22, 2026 at 10:52 am
At Lal Qila, we specialize in creating unforgettable experiences for your special occasions — whether it’s weddings, corporate events, or celebrations with family and friends. As one of the premier Banquet Halls in Carrollton, TX, our elegant venue, exquisite catering, and dedicated staff are committed to making your event extraordinary. Conveniently located among the top-rated Banquet Halls Near Carrollton, TX and known across Texas for our hospitality and ambiance, Lal Qila Banquet Hall Carrollton, TX offers the perfect setting for any celebration. Explore our offerings and let us help you create memories that will last a lifetime. wedding banquet halls near me
January 23, 2026 at 10:32 am
Animeflv is a popular online streaming website that offers a large collection of anime series and movies in Spanish. It allows users to watch episodes for free, often with subtitles or Latin Spanish dubbing.
January 23, 2026 at 2:17 pm
iqos modelleri renkleri ve fiyatları
January 23, 2026 at 3:36 pm
I really appreciate how you simplified the skeleton and muscles. Drawing people is so hard! Once I finish my sketches, I usually move on to image editing to polish them up. Tools like Flux2Max are great for turning those basic ideas into professional art quickly.
January 25, 2026 at 10:46 am
Parivahan Sewa Portal Services for vehicle registration include booking appointments, checking application status, and managing records. You can also handle requests for a duplicate registration, a change of address, or a transfer of ownership.
January 25, 2026 at 10:52 am
The Tamil Nadu government has started a digital initiative named the Pregnancy and Infant Cohort Monitoring and Evaluation (PICME) system. This system keeps track of each stage of a woman’s pregnancy to make sure she gets the right medical care at the right time.
January 27, 2026 at 11:25 am
Thanks for the insight! To get a complete look at İlsu Demirci’s background — including her early life, pageant win, and TV roles — check out ilsu demirci.
January 28, 2026 at 2:10 am
Derek Rivers, a defensive end from Youngstown State, entered the NFL in 2017 when drafted by the New England Patriots. His career spans multiple teams, marked by key sacks and tackles. Fans proudly sport his authentic Derek Rivers Jersey to show support for his on-field prowess and dedication to the game.
January 28, 2026 at 2:15 am
Zach Ertz is a renowned NFL tight end, drafted by the Philadelphia Eagles in 2013. He played a key role in their Super Bowl LII victory, earning multiple Pro Bowl honors. Fans often celebrate his legacy by sporting a Zach Ertz Jersey at games and events.
January 28, 2026 at 8:07 am
NSFAS Login helps South African students securely access their funding accounts. Easily check application progress, upload documents, and manage student financial aid online with a fast and user-friendly login system.
January 29, 2026 at 2:06 am
Precision in motion, powered by servo motor technology.
January 29, 2026 at 12:13 pm
Betflik5k Your support is greatly appreciated. Thank you very much.
January 29, 2026 at 12:18 pm
This article does a great job of breaking down the common flaws in stick figure drawing. It’s essential for beginners to understand these basics to improve their skills. For more fun and creative ways to enhance your art, check out Fun Clicker!
January 29, 2026 at 7:02 pm
Parivahan Sewa is India’s official online portal managed by the Ministry of Road Transport and Highways (MoRTH) for handling vehicle registration, driving licenses, and related transport services. It integrates nationwide RTO databases to offer digital access without physical visits.
January 29, 2026 at 7:03 pm
SSO Rajasthan is the Single Sign-On portal launched by the Rajasthan government to provide a unified digital identity for accessing over 100 state government services with one username and password.
January 30, 2026 at 7:32 am
Interior fitout companies in Dubai specialize in providing end-to-end solutions for interior design and construction projects. Unlike general contractors, these companies focus on creating customized interiors that match the client’s vision while adhering to local building regulations and standards. They handle every stage of the project, including initial design concepts, 3D visualizations, material selection, project management, construction, and final finishing touches. interior fitout companies in dubai
January 30, 2026 at 11:18 pm
Many users trust likee app when they need a fast and secure Likee video downloader.
January 31, 2026 at 1:48 pm
Really helpful guide! I like watching these drawing tutorials while relaxing, and I usually stream my favorite Korean art shows employing a VPN翻墙 or VPN代理 to keep access smooth. Makes learning stick figures even more enjoyable when your shows run without interruptions.
January 31, 2026 at 7:49 pm
This is so helpful! It’s true, drawing bodies is tricky. I wonder if something like Genie 3 AI could help with understanding all those complex movements for art and games.
January 31, 2026 at 7:57 pm
Renewing your driving licence online in India is straightforward via the official Parivahan Sewa portal, you can renew up to 30 days before expiry or within a grace period (typically 30 days after, with late fees).
February 1, 2026 at 11:59 am
I’m really curious about the anatomy of stick figures now, I had no idea there was so much to it. I love how you broke down the flaws in a way that’s easy to understand, like the way people always make the arms too short. I’m gonna have to practice my stick figure drawing skills now, thanks for the tips.
February 1, 2026 at 12:23 pm
Shankhapushpi, huh? Sounds like a magical herb, like the fairy dust of the plant world. By the way, if you’re curious about cutting-edge AI stuff, there’s this interesting resource that gives a breakdown on the latest AI video tech—very cool, if you’re into that sort of thing! Check it out: Kling 3 AI
February 1, 2026 at 8:53 pm
Sewa Online is a convenient digital platform that allows citizens to access transport and vehicle-related services from anywhere. Through Sewa Online, users can apply for driving licences, vehicle registration, permits, and pay challans without visiting offices. The portal saves time, reduces paperwork, and ensures transparency by offering online applications, appointment booking, and real-time status tracking for Parivahan and road transport services across India.
`
February 2, 2026 at 4:44 am
Just like correcting small mistakes can dramatically improve a stick figure, choosing the right nearby food stop can improve your daily routine. Whether you’re sketching, studying, or taking a break, knowing where to grab a quick coffee or snack matters. Using Dunkin Donuts Near Me in the middle of a busy day helps you locate the closest store without disrupting your creative flow.
February 2, 2026 at 12:38 pm
This stick figure drawing guide is a total game-changer! It’s so refreshing to go back to basics and fix those common flaws with clear, simple tips. Perfect for artists of all levels—thanks for making figure drawing feel less intimidating!
February 2, 2026 at 2:35 pm
The post emphasizes that these small, simple adjustments—correcting proportions, adding anatomical anchors (collarbone, pelvis), and using basic shapes for volume—can drastically improve stick figure realism. It aims to boost beginners’ confidence, reinforcing that drawing convincing stick figures requires no advanced skills—just an understanding of basic human structure. The author ends with gratitude to readers, with tags linking to themes like anatomy, art, and drawing.
February 3, 2026 at 8:33 am
Eject Water: Easily remove water from your phone speaker. Click Eject… Water Tracker: Track your water intake with Water Tracker!
February 3, 2026 at 11:57 am
Thanks for sharing such practical advice
February 3, 2026 at 7:19 pm
dapodik
February 4, 2026 at 5:20 am
Vape Shop AE is a leading vape retailer based in Dubai, offering a premium selection of vaping products, e-liquids, and accessories from top international brands. We are committed to providing high-quality, authentic vaping devices to both beginners and experienced vapers.
At Vape Shop AE, customers can explore a wide range of vape kits, disposable vapes, pod systems, and nicotine salts — all carefully curated to ensure superior performance and satisfaction. Our goal is to deliver a seamless shopping experience with competitive prices, fast delivery, and exceptional customer support.
Whether you’re switching from traditional smoking or upgrading your vape gear, Vape Shop AE is your trusted destination for all things vaping in Dubai.
https://vapsshop.ae/
February 4, 2026 at 9:15 am
Nana Banana: AI Image Editor | Edit Images with Text is an advanced AI image editing platform designed for fast, high-precision text-to-image and image-to-image creation, supporting regional edits, background replacement, and resolution enhancement.
February 4, 2026 at 9:37 am
this is news based site
February 4, 2026 at 11:32 am
Thanks for the helpful post! I found Zefoy useful for understanding TikTok engagement tools and common issues. Worth checking out. One of the best platforms to boost TikTok followers, likes, and comments.
February 4, 2026 at 11:40 am
Vape Shop AE is a leading vape retailer based in Dubai, offering a premium selection of vaping products, e-liquids, and accessories from top international brands. We are committed to providing high-quality, authentic vaping devices to both beginners and experienced vapers.
At Vape Shop AE, customers can explore a wide range of vape kits, disposable vapes, pod systems, and nicotine salts — all carefully curated to ensure superior performance and satisfaction. Our goal is to deliver a seamless shopping experience with competitive prices, fast delivery, and exceptional customer support.
Whether you’re switching from traditional smoking or upgrading your vape gear, Vape Shop AE is your trusted destination for all things vaping in Dubai.
https://vapsshop.ae/
February 4, 2026 at 1:29 pm
Vape Shop AE is a leading vape retailer based in Dubai, offering a premium selection of vaping products, e-liquids, and accessories from top international brands. We are committed to providing high-quality, authentic vaping devices to both beginners and experienced vapers.
At Vape Shop AE, customers can explore a wide range of vape kits, disposable vapes, pod systems, and nicotine salts — all carefully curated to ensure superior performance and satisfaction. Our goal is to deliver a seamless shopping experience with competitive prices, fast delivery, and exceptional customer support.
Whether you’re switching from traditional smoking or upgrading your vape gear, Vape Shop AE is your trusted destination for all things vaping in Dubai.
https://vapsshop.ae/
February 4, 2026 at 3:23 pm
Pass Your Prop Firm challenge today with the propfirm worldwide today https://thepropfirmpass.com
February 4, 2026 at 4:23 pm
hi , sports based blog
February 5, 2026 at 6:10 am
Fun and helpful guide for aspiring artists! Fixing stick-figure flaws is made simple with clear tips, perfect for anyone looking to improve their basic drawing skills effortlessly.
February 6, 2026 at 5:48 am
Aadhar Card Download Access all the aadhaar services on My Aadhaar by UIDAI. Update, Download, Appointment, Order PVC Card, Check Status 2026
February 6, 2026 at 7:30 am
The Online Singing Classes at MasterClap were excellent! The instructor really knew their craft and helped me improve my pitch, control and stage presence. The interactive sessions and feedback were very motivating. I’d recommend these classes for anyone serious about improving their vocals.
February 6, 2026 at 9:56 am
The Snaptube MP4 Download lets users save videos in high-quality MP4 format.
February 6, 2026 at 12:22 pm
Online gas bill check options help users avoid delays and late payments.
February 7, 2026 at 10:18 am
Low entry stakes allow experimentation without fear. Halfway through testing strategies, aviator let me tweak bets in tiny increments, giving freedom to explore and learn without financial stress.
February 8, 2026 at 3:02 am
This post explains stick figure drawing in a very simple and practical way.
Pointing out common flaws really helps beginners improve their basics. Just like learning step by step in art, tools such as Zefoy show how consistent effort helps growth over time.The tips are easy to follow and useful for practice. Thanks for sharing such a helpful guide for learners.
February 8, 2026 at 3:52 am
Great tips on improving stick figure drawings! The breakdown of common mistakes is really helpful. I’ve been looking for resources on figure drawing fundamentals. By the way, if you’re interested in AI art tools, check out AllAITools.ai for a curated collection of AI art generators and drawing assistants that can help with character design.
February 8, 2026 at 3:53 am
Great tips on improving stick figure drawings! The breakdown of common mistakes is really helpful. By the way, if you’re interested in AI art tools, check out AllAITools.ai for AI art generators that can help with character design.
February 8, 2026 at 3:56 am
Great tips on improving stick figure drawings! The breakdown of common mistakes is really helpful. By the way, if you’re interested in AI video generation tools, check out Kling-3.com for amazing AI video creation capabilities that can help with animation and character design.
February 8, 2026 at 4:58 am
My blog
February 9, 2026 at 7:21 am
I love how you break down complex art topics into simpler steps. For those who find drawing tricky, maybe using tools like Try Seedance 2.0 Online could help visualize ideas with videos and images.
February 9, 2026 at 11:53 am
I really appreciate how you’re simplifying the complex process of drawing the human body! Your mention of moving away from overwhelming anatomy details to fix common stick figure flaws is super helpful for game development. I can’t wait to see how you break down these basics further.
February 9, 2026 at 11:54 am
I really appreciated how you’re simplifying things after those deep dives into skeletons and musculature. Focusing on fixing stick figure flaws makes learning the complex human anatomy feel much less overwhelming. It’s a great bridge for anyone interested in art and game development!
February 10, 2026 at 8:38 am
Stick figures are a simple way to start learning figure drawing, but beginners often make common mistakes. Arms may start at the neck, torsos are too long, legs branch directly from the body, and hands and feet are often missing.
To improve, add a neck, attach arms at the shoulders with a basic clavicle line, and divide arms and legs into upper/lower sections. Including simple hands and feet makes stick figures look more realistic without adding complexity. This keeps your drawings expressive while maintaining the simplicity of the stick figure framework.
February 10, 2026 at 11:47 am
I really enjoyed this post about fixing stick figures. Your previous lessons on skeletons and muscles were very detailed, so I appreciate you simplifying things here. Breaking down the complex parts of the human body makes learning art and game development much less overwhelming for me.
February 10, 2026 at 2:29 pm
Parivahan is one of India’s best government digital services, offering convenient, transparent, and efficient access to transport-related services. It allows users to apply for driving licenses, register vehicles, pay road tax, and check challans online—eliminating long queues at RTOs. Integrated across states, it ensures uniform services and easy tracking of applications. With tools like the mParivahan app, it supports paperless governance and the Digital India initiative. https://parivahansewas.uno/
February 11, 2026 at 5:18 am
Really helpful tips — breaking down common stick-figure flaws makes improving your basics feel doable and motivating. It made me think about how the same attention to detail and thoughtful adjustments matter in Building Management Services in Sydney
to create better, more functional spaces.
February 11, 2026 at 1:48 pm
This is such an insightful breakdown of stick figure anatomy! I love how you explained that even simple stick figures can be expressive through exaggerated posing. As someone interested in both traditional and digital art, I find this kind of foundational knowledge invaluable. For anyone looking to explore figure drawing further, AI art tools have gotten incredibly good at understanding human poses and anatomy. I’ve been using https://modelfy.art to experiment with figure-based art generation, and understanding these basic principles actually helps create better AI art prompts too!
February 12, 2026 at 12:13 am
Great tips on fixing common stick figure flaws! Understanding proportions and joint placement really does make a huge difference in drawing. For anyone wanting to take their figure drawings further, check out sam-3d.com — it can convert 2D figure photos into 3D body models with accurate pose estimation. It’s a fantastic reference tool for artists learning anatomy and proportions. Thanks for this helpful post!
February 12, 2026 at 2:04 am
Great breakdown of common stick figure mistakes! The tips on proportions and joint placement are really practical for beginners. I’ve been exploring AI tools that can animate drawings – Seedance AI can actually generate smooth video animations from still images. Imagine turning your improved stick figures into animated clips!
February 12, 2026 at 5:31 am
AI Raphael is a professional AI image editing and generation tool powered by the Nano Banana model. It offers natural language text-to-image generation, precise text + image editing, multi-image composition, and character consistency. Key features include reliable text rendering, style matching, and scene preservation, making it ideal for everything from anime generation to professional logo design.
February 12, 2026 at 8:49 am
Fixing common flaws in stick figures is really about simplifying without losing structure—just like you mentioned in your earlier posts about studying the skeleton and musculature, where the depth can feel overwhelming at first, yet everything functions as one connected system. Stick figures allow artists to focus on balance, proportion, and flow before moving into complex anatomy, much like starting with a simple platform before exploring richer content. In that way, it’s similar to using a free streaming app like Cineby Pro: you begin with something accessible and straightforward, then gradually build confidence and understanding before diving into more detailed and demanding experiences.
February 12, 2026 at 11:33 am
This is such a helpful breakdown of stick figure fundamentals! I love how you explain that even simple stick figures can be expressive through posing. As someone learning animation, I’ve found AI tools like https://seedance-2.pro really helpful – you can turn sketches and drawings into animated videos. Would be cool to see stick figures come to life! Great tutorial series!
February 12, 2026 at 11:47 am
This is such a helpful guide! It’s amazing how small adjustments to proportions and posture can completely change the look of a stick figure. Great explanation
February 12, 2026 at 4:01 pm
The workflow in Seedance 2 feels designed for real creators. Uploading references and generating results quickly makes iteration much easier.
February 14, 2026 at 2:25 am
I see strong potential for Seeddance in advertising and product demos, especially for teams that need fast turnaround without sacrificing quality.
February 14, 2026 at 10:24 am
A pay slip, also known as a salary slip, is a document issued by the employer that includes a detailed breakdown of an employee’s earnings and deductions for a specific month. For Madhya Pradesh government employees, the IFMS MP portal offers easy access to monthly pay slips online, MP Treasury Payment Status, making it convenient and transparent.
February 14, 2026 at 10:25 am
ChatPic packs a surprising amount of power behind its simple chat interface. It isn’t just for fixing mistakes; it’s for creative reimaging ChatPic User Manual Natural Language Editing: The standout feature. You don’t need technical jargon; “fix the lighting” works just as well as “increase exposure by 10%”.
February 14, 2026 at 12:58 pm
Great article! This is really helpful. I’ve been using Kling 3.0 for AI video generation and it’s amazing. Check it out: https://kling-3.com
February 15, 2026 at 12:12 am
Great insights! If you’re into video creation, you should check out PixShot AI (https://pixshot.ai) – it turns images and text into cinematic quality videos. Really impressive AI video generator!
February 15, 2026 at 12:17 am
Thanks for sharing this! By the way, PixShot AI is an amazing tool for filmmakers – https://pixshot.ai – creates stunning cinematic videos from simple prompts.
February 15, 2026 at 6:42 am
link gacor
February 15, 2026 at 7:24 am
Vape Collection Shop is your go-to online store for a premium selection of vaping products in Dubai, UAE. We offer an extensive range of e-cigarettes, vape juices, and accessories tailored to satisfy every vaper’s needs. Whether you’re a beginner or an experienced vaper, our high-quality products and top-notch customer service ensure an unbeatable vaping experience. Visit Vape Collection Shop and discover the best in vaping today https://vapecollection.shop/
February 15, 2026 at 7:31 am
This is really helpful! I’ve been experimenting with NanoBanana AI (https://ai-nanobanana.com) which specializes in . The results have been impressive.
February 15, 2026 at 9:39 am
Great post, learn a lot!
Check it out: https://seedance-2.video
February 15, 2026 at 10:07 am
MP treasury ifms login is a comprehensive online financial management platform designed for government employees and departments. It offers secure access to salary slips, payroll records, pension details, and budget tracking tools, ensuring transparency, efficiency, and real-time treasury operations across Madhya Pradesh.
February 15, 2026 at 10:07 am
If you’ve recently tried to access Chatpic and found yourself staring at a blank screen or an error message, you’re not alone. Many users have been asking: Is Chatpic.org down? The sudden inability to connect can be frustrating, especially if you’ve come to rely on this platform for sharing images and connecting with others.
February 16, 2026 at 10:39 am
This is a great approach! Mastering basics is key, much like learning to use a tool properly. For instance, to automate a complex sequence, you first need to understand the simple steps at https://gs-autoclicker.com/how-to-automate-multiple-clicks-on-gs-autoclicker/ before running advanced macros.
February 17, 2026 at 10:19 am
Really helpful guide — I didn’t realize how simple fixes can make stick figures look so much better! ✏️😊
After learning creative tips like this, I unwind with Car Parking Multiplayer
February 18, 2026 at 12:00 pm
Really helpful guide.
i love sticker man.
February 19, 2026 at 7:27 am
lyria ai music is suitable for AI-assisted soundtrack creation.
February 19, 2026 at 8:55 am
Fixing common stick figure mistakes is all about simplifying while maintaining proper structure—just as you highlighted in your earlier posts about studying the skeleton and musculature, where the depth can feel overwhelming at first but ultimately functions as one connected system. Stick figures allow artists to concentrate on balance, proportion, and movement before tackling complex anatomy. In a similar way, starting with a simple platform makes entertainment easier to approach before exploring more advanced content. It’s comparable to using a free streaming app like Movie Box Android tv: you begin with something simple and accessible, then gradually build confidence and understanding before moving on to more detailed and demanding experiences.
February 26, 2026 at 11:36 pm
The SSO ID
is a Single Sign-On (SSO) system introduced by the Government of Rajasthan to provide citizens with a convenient and secure way to access multiple government services. With just one unique set of login credentials, users can seamlessly log in to a wide range of online portals, saving time and effort.
February 26, 2026 at 11:37 pm
Meehoomi launched by the Andhra Pradesh Revenue Department, is a digital platform providing easy access to land records.
February 19, 2026 at 8:59 am
Improving common mistakes in stick figures is mainly about keeping things simple without sacrificing structure—just as you noted in your earlier posts about studying the skeleton and muscles, which can feel overwhelming at first but ultimately work as one connected system. Stick figures help artists concentrate on balance, proportion, and flow before tackling complex anatomy, much like beginning with a basic platform before exploring richer content. In a similar way, using a free streaming app like Animesalt 2026 lets you start with something easy and accessible, then gradually build confidence and understanding before moving into more detailed and demanding experiences.
February 19, 2026 at 9:05 am
Correcting common stick-figure flaws is all about simplifying while preserving structure—just as you highlighted in your earlier posts on studying the skeleton and musculature, where the complexity can seem intimidating but ultimately works as one unified system. Stick figures help artists focus on balance, proportion, and movement before advancing to detailed anatomy, much like starting with a basic foundation before exploring richer material. Similarly, a free streaming app like BiliBIli App Download offers an easy entry point, allowing users to build familiarity and confidence before diving into more advanced experiences.
February 20, 2026 at 3:00 pm
After watching your drawing technique tutorial, I have gained a lot of insights. Thank you for your guidance.
February 20, 2026 at 3:02 pm
Indeed, simple line drawings are very common among beginners and hobbyists, and knowing how to draw well is very important.
February 21, 2026 at 10:23 pm
Parivahan Sewa complete guide portal is a digital platform provided by the Ministry of Road Transport and Highways (MoRTH) in India, Apply for driving license, vehicle registration, pay eChallan and access all RTO services online through official government portal.
February 22, 2026 at 7:02 pm
This calculadora de finiquito offers a straightforward way to estimate final compensation. It breaks down complex calculations into manageable steps, making it easy to understand. The clarity and precision help workers feel confident and informed, which is crucial when dealing with financial and legal matters.
February 23, 2026 at 9:24 am
Simplifying the human form into stick figures is a great way to master basic proportions before tackling complex anatomical details.
February 23, 2026 at 2:21 pm
Amazing article! Your writing style is simple and interesting. Looking forward to your next post.”
February 23, 2026 at 3:38 pm
Interesting topic! If anyone is searching for official background details, this amitabh das ips wikipedia style article explains his profile well.
February 24, 2026 at 10:12 am
Thanks for taking a step back! Focusing on stick figures is a brilliant way to make drawing accessible to everyone.
February 25, 2026 at 11:13 am
Great and amazing blog post!
February 25, 2026 at 3:35 pm
I really enjoyed this breakdown. It is amazing how small adjustments in proportion and movement can instantly make a stick figure feel more natural and expressive. The way you explain balance, joint placement, and posture makes it approachable even for beginners who might feel intimidated by drawing.
What stood out most is how fixing the basics builds a stronger foundation for more advanced work. It reminds me of how professionals in completely different industries focus on fundamentals first. For example, Commercial contractors Fairfield ohio would never start a large project without ensuring the structural framework is solid. The same principle applies here. Once the core structure of your figure is correct, everything else becomes easier and more refined.
Thank you for breaking this down in such a clear and encouraging way. It definitely makes practicing feel less overwhelming and more achievable.
February 25, 2026 at 8:20 pm
Bobo Milk Tea is a popular and indulgent drink that blends creamy milk tea with chewy tapioca pearls, also known as boba. Each sip offers a delightful combination of smooth tea flavor and the fun, chewy texture of the pearls. Available in various flavors and sweetness levels, Bobo Milk Tea can be customized to suit individual tastes. It’s a refreshing and satisfying treat for tea lovers of all ages.Bobo Milk Tea
February 25, 2026 at 8:20 pm
Bobo Milk Tea is a popular and indulgent drink that blends creamy milk tea with chewy tapioca pearls, also known as boba. Each sip offers a delightful combination of smooth tea flavor and the fun, chewy texture of the pearls. Bobo Milk Tea
Available in various flavors and sweetness levels, Bobo Milk Tea can be customized to suit individual tastes. It’s a refreshing and satisfying treat for tea lovers of all ages.
February 26, 2026 at 10:11 am
TV libre es una solución práctica de televisión digital gratuita, pensada para quienes buscan entretenimiento online accesible y sin compromisos.
February 26, 2026 at 4:28 pm
Among top model making companies in Dubai, On Point 3D stands out for precision, artistry, and innovation. We create premium architectural models, CGI visualizations, and animations tailored to developers, architects, and designers. Our craftsmanship and advanced techniques ensure accurate, impressive representations that elevate presentations and project approvals. model making companies in dubai
February 26, 2026 at 4:34 pm
Among top model making companies in Dubai, On Point 3D stands out for precision, artistry, and innovation. We create premium architectural models, CGI visualizations, and animations tailored to developers, architects, and designers. Our craftsmanship and advanced techniques ensure accurate, impressive representations that elevate presentations and project approvals. model making companies in dubai
February 26, 2026 at 5:27 pm
HiAnime is a free anime streaming website where users can watch the latest and classic anime series online in HD quality. With a massive library of subbed and dubbed anime, fast streaming servers, and a user-friendly interface, HiAnime makes it easy to enjoy popular titles across action, romance, fantasy, and more.
February 27, 2026 at 6:34 am
Discover elegant girls dresses for wedding perfect for festive celebrations. Buy wedding dresses for girls online in India at the best price today. girls dresses for wedding
February 27, 2026 at 9:48 am
The common mistakes with stick figures really caught my eye. I was using the accentvoice tool earlier, and it made me think about how even simple drawings need attention to detail. Wow, fixing these flaws can make a big difference, especially when you’re just doodling on the subway.
February 27, 2026 at 10:27 am
Stick figures are so common, but using displaytest really helps reveal their flaws. I was on the subway, reading about how arms shouldn’t start at the neck, and thought, wow, this makes so much sense. It’s like a quick check for my drawing skills.
February 27, 2026 at 12:56 pm
Love this blog i like it.
February 27, 2026 at 8:06 pm
This is such a clear breakdown of stick figure fundamentals! I love how you explained the clavicle and pelvis lines — it makes proportions much easier to understand. The step-by-step visuals really help simplify anatomy. I also enjoy exploring creative resources and tools at RC Download for artistic inspiration.
February 28, 2026 at 2:18 am
Great article !!!!!!!! I also run HairIsEverything (https://hairiseverything.app), an AI hairstyle changer for trying different looks on your own photos.
February 28, 2026 at 2:33 am
Stick figures are super common, but most beginners get the arm placement wrong. I was thinking about this while on the subway, and it hit me – photocollagemaker could actually help visualize these corrections, you know? It’s a bit funny how simple tweaks make a big difference.
February 28, 2026 at 3:31 am
The common mistakes in stick figures really got me thinking. I mean, who knew arms should start at the clavicle? It’s like oebai said, fixing these flaws can really Boost Your Productivity with the Best AI Websites & Tools. I was just sipping coffee when this hit me, wow!
February 28, 2026 at 7:04 am
What impressed me most about Nana Banana is how quickly ideas can be turned into visual prototypes, making it ideal for creative experimentation.
March 1, 2026 at 2:36 am
DigiLocker is a secure and user-friendly digital platform that allows citizens to store and access their important documents online with ease. It reduces the need for physical copies, saves time, and simplifies document verification. By promoting paperless services and digital convenience, DigiLocker supports a more efficient and transparent system for everyone.
March 2, 2026 at 9:54 am
Great guide on improving stick figures! I love how you break down the common mistakes and provide simple fixes like adding a neck, dividing the arms and legs, and using basic shapes for mass. It really shows that even minimal adjustments can make stick figures look more realistic and expressive. For anyone who enjoys creative online games or interactive art, practicing figure drawing can actually help with timing, movement, and coordination in games. If you want to test your reflexes and have fun while sharpening your visual skills, you might enjoy speed stars—it’s a fast-paced game where precision and reaction matter just like in drawing dynamic poses!
March 2, 2026 at 9:55 am
Adding shapes and mass to stick figures really brings them to life! It’s amazing how small tweaks can create more expressive characters. If you like experimenting with character designs and visual creativity, you might enjoy AI outfit swap, where you can try different looks and styles on virtual models—kind of like giving your stick figures a personality through clothes.
March 2, 2026 at 9:55 am
The explanation of arm and leg placement is so clear, I feel more confident about drawing motion now. Understanding rhythm and flow in figure drawing can also translate to timing in music. If you’re into experimenting with creative timing, beats, and rhythm, try phonk maker to mix your own tracks—it’s all about movement and flow, just like in figure animation.
March 2, 2026 at 9:56 am
I really appreciate how this guide makes stick figures accessible without losing realism. It’s a perfect exercise for anyone wanting to bring ideas to life quickly. If you’re inspired to take your creative concepts further, nano banana 2 lets you generate AI-powered images from your sketches—so your stick figures could become full, vibrant characters in no time!
March 2, 2026 at 9:57 am
Your breakdown of common stick figure mistakes is super helpful for beginners, especially the part about dividing limbs into separate lines. This reminds me of timing and movement in rhythm-based games. For a fun way to see your sense of timing and motion in action, check out fnf online, where your coordination skills are just as important as your creative eye.
March 2, 2026 at 10:59 am
Thanks for sharing this kind of information with us.
March 3, 2026 at 5:42 am
Available in various flavors and sweetness levels, Bobo Milk Tea can be customized to suit individual tastes. It’s a refreshing and satisfying treat for tea lovers of all ages.
March 3, 2026 at 7:43 pm
Hey, if you ever need a quick visual aid while practicing stick figures, I’ve found delta hack roblox useful for sketching basic poses on the side. Your point about using stick figures as a simple skeleton framework really helped me stop overthinking the muscles and just focus on line flow. I tried exaggerating the poses like you suggested and my doodles look way more lively now.
March 4, 2026 at 9:36 am
https://removetextfromvideo.com/
March 4, 2026 at 2:15 pm
Thanks for breaking down stick figure flaws in a way that’s easy to grasp. I appreciate how you acknowledge the complexity of drawing the human body while keeping it approachable for beginners like me.
March 4, 2026 at 2:35 pm
Many people recognize her name but don’t fully know her journey or achievements. If you’re looking for a structured and easy-to-read breakdown of her career, personal life, and major milestones, this page on Who is Daryl Hannah provides a comprehensive summary that’s worth checking out.
March 4, 2026 at 10:32 pm
Thanks for this helpful post on fixing stick figure flaws! I appreciate you acknowledging that anatomy can be overwhelming, and your effort to simplify it makes learning to draw feel more approachable.
March 5, 2026 at 6:50 am
In 2025 the concept of decentralized gambling evolves dramatically, and Lucky Block emerges as a standout crypto casino for players who seek speed and subtle privacy. Visitors researching lucky block casino australia quickly notice a platform engineered for instant access, fluid navigation, and a futuristic gaming rhythm.
This offshore project operates under the Curaçao jurisdiction and welcomes international players, including those from Ontario. Deposits through BTC or USDT move swiftly from wallet to balance, allowing players to begin games almost immediately. Withdrawals follow the same philosophy of velocity, often processed with blockchain efficiency that feels refreshingly instant.
Inside the casino interface, the environment resembles a digital arcade infused with crypto energy. Players can explore animated slots, experimental games, and dynamic gambling formats designed for both desktop and mobile access. A diverse bonus structure spices up gameplay, while cashback features quietly return value after long sessions.
Promotions appear frequently, and ambitious players may climb toward VIP status where enhanced rewards and premium support await. Unlike traditional platforms burdened by excessive verification, Lucky Block emphasizes privacy by limiting heavy KYC demands while still maintaining safe operations.
The lucky block casino australia experience ultimately feels modern and agile. Fast deposits, discreet withdrawals, and an evolving catalogue of games create a playground where crypto enthusiasts can enjoy gambling with fewer obstacles and more autonomy.
March 5, 2026 at 6:56 am
Great practical guide for improving stick figure drawings. The flaw-by-flaw breakdown is very clear. My website: https://nanabananapro.com/
March 5, 2026 at 10:37 am
Null’s Brawl is a popular private server based on Brawl Stars. Players get access to all fighters and resources immediately after launch. The version is stable and has a user-friendly interface.
March 5, 2026 at 6:52 pm
https://ic-connect.net/company/
March 5, 2026 at 7:50 pm
Whether someone is producing beats, composing cinematic soundscapes, or editing podcasts, having access to reliable music production tools can make a significant difference in the creative workflow. These platforms provide powerful features designed to enhance sound quality, streamline project management, and support creative experimentation.
March 7, 2026 at 8:23 am
Vapes Shops is your go-to online store for a premium selection of vaping products in Dubai, UAE. We offer an extensive range of e-cigarettes, vape juices, and accessories tailored to satisfy every vaper’s needs. Whether you’re a beginner or an experienced vaper, our high-quality products and top-notch customer service ensure an unbeatable vaping experience. Visit Vapes Shops and discover the best in vaping today. https://vapsshops.com/
March 7, 2026 at 12:14 pm
Thanks for sharing such an amazing post.
March 8, 2026 at 1:50 am
namatoto
March 8, 2026 at 5:39 am
This was such a helpful breakdown! Focusing on the three major masses makes anatomy feel so much less intimidating than trying to map out every single muscle group. I’ve found that simplifying complex structures is just as important in my own work; we actually built https://musicapi.ai to help creators break down the complexities of music composition in a similar, more intuitive way. Thanks for the great advice on leveling up those stick figures!
March 8, 2026 at 9:49 am
MegaPersonals (megaporsonals.com) is a popular online personals and hookup website designed for people looking to connect, make friends, and build relationships. Users can easily create accounts, post personal ads, manage and update listings, and interact with others in a safe and private environment. With user-friendly features and a focus on privacy, MegaPersonals is a trusted platform for meeting new people online https://megaporsonals.com
March 8, 2026 at 5:56 pm
Vapes Shops is your trusted online destination for premium vaping products in Dubai, UAE. We provide a wide range of e-cigarettes, vape juices, and vaping accessories designed to meet the needs of every vaper. Whether you’re just starting out or you’re an experienced user, our high-quality products and dedicated customer support ensure a smooth and satisfying vaping experience. Explore Vapes Shops today and find the best vaping essentials all in one place.
March 8, 2026 at 5:58 pm
Lighting & Grocery Shop is your trusted destination for quality lighting products and daily grocery essentials. We offer a wide selection of LED lights, bulbs, electrical accessories, and fresh grocery items to meet your everyday needs. Whether you’re looking to brighten your home with modern lighting or shop for daily household essentials, our quality products and friendly service ensure a convenient shopping experience. Visit our shop today and find everything you need in one place. 💡🛒
March 8, 2026 at 8:12 pm
A reliable source for a premium VST free download can help you explore professional instruments, effects, and sound‑shaping tools that enhance your music production workflow. These VST plugins are designed to deliver powerful performance, studio‑grade sound quality, and compatibility with most popular digital audio workstations.