
Today’s post is a filler of sorts – I’m still recovering from my novel-length post about muscles. For the time being, we’ll be taking a look at a video from the Kazone Art YouTube channel.
Kazone Art is an excellent resource for learning artists, providing various instructional videos describing difficult artistic concepts. In addition to providing free instructional videos through their YouTube channel, Kazone also provides numerous paid courses through their website, taught by experienced master artists like Kim Jung Gi, and Kim Hyun Jin (often Americanized as “Hyun Jin Kim”).
Not only are the instructions given by experienced artists, many of these artists are good teachers, who understand how to break down difficult tasks into simple terms, to make them digestible for amateurs (like me).
Drawing Hands is (very) Difficult
Ask any artist you know if they think hands are difficult to draw. I’d wager that in most cases, the answer will be “yes.” Hands are an extremely complex part of the human body, with lots of moving parts and fine details that contribute to their incredible range of motion, and function. This makes them (very) difficult to draw, especially when you attempt to draw them in extreme poses, and from extreme angles.
If you guys are interested in seeing a blog post where I talk about hands in greater depth, please let me know in the comments section. This post will focus more on Kazone Art’s video about drawing hands.
“How to Draw Hands” ; Kim Hyun Jin
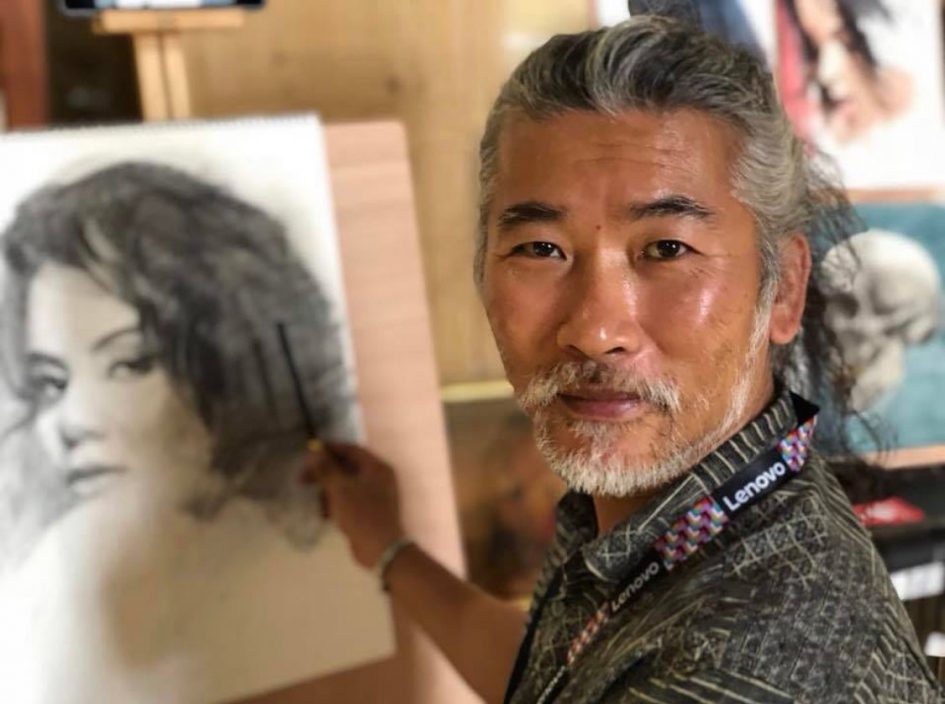
Kim Hyun Jin’s excellent instructional video, the topic of this blog post.
Before I discuss this video, I think a brief introduction to Hyun Jin is in order. Kim Hyun Jin is the founder of Superani (sometimes written as Super Ani), an artistic supergroup of which a majority of my favorite artists are members.
Superani includes artists like Kim Jung Gi, Karl Kopinski, Eliza Ivanova, Peter Han, Viktor Kalvachev, Nikolay Georgiev, and many, many others. I’ll be discussing Superani and its history in greater depth in a separate, future blog post.
Of course, as one of its founders, Kim Hyun Jin is also an active participant of Superani. Kim Hyun Jin is perhaps best known as Kim Jung Gi’s cameraman (and boss), although this description is doing his artistic talent a great disservice, in my opinion. Hyun Jin is a world-class painter and instructor, as evidenced by the above video.
I won’t be breaking down this video as much as I did in my previous YouTube-related blog post, because this video is quite short, and very self-explanatory. Kim Hyun Jin explains his methods far more succinctly than I could reiterate them, so I feel as though further analysis would be redundant. Instead, I’ll be briefly highlighting a couple of his most compelling points.
Division of Planes on the Hand
Understanding planes is an important part of art. Planes are related to forms (3D shapes), generally defining the faces (sides) of a form. In addition to making your drawings feel more three-dimensional, a strong understanding of planes will allow you to break down complex forms into more simple shapes.
Rather than thinking about complex objects as abstract, three-dimensional shapes, you can instead break them down into a collection of two-dimensional shapes (since planes are two-dimensional).
Kim Hyun Jin applies this to drawing the hand by dividing the back (dorsal) side of the hand into three separate planes. For the sake of clarity, Kim Hyun Jin demonstrates by drawing those planes directly onto his hand, providing a clear visual reference of his instructions.

“You might think that [the dorsal side of your hand] is just a flat surface, but you must remember that it can actually be divided up into three distinct planes” (How to Draw Hands).
Ovular Cross Sections at Fingers
This point blew my mind the first time I watched this video. While you might imagine the plane where your fingers attach to your palm as a flat surface, that’s actually not entirely correct.
In truth, your fingers attach to your palm in such a way that what would normally appear to be a flat, circular cross-section, becomes an angled, ovular (oval-shaped) cross-section.
In simple terms, a cross-section is just the two-dimensional shape of a particular section of an object – as though you cut through it with a knife to look at the interior contents.
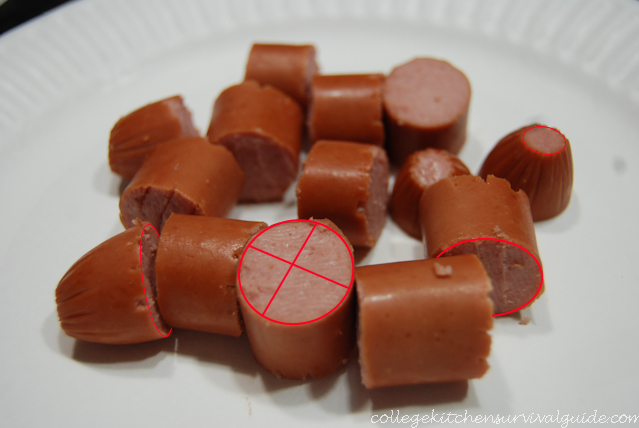
Hot dog cross-sections 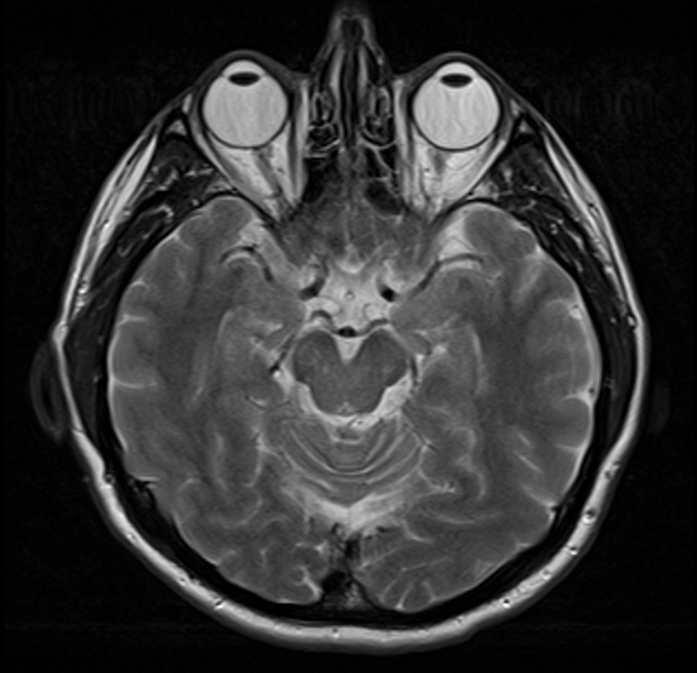
MRI cross-section
Two examples of cross-sections. On the left, (horizontal) cross-sections of a hot dog are drawn in red. On the right, a (horizontal) cross-section of the brain and eyes, taken via Magnetic Resonance Imaging (MRI).
The idea that fingers attach via a slightly angled, ovular cross-section was an extremely simple fact that, when pointed out, changed my understanding of hand anatomy. It’s a relatively small detail, yet it’s such a powerful observation – one that I try to keep in mind whenever I’m drawing hands.
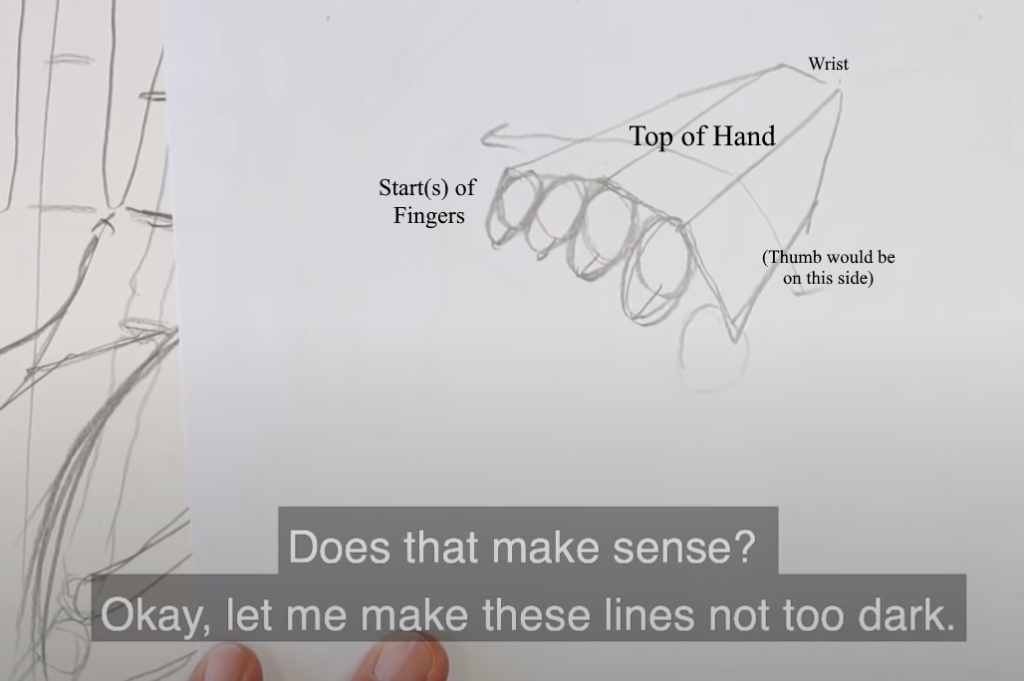
“And we know that although the fingers start here on the [dorsal] side, we have the webbing on the palm side that makes the fingers shorter . . . That means that these circular cross-sections should actually be ovular in shape” (How to Draw Hands).
Sources
- Kazone Art. (2020, April 23). How to Draw Hands [Video]. YouTube. https://www.youtube.com/watch?v=XXiUlO4dxZY
- Kazone Online. (n.d.). Kim Hyun Jin [Photograph]. Kazone Art. https://www.filepicker.io/api/file/p31mFJBQp2IH99ku72sw
- MRI of the Head (Brain). (2017, November 21). [Photograph (Magnetic Resonance Image)]. Wikipedia. https://upload.wikimedia.org/wikipedia/commons/e/ef/MRI_Head_Brain_Normal.jpg
- Sonia, M. S. (2013, January 25). Sliced Hot Dogs [Photograph]. The College-Kitchen Survival Guide. https://collegekitchensurvivalguide.files.wordpress.com/2013/01/dsc_01371.jpg
Disclaimer
All information in these posts is my own words, unless explicitly stated otherwise. None of this information is quoted, nor paraphrased, unless explicitly stated otherwise. Any similarities between my own words, and the informative sources/hyperlinks provided is purely coincidental, unless explicitly stated otherwise.
In any case where I am using someone else’s words (or imagery), the source will be cited internally, with a link to that source provided either within the internal citation, at the end of the post under “Sources,” or both.
March 9, 2021 at 6:48 pm
I’ll be honest, drawing hands has always been my major weakness. That and ears, for some reason. It’s good to see skilled artists are giving tutorials on drawing these parts. I’ll have to give them a further watch at some time, so thank you for pointing me to them.
March 9, 2021 at 7:04 pm
Hands are one of the toughest things to draw, but it’s important to understand them if you plan on drawing people. Kim Jung Gi says that hands are one of the most important indicators of character, you can tell a lot about a character based upon the position and appearance of their hand(s).
Ears are tricky too – Stonehouse’s Anatomy has a great breakdown/tutorial for drawing ears, and I’ll be talking about that book in a future blog post.
March 10, 2021 at 12:14 am
I have always struggled with hands! I definitely used to avoid drawing them because they would just end up ruining the overall picture. I’ll have to check out some more tutorials to see if I can improve.
March 10, 2021 at 1:12 am
I think that’s something plenty of artists can relate to. “Hiding-hands-in-pockets” syndrome is something I’m guilty of too. I used to draw a lot of characters with masks and/or scarfs to avoid drawing faces and necks.
Once you’ve practiced them, drawing hands is a lot of fun. They can give a lot of character and life to your drawing, in addition to being a show of skill. Drawing hands skillfully is a clear sign that you’ve practiced difficult anatomical subjects.
March 10, 2021 at 3:19 am
This is a great post and very helpful. I really wanted to get into drawing more when I was younger but drawing hands was one of the things I really struggled with. This has made me want to try again at drawing. Thank you and Im excited for more posts!
March 10, 2021 at 6:53 am
That’s just about the highest compliment I can receive, as far as I’m concerned. I’m glad this post (and video) inspired you to try again. Kim Hyun Jin inspires me a lot as an artist, and I’m glad to share that inspiration with people. Hopefully my future posts will continue to hold your interest. Thanks for reading!
July 11, 2024 at 4:47 pm
Kazone Art is a talented artist that I have admired for a long time. I’m trying to accumulate and learn from him.
January 11, 2025 at 4:56 am
The satisfaction of crafting the perfect beat in Sprunki Incredibox is an exhilarating feeling that keeps players coming back for more.
January 24, 2025 at 9:55 am
wheel spinner- Random name picker
February 3, 2025 at 8:16 am
Nice Blog !!
February 4, 2025 at 2:06 am
Great post! I appreciate the way you highlight Kazone Art’s value for learning artists. Kim Hyun Jin’s teaching style is truly exceptional, and I love how you emphasize his ability to break down complex concepts. Chill Guy Clicker
February 5, 2025 at 3:44 pm
PowerDirector is the best app for editing. You can download it through https://pdapk.com
February 13, 2025 at 9:23 am
Unravel the mysteries of Miside Game. Multiple endings await in this unique horror dating simulation.
February 14, 2025 at 2:49 am
Play Sprunki Retake lets you explore beats, melodies, and effects, unlocking limitless opportunities for musical creativity.
February 14, 2025 at 2:49 am
Sprunki Incredibox Games has long been a beloved music creation game, blending interactive storytelling with music production in a fun and engaging way.
February 14, 2025 at 2:50 am
Dive into the world of Sprunki Incredibox, Play Sprunki! Mix, match, and create unique Sprunky beats with our quirky characters. Experience music creation like never before.
February 14, 2025 at 2:50 am
Sprunki Game, a fan-made mod inspired by the original Incredibox game. Mix fresh beats, create unique music, and enjoy exclusive content online at https://sprunkigamer.com
February 14, 2025 at 2:51 am
Play online games for free In RymGames. On site you can play interesting and exciting games, racing games, shooting games, games for girls, games for two, old games. Have fun!
February 14, 2025 at 2:51 am
Play Sprunki Phases Online For Free! Discover Incredibox Sprunki Game Mods and use the characters of Retake, Phase 3, 4, 5, 9, 10, mustard mods to create unique melodies.
February 19, 2025 at 3:01 pm
Drawing hands is indeed a tricky beast, but Kazone Art makes it seem almost approachable. Their videos break down the complexity into digestible steps, which is a lifesaver for amateurs like me. Still, I can’t help but chuckle at the irony—hands, the very tools we use to draw, are so hard to draw themselves. A humbling reminder of the artist’s eternal struggle!
March 7, 2025 at 4:59 am
Freegameonline.net is the premier destination for browser games, offering a vast selection of titles that you can play game instantly, with no downloads or installations required. Dive into a world of endless gaming possibilities, from casual puzzles to intense action titles. Explore different genres, discover hidden gems, and connect with a thriving community of fellow gaming enthusiasts. With our user-friendly interface and regularly updated content, Freegameonline.net makes it easy to find your next favorite free online game. We bring you a truly premium gaming experience, with optimized controls and immersive gameplay. Looking for free online games? We got you. Come play game with us now and learn all about gaming and related secrets!
March 11, 2025 at 5:39 am
Your perspective on this topic is both unique and enlightening. I admire your ability to convey such detailed information in an accessible way.
March 13, 2025 at 6:57 am
Block Blast has become a global phenomenon for a reason, but because it has an irresistible appeal. A simple yet profound game, easy to play but difficult to master, it will keep you coming back to improve your skills. The feeling of challenging yourself, achieving higher scores, and overcoming creative levels brings endless excitement. This is not just a game but a source of inspiration for you to constantly think and conquer new heights!
March 14, 2025 at 10:18 am
Great to see a break from the deep dive on muscles! Kazone Art\’s videos are a fantastic resource for artists at any level. Their breakdown of complex artistic concepts is both informative and accessible. Keep up the great work, and thanks for sharing this insightful video on drawing hands!
March 17, 2025 at 2:43 pm
Huge thanks for sharing such clear, practical advice.
March 18, 2025 at 8:42 am
Kim Hyun Jin’s approach to drawing hands is incredibly insightful! Breaking down complex forms into planes and understanding ovular cross-sections truly simplifies the process. A must-watch for any aspiring artist!
March 24, 2025 at 7:34 am
I never thought a drifting game could be this detailed! Drift Hunters has set a new standard for racing games.
March 26, 2025 at 12:34 am
🎵✨ Discover a new world of music games! The Sprunki music collection (including Abgerny creation, Mustard rhythm, and Retake classics reimagined) is now live! Perfect for music lovers of all levels: https://sprunkimusic.org 🎮🎹
March 26, 2025 at 12:34 am
🧩 Love puzzles? Check out 24funpuzzle – a brain-training playground with math mazes, logic puzzles & weekly challenges! Works on any device with progress tracking. Give your neurons a fun workout! https://24funpuzzle.com ✨🧠
March 31, 2025 at 6:35 am
This Kazone Art tip on drawing hands is so useful! Can’t wait to try.
April 8, 2025 at 2:48 am
Your one-stop shop for <a href="https://cartooncharacters.ai".cartoon character interaction and the latest AI animation news. Dive in!
April 9, 2025 at 9:59 am
This game is packed with quirky surprises, chaotic gameplay, and tons of laughter. Whether you’re here for the challenge or just to enjoy the madness,
color block game delivers pure fun with its unique characters and unpredictable moments. Don’t wait—dive into the color block game experience now and let the craziness begin!
April 10, 2025 at 3:50 pm
Discovering incredibox sprunki transformed my downtime completely – the Sprunki features offer a delightful mix of rhythm creation and mental stimulation that’s become my favorite productivity break.
April 11, 2025 at 4:04 am
Hyun Jin’s ovular cross-section tip was a total lightbulb moment for me too! Hands went from impossible spaghetti to actual 3D forms after watching this. Now if only my sketches would stop looking like overcooked spaghetti…
April 13, 2025 at 2:03 am
Experiment risk-free with our browser-based free ai doll generator – no downloads required. Generate 5 dolls daily with commercial-use licenses.
April 19, 2025 at 6:59 am
The innovative sound combinations in sprunki retake , especially the Sprunki elements, have revolutionized how I approach creative breaks – a perfect mental refresh that blends musical exploration with interactive fun.
April 21, 2025 at 5:43 am
If you’re into quirky, physics-based games, you might love Crazy Cattle 3D – a chaotic multiplayer experience where explosive sheep battle it out in colorful arenas. Surprisingly smooth and ad-free.
April 23, 2025 at 7:38 am
From terrifying to adorable, explore the bizarre world of that have become an internet sensation.
April 24, 2025 at 2:58 pm
Wow, that’s really interesting, but it looks so difficult. I recently discovered that AI can also help me draw. Maybe everyone can give this AI drawing tool a try.
April 25, 2025 at 6:50 am
Have you ever tried sketching hands and ended up with spaghetti fingers? This guide makes it easier with steps that feel like tracing shadows in the sand! But what if we add color? At ColorearW.com, kids can download and print free PDF pages to swirl, smudge, and splatter their own hand-tastic art!
April 26, 2025 at 1:21 am
Explore the world of animation and AI! Discover news, and chat with beloved cartoon characters.
May 4, 2025 at 2:55 pm
Your one-stop shop for cartoon character interaction and the latest AI animation news. Dive in!
May 7, 2025 at 6:40 am
This video is so helpful! I always struggled with hands. Breaking down the planes like that makes it way easier. I wonder if there’s an AI Image Expansion Tool to help fill in details after the basic sketch. Definitely gonna practice this!
May 8, 2025 at 2:44 am
The ultimate destination for cartoon fans! Interactive chats, AI animation news, and a world of characters await.
May 9, 2025 at 2:37 am
This is a great guide for mastering the art of drawing hands! Just like developing your artistic skills, puzzle games like Tetris Tumble offer a fun way to challenge your mind and improve problem-solving abilities. Both art and games require creativity, precision, and practice to truly master, and we love how they inspire us to think in new ways!
May 9, 2025 at 2:38 am
What a fantastic guide for mastering hand drawing! At Syloon, we believe that creativity knows no bounds, and whether you’re sketching or designing, having the right tools can make all the difference. Our collection of creative stationery and design accessories is crafted to inspire every artist, from hobbyists to professionals. Just like drawing hands, every detail counts in creating something unique and personal.
May 9, 2025 at 2:41 am
Such an insightful guide! Drawing hands requires patience and precision, but color also plays a huge role in bringing your artwork to life. At Pantone Color Chart, we understand how crucial the right hues are in adding depth and emotion to your drawings. Whether you’re working on a hand study or any other piece of art, the perfect color palette can truly enhance the overall composition.
May 12, 2025 at 1:49 am
Learning to draw hands can feel like navigating a tricky slope, much like mastering the Snow Rider game. Kazone Art offers fantastic videos breaking down complex concepts like hand anatomy, making them easier to understand. Their experienced artists offer valuable insights, turning a daunting task into a manageable skill. If you’re struggling with hand poses, their tutorials are a great starting point for your artistic journey, much like finding the perfect line in Snow rider .
May 13, 2025 at 9:17 am
The Chasen is an exceptional tool for preparing matcha, providing both efficiency and authenticity in the tea-making process. Crafted from high-quality bamboo, this traditional whisk effortlessly creates a velvety and frothy consistency, essential for an ideal matcha experience. Its ergonomic design allows for easy handling, making it a delight to use for both novice and seasoned matcha enthusiasts. I particularly appreciate how the Chasen easily incorporates air into the matcha, enhancing the flavor and aroma of each cup. Overall, the Chasen is a must-have accessory for any matcha lover looking to elevate their tea ritual.
May 16, 2025 at 5:17 am
Thank you for your interest in our urine test strip. These strips are an invaluable tool for quick and accurate home testing of various health parameters. Utilizing advanced reagents, they provide reliable results for parameters such as pH, protein, glucose, and ketones with just a simple dip. The color chart included allows for easy interpretation of results. Many users appreciate the convenience and precision these strips offer, making it effortless to monitor their health. Overall, our urine test strips are highly effective for proactive health management, delivering professional-grade insights from the comfort of your home.
May 16, 2025 at 5:30 am
Thank you for your interest in the ebeam machine. This state-of-the-art electronic beam equipment has revolutionized the way we approach material processing, offering precision and efficiency in various applications. Users have noted its exceptional ability to enhance product durability and quality, making it an invaluable asset in industries such as packaging, electronics, and medical devices. The ebeam machine operates with minimal environmental impact, and its user-friendly interface allows for seamless integration into existing production lines. Overall, it represents a significant advancement in technology that continues to improve manufacturing processes.
May 18, 2025 at 4:39 am
Give your photos a playful makeover! Our Image to Cartoon AI transforms them into charming cartoons instantly.
May 31, 2025 at 12:42 pm
Ah, hands—the nemesis of every artist! It’s like they have a mind of their own. I guess if you need some extra help, you could always check out ImagesArt.ai. What’s the most challenging part for you when drawing them?
May 31, 2025 at 12:42 pm
I never realized how complex hands are until I tried drawing them! It’s like trying to decipher a Rubik’s Cube like an octopus. If you’re looking for some video support, maybe you could explore FacelessVideos APP. What’s the craziest pose you’ve tried?
June 1, 2025 at 7:59 am
Hands may be a handful (pun totally intended), but thanks to videos like the one from Kazone Art, maybe I won’t need to resort to drawing them as ovals anymore! Check out Dirs.cc if you want to dive deeper into the anatomy of hands.
June 2, 2025 at 1:04 am
Italian Brainrot‘s popularity is no accident. Delve into the reasons behind its widespread appeal and discover what makes it a cultural staple.
June 10, 2025 at 3:48 am
This is a neat breakdown of how to approach drawing hands! Kim Hyun Jin’s points about planes are super helpful. Makes me wanna try drawing some hands now… maybe I can even use it to make some AI Cute Baby Shorts later lol!
June 11, 2025 at 5:35 am
The elisa washer has significantly streamlined my laboratory workflow. Its user-friendly design allows for efficient washing of microplate wells, ensuring optimal separation of bound and unbound substances. The programmable settings are a standout feature, providing flexibility to adjust wash volumes and cycles, which enhances reproducibility in results. I particularly appreciate the compact size, which saves valuable bench space without compromising on performance. Additionally, the rapid wash time has improved our overall productivity. Overall, the Elisa Washer is an essential tool for any lab focused on precise and efficient ELISA assays. Highly recommended!
June 12, 2025 at 3:25 am
Adelyn Cline Beauty Machine is a remarkable innovation in the beauty industry, exemplifying the brand’s commitment to quality and effectiveness. As the manufacturer, Adelyn Cline ensures that every feature of this machine is designed with precision and user-friendliness in mind. The advanced technology incorporated into the device provides exceptional results, making it a must-have for anyone serious about skincare. The machine’s sleek design and ease of use enhance the overall experience, allowing users to achieve professional results at home. Trust in Adelyn Cline’s expertise and elevate your beauty routine with this outstanding product.
June 13, 2025 at 6:51 am
Whenever I need a dose of sonic inspiration, I revisit sprunki play and let the melodies guide me.
June 13, 2025 at 9:14 am
As a healthcare professional, I have found the medical molding to be an invaluable tool in my practice. Its precision and adaptability allow for optimal patient comfort and support during various procedures. The molding material is durable yet pliable, ensuring a perfect fit for different anatomical shapes. Furthermore, the easy-to-use application process significantly enhances workflow efficiency, saving both time and resources. I highly recommend this product for anyone in the medical field seeking reliable and effective solutions for patient care and support.
June 14, 2025 at 3:49 am
Wow, this is super helpful! I always struggle with hands, especially the angles. Gonna check out that Kazone Art video. Maybe AI Image Recognition will one day make this drawing stuff easier! Thanks for sharing!
June 15, 2025 at 12:26 pm
Explore hundreds of officially recognized Italian Brainrot Characters on AI Brainrot’s interactive character gallery — from OG legends to rising stars.
June 19, 2025 at 3:45 am
Wow, this “live photo tutorial” about hands is super helpful! I always struggle with drawing hands, but the planes idea is a game-changer. Definitely gonna try it out!
June 24, 2025 at 3:28 am
This “How to Draw Hands” video from Kazone Art is super helpful! Kim Hyun Jin breaks down the hand anatomy really well, especially the planes. Definitely keeping this in mind to avoid any future fake equity risk in my art when I’m drawing hands. Thanks for sharing! Read More
June 30, 2025 at 12:11 am
Your portal to the world of cartoons! Chat with characters, get AI animation updates, and more. cartoon character fun awaits!
July 1, 2025 at 3:17 am
Wow, hands really are tricky! The first time I tried drawing them, I ended up with some weird alien-like claws. Haha! I’d love to see more insight on this topic if you ever do a deep dive. Also, if you’re ever interested in building your own tier list of drawing tips, you can check this out: building your own tier list of drawing tips
July 3, 2025 at 3:18 am
This is a cool breakdown of Kim Hyun Jin’s hand drawing video! The division of planes is super helpful. I need to practice more to nail those classic mahjong tips and apply them to my art. Thanks for sharing! Read More
July 3, 2025 at 3:28 am
This is a great intro to drawing hands! Kim Hyun Jin’s explanation of planes is super helpful. Now, if only there was a 2048 cupcakes tutorial that was this easy to follow! Seriously, though, very useful stuff.
July 4, 2025 at 3:21 pm
The TakedownChallenge is sweeping the globe! Inspired by TWICE’s hit track from the new film, millions of fans are showing off their moves. Join the viral dance trend and prove you have what it takes to be a <a href="https://kpopdemon.com".KPop Demon Hunter!
July 7, 2025 at 3:49 am
Hello! I love all the styles you share!
July 9, 2025 at 6:24 am
I really enjoyed learning about Kazone Art and the focus on drawing hands. It’s amazing how anatomy plays such a big role in art and game development. Speaking of immersive experiences, have you tried AI Asmr? It’s a cool way to relax while exploring creative content. Thanks for sharing this post!
July 10, 2025 at 3:21 pm
Drawing hands? Ugh, that’s like trying to stop a train with your bare hands. But this video breaks it down pretty well. Like speaker cleaner sound.Just wish I had this info years ago.
July 11, 2025 at 8:40 am
when did retire?
July 14, 2025 at 11:01 am
Kontext Dev gives you AI-powered image editing with advanced local control. Try it free and transform images faster with consistent results.
July 14, 2025 at 11:02 am
Heic To Jpg – Fast & Easy HEIC Image Converter
July 15, 2025 at 7:08 am
Welcome for this useful information, I have bookmarked and written some things down. I will be checking back, from time to time too.
July 17, 2025 at 1:59 am
Hands are a real challenge, huh? I once struggled drawing them until I discovered techniques like these. It’s amazing how understanding basic forms can make a big difference! If you’re into design too, you might find some useful resources here: newspaper template.
July 18, 2025 at 9:09 am
Drawing hands can be so tricky, but your post makes it seem a bit easier! For those times when drawing feels overwhelming, have you tried the AI Anime Generator? It’s a cool tool that helps bring anime characters to life in seconds, perfect for artists and game developers alike!
July 24, 2025 at 2:20 am
Cookingdom All Level Walkthroughs Guide
July 31, 2025 at 4:47 am
Drawing hands is famously challenging for artists due to their complex structure and range of motion. In the insightful blog post “How to Draw Hands” (Kazone Art), the author discusses Kim Hyun Jin’s approach to simplifying this process by dividing the back of the hand into three distinct planes and recognizing that fingers attach to the palm with angled, ovular cross-sections rather than flat circles. These observations help artists break down intricate forms into more manageable shapes, making hands less intimidating to draw. For those interested in visualizing processes or organizing creative ideas, tools like flowchart ai can also provide valuable support in mapping out artistic concepts and workflows.
July 31, 2025 at 2:41 pm
Love coffee and gaming, Good Coffee, Great Coffee is the ultimate Coffee Shop Simulation where you can play as a virtual barista. Developed by TapBlaze, this Cozy Game lets you master Cafe Management—perfect for a relaxing break!
August 20, 2025 at 7:30 am
Great post on drawing hands! I love how Kazone Art breaks it down. Speaking of art, I recently used an AI Cartoon Generator to turn my photos into cartoons—super fun and easy for quick projects!
August 21, 2025 at 3:27 am
This is such a cool find! Hyun Jin Kim’s approach to drawing hands is so insightful. Really digging the vibe coding style of teaching, breaking it down makes it so much easier to understand. Gotta try these tips next time I draw!
August 21, 2025 at 7:31 am
Looking for girls party dress online? We have multiple collection of babies Dresses, girls dresses, Party Dresses and Kids Fashion Clothing Online. girls party dress
August 28, 2025 at 12:23 pm
Drawing hands has always been considered one of the most challenging aspects of figure drawing, given their complex anatomy and dynamic range of motion. In the insightful blog post “How to Draw Hands” (Kazone Art), the author highlights Kim Hyun Jin’s teaching approach, particularly his method of dividing the back of the hand into three distinct planes and recognizing the ovular cross sections where fingers attach to the palm. These observations help artists break down complex forms into simpler, more manageable shapes, making the process less daunting for beginners.
For artists who want to take their creative projects further, tools like voice clone can add another dimension to their work by enabling realistic voice synthesis. By combining strong foundational drawing skills with innovative technology, creators can bring their art and stories to life in new ways.
August 29, 2025 at 7:29 am
explains his methods far more succinctly than I could reiterate them, so I feel as though further analysis would be redundant. Instead, I’ll be levantsolarenergy briefly highlighting a couple of his most compelling points.
September 13, 2025 at 8:27 am
I love how this guide makes tricky hands feel doable! After sketching, I like to test my PC with a quick Volume Shader run—watching those FPS numbers dance is oddly relaxing while I rest my wrist.
September 13, 2025 at 8:28 am
I love how Kazone breaks hands down into simple shapes—makes me want to save every art clip I find. I just drag the saved videos into a mkv to mp4 tool so they play nice on my tablet while I sketch along.
September 24, 2025 at 1:50 pm
Drawing hands can be a real challenge for artists due to their complex structure and range of motion. In the blog post “How to Draw Hands” (Kazone Art), Kim Hyun Jin’s instructional approach is highlighted, focusing on breaking down the hand into simple planes and understanding the ovular cross-sections at the base of the fingers. These insights make the process of drawing hands more approachable, especially for beginners. For those interested in digital art and rendering, tools like volume shader can further enhance your creative process by helping you visualize and shade complex forms in 3D.
September 29, 2025 at 7:53 am
Thanks for this fun filler post! I love how you’re sharing the Kazone Art video on drawing hands. It’s a great break after your detailed muscle article and really helpful for artists and game developers.
October 3, 2025 at 11:48 pm
Crafting the perfect beat in Sprunki Incredibox brings an exhilarating sense of satisfaction that keeps players returning for more.
October 7, 2025 at 11:00 am
Rest assured with Sora 2 AI video’s built-in safety features, including C2PA watermarking and consent-driven cameo technology.
October 8, 2025 at 4:57 am
Integrate Sora 2 AI capabilities directly into your applications with our developer-friendly API, scaling from individual projects to enterprise solutions.
October 8, 2025 at 6:19 am
InvesQ, as a leading property consultant in Dubai, helps clients navigate the dynamic real estate market with tailored solutions for maximum returns. https://invesq.com/
October 12, 2025 at 1:15 pm
Not only are the instructions given by experienced 1depositca artists, many of these artists are good
October 16, 2025 at 3:12 am
This is a fun and relaxing management game site that’s been gaining attention recently. The interface is clean, the progression feels rewarding, and it’s perfect for unwinding during a short break. I recommend trying Raise Animals if you enjoy pet-raising or idle/tycoon-style games. It’s easy to learn, quick to play, and definitely worth bookmarking for daily fun.
October 18, 2025 at 3:46 pm
Clear breakdown of hand anatomy—the three planes and ovular finger cross-sections—makes tough concepts practical. For a playful way to turn practice into interactive learning, try https://brainrotgames.games.
October 19, 2025 at 11:02 am
Discover tomorrow’s breakthroughs today with DualMedia Innovation News, your daily source for AI, crypto, and cybersecurity updates.
October 25, 2025 at 2:28 am
Great breakdown! Kim Hyun Jin’s tips on hand planes and ovular finger cross-sections are game-changers. Clear, simple insights that make drawing hands feel far less intimidating.
October 28, 2025 at 7:10 am
Great breakdown of hand drawing techniques! The plane division and ovular cross-section tips are game-changers. Kazone Art’s instructional approach really simplifies complex anatomy.
November 2, 2025 at 4:28 am
Face GPT: Advanced AI face swap and face analyzer. Use Face GPT swap for photo transformations, Face GPT analysis for insights. Fast and accurate.
try: https://www.facegpt.io
November 12, 2025 at 5:28 am
Great breakdown of hand anatomy! The plane division & ovular cross-section tips are game-changers. Kazone’s tutorials always deliver clear, practical advice. Would love that deeper hands post!
November 20, 2025 at 5:23 am
Well-articulated and highly relevant. Thank you for sharing your expertise. e-zpassri com
November 23, 2025 at 11:39 am
Check out > https://www.reelshortapkmod.com/ if your love bingeing short-form drama content.
November 30, 2025 at 3:52 am
This discussion about breaking down complexity reminds me of some of the powerful AI tools available now. For instance, a website like Animify (https://animify.app) can instantly transform static images into animated ones with various styles, producing really dynamic results.
December 7, 2025 at 1:52 pm
Ah, the age-old battle of artists versus hands—it’s like trying to wrestle an octopus. If only drawing hands were as easy as turning to this new cool tool I found to make meme-worthy GIFs in a jiffy! Check it out here https://kirkified.ai/.
December 17, 2025 at 6:15 am
Kazone Art’s “How to Draw Hands” with Kim Hyun Jin is a concise masterclass in turning complex anatomy into simple, actionable ideas. The division of the dorsal hand into three planes—and the insight that finger bases form angled, ovular cross-sections—gives learners a practical framework to make hands feel solid and believable. As Superani’s founder, Hyun Jin’s teaching shines because it bridges theory and practice for artists refining fundamentals. For creators sharing studies and tutorials online, staying transparent about AI use is increasingly important; tools like a detector de ia can help assess whether content is AI‑generated and keep learning spaces trustworthy.
December 21, 2025 at 1:22 am
z-img.art is an AI image generation and editing platform for creators, allowing them to quickly generate high-quality images simply by providing input prompts.
December 21, 2025 at 9:53 am
This made the whole topic so much clearer for me. Thanks a lot!
December 22, 2025 at 7:39 am
nano banana pro is an AI image generation tool to create stunning images from prompts in seconds.
December 31, 2025 at 8:53 am
This works exactly as expected. Clean and easy to use.
January 5, 2026 at 3:21 am
Your point about hands being a “complex part of the human body” with an “incredible range of motion” really resonated—that’s exactly why they can feel so daunting to practice. I appreciated Kim Hyun Jin’s approach of breaking them into simpler forms first, as that mindset has helped me move past the initial intimidation.
Your mention of Superani was fascinating, as seeing how master artists collaborate and teach can be just as instructive as the technical lessons themselves. I found some additional resources (https://bloxfruitscalculator.co) that explores similar ideas on gesture and form, which complemented this video well. Do you think this foundational approach of simplifying complex anatomy is equally crucial for stylized art, like in game development, or does the process change significantly?
January 5, 2026 at 9:51 am
This is a fantastic and clear tutorial on how to draw hands — the step-by-step approach makes a tricky subject much easier to grasp, and I love the helpful visuals. Practicing with guides like this has really improved my confidence in sketching anatomy. And if anyone here also enjoys combining art with tech, you might like to check out Math AI helper for quick AI-powered help with math challenges that come up in creative projects!
January 5, 2026 at 10:08 am
This tutorial does an amazing job breaking down one of the most challenging parts of drawing — hands — into simple, approachable steps. The explanations and examples are especially helpful for artists at any level who want to improve their anatomy skills. I also find that tools like AI Color Analysis can be surprisingly useful when refining color choices and visual balance in artwork.
January 5, 2026 at 10:12 am
This hands-drawing tutorial is incredibly detailed and easy to follow, breaking down complex shapes into manageable steps that make learning anatomy feel fun and achievable. The clear visuals and practical tips really help artists of all levels improve their technique. And if you ever want to take a creative break between art sessions, Kirkify AI is a fun tool to turn your photos into hilarious AI-generated memes!
January 7, 2026 at 11:22 am
This is a fantastic breakdown! I’ve always struggled with drawing hands, so it’s great to know there are resources like Kazone Art that explain complex concepts in a way beginners can actually follow. Definitely going to check out their videos and courses—thanks for sharing!
January 8, 2026 at 1:23 am
Great breakdown of hand anatomy! As someone who appreciates both traditional art fundamentals and modern tools, I find it fascinating how understanding these basics can inform digital creation. For artists looking to apply anatomy knowledge in a different medium, experimenting with an AI graffiti generator like street art generator can be a fun way to explore form and style in street art. Thanks for sharing this resource!
January 15, 2026 at 3:39 pm
grok image supports high-resolution, prompt-based image creation.
January 16, 2026 at 12:05 pm
Great article! I really enjoyed reading your insights. By the way, if you ever need to make your AI text sound more natural, you should check out CoolHumanizer – it’s a completely free tool with no login required!”
January 17, 2026 at 4:18 am
Ah, hands! They’re like the ultimate test for any artist. Just when I think I’ve figured them out, they pull a fast one! Anyway, if you need some serious gaming strategy while you’re at it, that wiki could be a lifesaver devil hunter guide.
February 4, 2026 at 8:53 am
Great tutorial — your step-by-step breakdown for drawing hands makes a tricky subject feel much more approachable! ✍️ The visuals and tips really help demystify proportions and gesture. For anyone interested in creative techniques, tools, and inspiration, check out openclaw/
— it’s a helpful resource for art, tech, and practical insights. Thanks for sharing! 🎨👏
February 4, 2026 at 2:48 pm
Nana Banana Image Editing Tool enables fast visual creation with reference-guided styling, consistent results, and built-in resolution enhancement.
February 5, 2026 at 9:25 am
one of the best video for doing art with techniques
February 9, 2026 at 1:23 pm
Kazone Art offers fantastic resources for artists, simplifying complex concepts through free YouTube videos and paid courses. For more creative inspiration, explore Undead Invasion, where imagination comes to life!
February 13, 2026 at 2:45 am
What impressed me most about Seedance 2 is how quickly ideas can be turned into visual prototypes, making it ideal for creative experimentation.
February 13, 2026 at 7:01 am
Seedance 2 Describe a scene and watch it become a video. Upload an image and bring it to life. Seedance 2 handles text to video and image to video in one place—with camera motion prompts, aspect ratio control, and HD export when you need it.
February 14, 2026 at 12:22 pm
I like the fast performance and simple navigation. Everything was easy to install and start using. The basswin login app opens instantly and works without errors. The interface looks clean and modern. Overall, the platform provides a secure and comfortable experience for everyday use.
February 22, 2026 at 3:57 am
Great breakdown of such a challenging artistic skill! The point about breaking down complex tasks into simpler terms really resonates with me. I’ve been using seedance 2.0 unlimited for creating instructional video content, and this same principle of breaking things down into digestible steps applies perfectly to video production as well. Hands really are one of the most difficult subjects, so it’s helpful to have these kinds of resources available for artists learning the craft.
February 22, 2026 at 10:11 pm
This is a great resource! Hands are notoriously difficult to draw, and Kazone Art’s instructional approach makes breaking down the complex anatomy much more manageable. I appreciate how you highlighted this channel as a free learning resource for artists at all skill levels.
February 23, 2026 at 4:48 am
This tutorial does an amazing job breaking down one of the most challenging parts of drawing — hands — into simple, approachable steps. You konow with sprunki games, creativity is at the center—you can mix rhythms, explore different musical phases, and share your creations with a vibrant online community, making music accessible, fun, and highly interactive for players of all ages.
February 23, 2026 at 4:52 am
This made the whole topic so much clearer for me. For players who like clarity and efficiency, hytale tools provide helpful utilities without unnecessary complexity.
February 25, 2026 at 12:13 pm
Loved this post! Speaking of creative tools, I recently discovered https://videodance.cc for AI video generation and it’s been a game-changer for my content workflow. Being able to go from a text prompt to a cinema-quality video in under a minute is incredible.
February 27, 2026 at 11:25 am
This tutorial is fantastic! Breaking down hand drawing into basic shapes and understanding the underlying structure makes such a difference. I particularly appreciated the tips about the knuckles and finger proportions – those details are often overlooked but crucial for realistic drawings. Keep up the great work sharing these foundational techniques.
February 28, 2026 at 3:36 pm
If you’re looking for structured information about crops, weather, gear, and mutations, Garden Horizons Wiki organizes the game’s core systems into clear, easy-to-navigate pages so you can understand mechanics and plan your progress more confidently.
March 4, 2026 at 3:36 pm
Many readers today prefer having a centralized biography instead of piecing together information from multiple platforms. The detailed write-up answering Who is Bong Suntay provides a clear timeline of his career and achievements, making it a valuable reference point for those researching his professional journey.
March 8, 2026 at 6:40 pm
Drawing hands is definitely one of the most challenging parts of figure drawing. The structure, finger positions, and proportions can change quickly depending on the pose, which makes it difficult even for experienced artists. Tutorials like this are really helpful because they break down complex shapes into simpler steps that beginners can understand and practice.
Many people who enjoy art and drawing also spend time online learning new techniques, watching tutorials, and exploring different educational resources. While browsing helpful guides on the internet recently, I also came across https://adp.com.pk/ which shares useful public information and guides online. It’s interesting how the internet allows people to learn different skills—from art and creativity to other useful knowledge—all in one place.