Food, Potatoes, Recipes, Tater Talk

Hamburger Packets (With Potatoes)

Ever since I was a kid, my mom (what a woman) has been making what we have called over the years: hamburger packets. These are also known as hobo packets, for those of you who were wondering. These have always come in clutch for our family when we want something yummy, but don’t necessarily want to do a lot of work to get the food. Bonus: they are incredibly filling, which is something my bottomless pit of a stomach is always searching for.

While we’re not exactly the camping kind, aka I’ve never been camping besides setting up a tent in my backyard, these make a camping meal. After you chop up all the ingredients, you simply throw them on the grill and let the heat do it’s thing.

You can also make these in the oven!

Hamburger Packets (With Potatoes, Obviously)

You’ll need:

  • 4 beef patties (this recipe serves 4 people)
  • 4 medium potatoes, peeled and sliced
  • 4 medium carrots, peeled and sliced
  • Butter
  • You could also add zucchini, onion, squash, etc. Whatever you think would taste good, go for it!

What you’ll need to do:

  1. Lay out 4 sheets of heavy duty aluminum foil. Rub butter on the foil first. This will serve as a base for the other ingredients, plus it will give them flavor.
  2. Peel and slice the potatoes first, and lay each potato out on the foil.
  3. Peel and slice the carrots next, evenly distributing them as well.
  4. Lay the hamburger patty on top.
  5. Gather the foil at the top, then roll up each of the sides.
  6. Place on the grill and let cook, keeping an eye on them. Once the potatoes are easily forked and the patty looks good, they are done and you can serve them. We usually have a problem with one of the packets not cooking as thoroughly as the others, so be sure to keep an eye on all of them.
  7. If you’d rather bake in an oven, place them on a cookie sheet and bake them for 20-30 minutes at 350 degrees.

The cool part about these is that everyone can have their own serving of food. If one person wants less food, they can simply put less in their packet to start. The potatoes and carrots easily come out of the foil as well, requiring not a lot of clean up!
Food, Potatoes, Recipes, Tater Talk

Chicken Potato Bake

Once again, Pinterest did not disappoint me with a potato recipe! One day, there I was, just minding my own business. I decided to log onto Pinterest (like one does) and stumbled upon this recipe. To say I was excited was an understatement.

Casseroles are the best, and casseroles with potatoes simply make the world go round. Let me explain. Casseroles are everything in one place. There’s no need to mix your food, it’s already mixed for you! Your entire meal can be scooped up onto your plate. What a time to be alive.

Chicken Potato Bake

You’ll need:

  • 4 medium sized potatoes – you can use russet, Idaho, or red but leave the peel on
  • 1 tablespoon of garlic, minced
  • 1 1/2 tablespoons of olive oil
  • 1/8 teaspoon salt
  • 1/8 teaspoon pepper
  • 1.5 pounds of boneless, skinless chicken – can use chicken thighs or chicken breasts
  • 3/4 cup shredded mozzarella cheese
  • optional: chopped parsley for flavor

What you’ll need to do:

  1. Preheat the oven to 425 degrees.
  2. Dice the potatoes and toss them into a large bowl. Add the garlic, olive oil, salt and pepper on top and toss to coat the potatoes.
  3. Spray a large 13 x 9 baking dish with non-stick spray and spread the potatoes evenly in the dish.
  4. Bake for 15 minutes, then remove the baking dish from the oven.
  5. Place the diced up chicken in the dish, nestling them into the potato mixture. Bake for 20-25 minutes until the chicken is cooked and the potatoes are browned.
  6. Sprinkle the mozzarella cheese over the top, and bake for a few more minutes to melt the cheese completely.
  7. Add chopped parsley on top, if desired.

Rather than not knowing what to cook and scratching your head in wonder, try this dish out tonight! I swear it’s more delicious than you could possibly imagine.

Enjoy!

Food, Potatoes, Recipes, Tater Talk

Foil Packet Cheesy Potatoes

All I can say is YUM. I found these bad boys on Pinterest and have been craving them ever since. I didn’t realize one could crave something they had never tasted before, but alas. Crazier things have happened!

These cheesy potatoes (made in foil packets) can be baked in the oven or the grill. The best part is, there’s basically no clean up in the end! If you want to make it a meal, simply add hamburger, chicken, or sausage and you’re set.

Foil Packet Cheesy Potatoes

You’ll need:

  • 4 medium Russet or Idaho potatoes (make as many potatoes for as many people as you have) – this recipe is written according to 4 people
  • 4 tbsp salted butter
  • 4 tbsp extra virgin olive oil
  • 1/2 medium sweet onion, chopped
  • 1/4 cup shredded sharp cheddar cheese
  • 1/4 cup shredded mozzarella cheese
  • 1/4 tsp black pepper

How you prepare it:

  1. Prepare 12″ x 10″ aluminum foil sheets for however many people you’re cooking for. Peel and dice the potatoes, but keep each diced potato separate. Preheat the oven to 375 degrees if cooking this way.
  2. Place each diced potato on their own sheet. Add the onion, butter, olive oil, and pepper on top. Fold up the foil tightly, but leaving enough room for the steam to escape.
  3. Place on a large baking sheet and stick in the oven if cooking that way. Bake for 18 to 20 minutes. The potatoes are officially done when they are soft. Once the potatoes are done, sprinkle shredded cheese and stick them back in the oven to melt the cheese, if desired.
  4. If cooking on the grill, get the grill to medium heat. Place foil packets on the grill, and cook for 10 minutes. Flip and cook for 10 more minutes. If the potatoes are done, top with cheese and close to melt it.
  5. Enjoy!!

Whether you want a quick and easy side dish, or want to make it a full out dinner, this recipe is sure to make the perfect summer food on the grill! Throw in some cobs of corn and chicken and you have a meal fit for a king.

Food, Potatoes, Recipes, Tater Talk

The Most Genius Potato Idea Ever – Taco Potatoes

Just when I thought life couldn’t get any cooler, it did. One night, I was scrolling through Pinterest like usual. It was then that I stumbled upon this recipe, and I knew that all was right in the world. While I will admit that I have not personally made this recipe, I do intend to very soon (and then will update you on the results!).

This recipe happens to combine my two favorite loves: tacos and potatoes! What better way to honor them than to put them altogether in one?

Special shout out to life-in-the-lofthouse.com for this amazing creation!!


Taco Potatoes

You’ll need:

  • Russet potatoes – use your best judgement on however many you can eat
  • 1 pound of ground beef
  • 1 (1 oz.) packet of taco seasoning
  • Any other toppings you like on your tacos:
    • lettuce
    • cheese
    • salsa
    • guacamole
    • sour cream

How you make them:

  1. Bake the potatoes however you wish. Personally, I feel that it can be easier to cook them in a microwave by poking holes in them and selecting the potato button (real difficult, right?) However, the original creator suggests preheating the oven to 400 degrees, poking holes in them, and wrapping foil around them. Bake the potatoes for an hour and set them aside to cool down.
  2. In a large skillet, brown the separate the ground beef on medium heat. Add taco seasoning to the meat and any amount of water necessary (this is usually outlined on the packaging for you). Reduce heat and cook until the water soaks in.
  3. Remove the foil from the potatoes and cut a slit on the top to open them up (like you would to make a loaded baked potato). Fill each with meat and your favorite toppings to enjoy!

I am personally STOKED to try these bad boys out this weekend. Who knew life could be so amazing after all?

Food, Potatoes, Recipes, Tater Talk

Melted Potatoes – A Follow Up Post

Hi all!

In case you didn’t follow my long, video tutorial, or wanted a more concrete recipe on how to make melted potatoes, look no further! I’m here to save the day for you.

I learned plenty of things during this melted potato video that were not shown, so hopefully this will serve as a behind the scenes look as well! I definitely didn’t do everything according to plan, and hope to translate my tips and tricks to you.


Melted Potatoes

You’ll need:

  • 3 pounds of potatoes, peeled
  • 1 tablespoon of thyme
    • I personally used half just because it looked like a lot
  • 9 tablespoons salted butter, melted
    • The recipe recommends 6 but I felt that this wasn’t enough to cover all of the potatoes fully – I also accidentally added too much pepper and this was how I counteracted that
  • 1/2 teaspoon pepper
  • 1/2 cups chicken broth
  • 2 garlic cloves, crushed
    • I used approximately 2 teaspoons – use your best judgement

How you’ll make it:

  1. Preheat the oven to 500 degrees. This will take a while, so make sure you do it first. Then, chop off the ends of the potatoes and cut them into inch-thick discs. Mine ended up being about 1/2 inch, but I just cut down on cooking time towards the end.
  2. Toss the potatoes into a mixture of butter, thyme, and pepper. Arrange them in a single layer on a 13×9 baking pan. Avoid using a glass dish, it may shatter due to the high temperature.
  3. Roast the potatoes for about 15 minutes, until the edges start to brown. Remove the pan from the oven. Use tongs or a fork to loosen and flip the potatoes onto the other side. Pop the pan back in to roast the potatoes on the other side for about 15 minutes.
  4. Again, take the pan out, flip the potatoes again, but this time add the broth and garlic on top of the potatoes. I mixed these two together to get an even flavor, but its not necessary. After about 15 minutes (or shorter if your potatoes are thinner), remove the potatoes from the oven. Spread any remaining sauce on top of them, and enjoy!


Food, Potatoes, Recipes, Tater Talk

Deliciousness in a Bowl: Garlic Mashed Potatoes

I’ve come to this blog today to share with you an oldie but a goodie. I found this recipe and fell in love with it after making it, as you do when it comes to anything potato related.

Growing up, my family ate most meals with some sort of potato to accompany it. Meat and mashed potatoes were our go-to, along with french fries, hashbrowns, and red potatoes to go along with everything else. Every once in awhile, I would volunteer to help make dinner. One random night, this help came in the form of the most delicious mashed potatoes (found on Pinterest, weird).

As to be expected, half of my Pinterest board is potato recipes. What can I say? I love potatoes! (This has become incredibly apparent by the fact that I have an entire blog about spuds). I have no shame.

Anyway, I tried this recipe on for size and the rest is history. I bring this to you today thanks to my sister (Hi Coley) after she made them once again for dinner. My mom suggested I share this with you all (Hi mom), so you can personally thank her when these turn out to be as good as I say. Special thanks to deliciousasitlooks.com for coming up with this greatness.

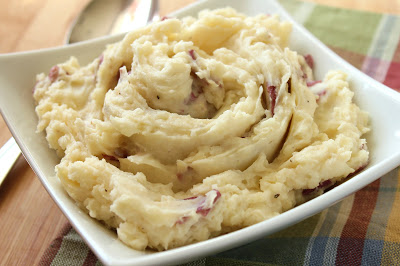
Garlic Mashed Potatoes (with the skins in them!)

You’ll need:

  • 1 1/2 pounds of red potatoes, quartered (about 8 red potatoes for those who don’t have a food scale in their house)
  • 1 teaspoon of garlic powder
  • 1/2 cup of sour cream (maybe a little less unless especially like the taste)
  • 1/2 cup grated Parmesan cheese
  • 1/4 cup of salted butter

What you’ll need to do:

  1. Place potatoes in a large pot with enough water to cover them. Bring the water to a boil, then reduce heat, cover and leave to cook for about 15-20 minutes.
  2. Meanwhile, place the garlic powder, sour cream, Parmesan cheese, and butter in a bowl, preferably in an electric mixer. If you do not have one, just mix and mash by hand.
  3. Once the potatoes are easily pierced (not piercing their ears but piercing with a fork), remove from heat and drain. Throw (gently) together with the other ingredients and mix on medium until smooth. Mash by hand until smooth if not using a mixer.

Voila! Potatoes with the skins sure to impress anyone – except potato haters maybe, but we don’t acknowledge those people here. Enjoy!


Food, Potatoes, Recipes, Tater Talk

Biscuit Chicken Pot Pie (With Potatoes!)

Helloooooooo fellow potato lovers! This past weekend, my family and I had a shindig at my place where we tried out a new recipe. The night consisted of us eating an entire box of

Girl Scout cookies and watching the cops chase one of my neighbors across the street. You know, the usual.

Anyways, there was one more amazing thing that came out of that night. You guessed it, there was a meal made with potatoes. This recipe, originally posted by sixsistersstuff.com, was revamped by my sister and my mom to include potatoes. They must really love me, after all. Without further adieu, I give you:

Biscuit Chicken Pot Pie (With Potatoes!)


You’ll need:

  • 1/2 cup of chopped carrots
  • 3 to 4 cups of diced potatoes
  • 4 tablespoons unsalted butter
  • 1/2 cup of all-purpose flour
  • 1 1/2 cups milk
  • 2 cups of chicken broth
  • 1 regular size can of cream of chicken soup
  • 2 cups (about 1 pound) of cooked, shredded chicken
  • 3/4 cup frozen peas, thawed
  • 1 refrigerated package of Pillsbury Grands Biscuits (8 biscuits)

How you make it:

Preheat your oven to precisely 400 degrees. In the meantime, cook the chicken and defrost the vegetables. We used frozen vegetables, but I suppose you could use unfrozen ones too. Use your discretion. Combine the cooked chicken and veggies and leave aside.

Add butter to a large pan, and when melted, mix in the flour and stir it for one minute on medium heat. Whisk in the milk, chicken broth, and cream of chicken soup. Let the sauce simmer enough to thicken, usually for about a minute. Transfer the veggies and chicken into the sauce and stir it in. (If your sauce seems too thick, add a dash more of chicken broth and milk.

Pour this filling into a 13 x 9 inch dish and bake for 18 minutes. Take the dish out of the oven and add the uncooked biscuits on top. Put the dish back in the oven and cook for 10 to 12 minutes, or until the biscuits are fully cooked. (We had a slight issue with a few biscuits being raw, so be sure to check them before taking them out of the oven completely). Let cool for five minutes and voila! A yummy dinner. (If you don’t want to let it cool, I understand. I get impatient when I’m hangry, too).


There you have it! A great alternative to chicken pot pie with the greatest food in the world, which are obviously potatoes. Enjoy!


Food, Recipes

Best Damn Potato Skillet

Hello fellow potato enthusiasts!

Have you ever just started throwing food things together in hopes that it works? Cause same.

One night I found myself staring aimlessly into the refrigerator (like always) and wondered what the heck I could make with the ingredients I had. If we’re being honest, I’m still not over the fact that I have to make all of my own meals every night.

Anyways, I had eggs, ham, potatoes, and cheese, among other things. In that moment, I figured I could be as creative of a chef as the best of them. It was like the show Chopped, except I wasn’t competing against anyone and I got to pick all my own ingredients.

Without further ado, I present to you the best damn potato skillet.

  • 1 package of Simply Potato diced potatoes
  • 4 eggs
  • A splash of milk
  • ~4 slices of lunch meat ham
  • ~1/2 cup of shredded cheddar cheese

Start by scrambling the 4 eggs with a splash of milk, put in a skillet, and cook normally. In a separate pot, cook the diced potatoes according to the package. Once each are done, combine the eggs with the potatoes. Rip apart the ham slices and toss into the pot. You can also use diced ham if this is more of your style. To finish it off, sprinkle the mixture with enough shredded cheese as you see fit (I use anywhere from 1/4 to a 1/2 cup).

While I admit that this isn’t the most complex recipe, it was a delicious one. Depending on your meat preferences, you can even add sausage or bacon. Enjoy!