
Today’s post will be fairly brief – for real this time. I know I say that fairly often, and end up writing a lot more than I expected, but for the sake of time, I’ve got to keep this one short.
Taking some inspiration from Alijah Peper’s blog post about holding glass cutting tools, I figured I’d talk about the importance of grip when it comes to drawing.
Consider this a bit of a filler post. Please check out my last two posts about my game development inspirations, and/or the game I’m currently developing, if you’d like something more detailed and carefully thought out.
Holding a Controller
This might seem like a bit of a non sequitur, but.. I think it’s easier to illustrate the importance of grip by discussing some methods for holding a controller, since there’s a few different grip styles that are relatively equal in terms of viability.
Pencil grips, on the other hand, are a bit less subjective, I’d argue. This also gives me an excuse to talk some more about video games.
I’ll be using an Xbox One controller for these examples, but the grip styles highlighted here can be used across just about any standardized gamepad – whether it’s a DualShock, GameCube controller, or some other comparable gamepad.
Note that across all of these grip styles, only the position of the right hand changes significantly.
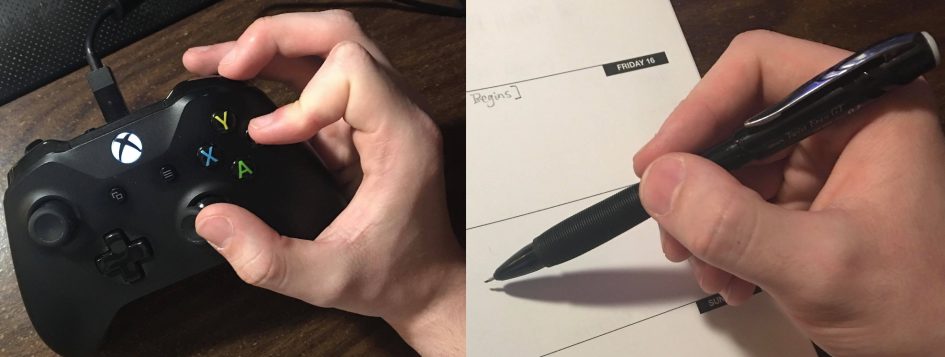
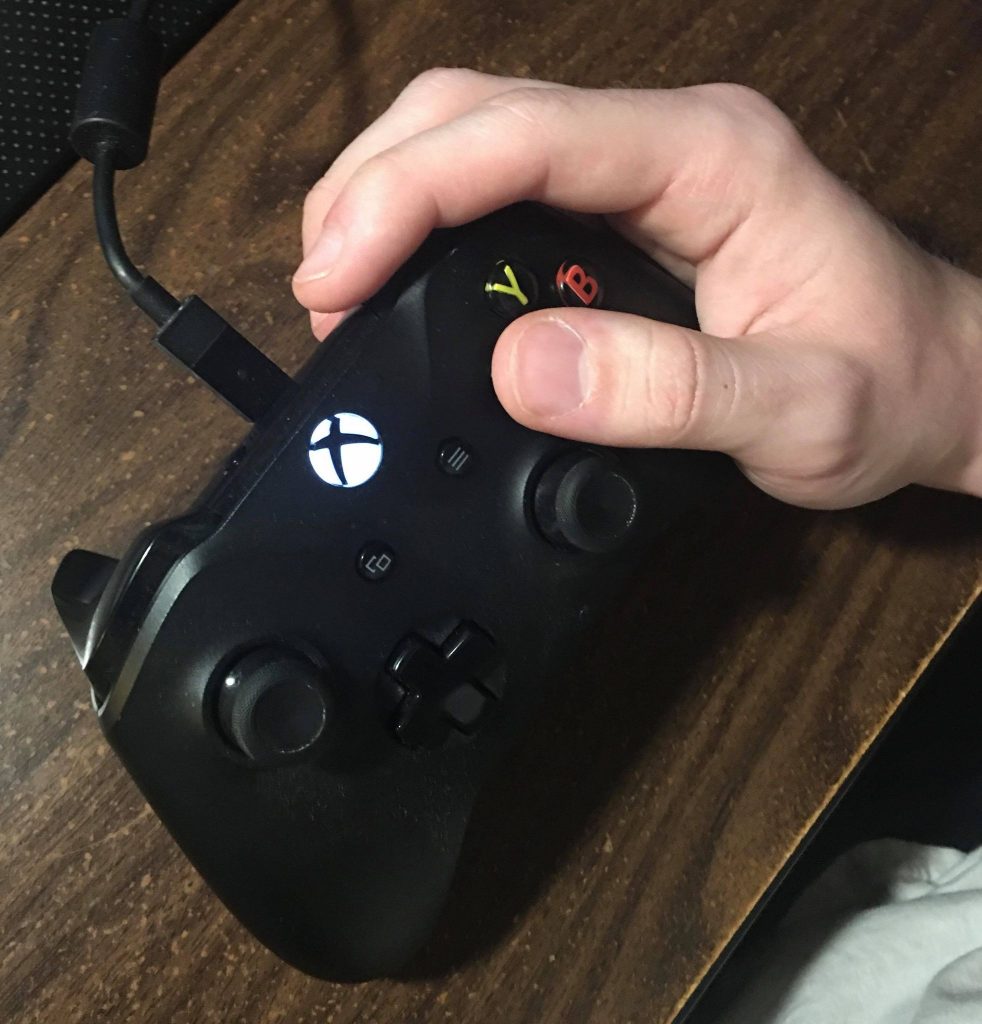
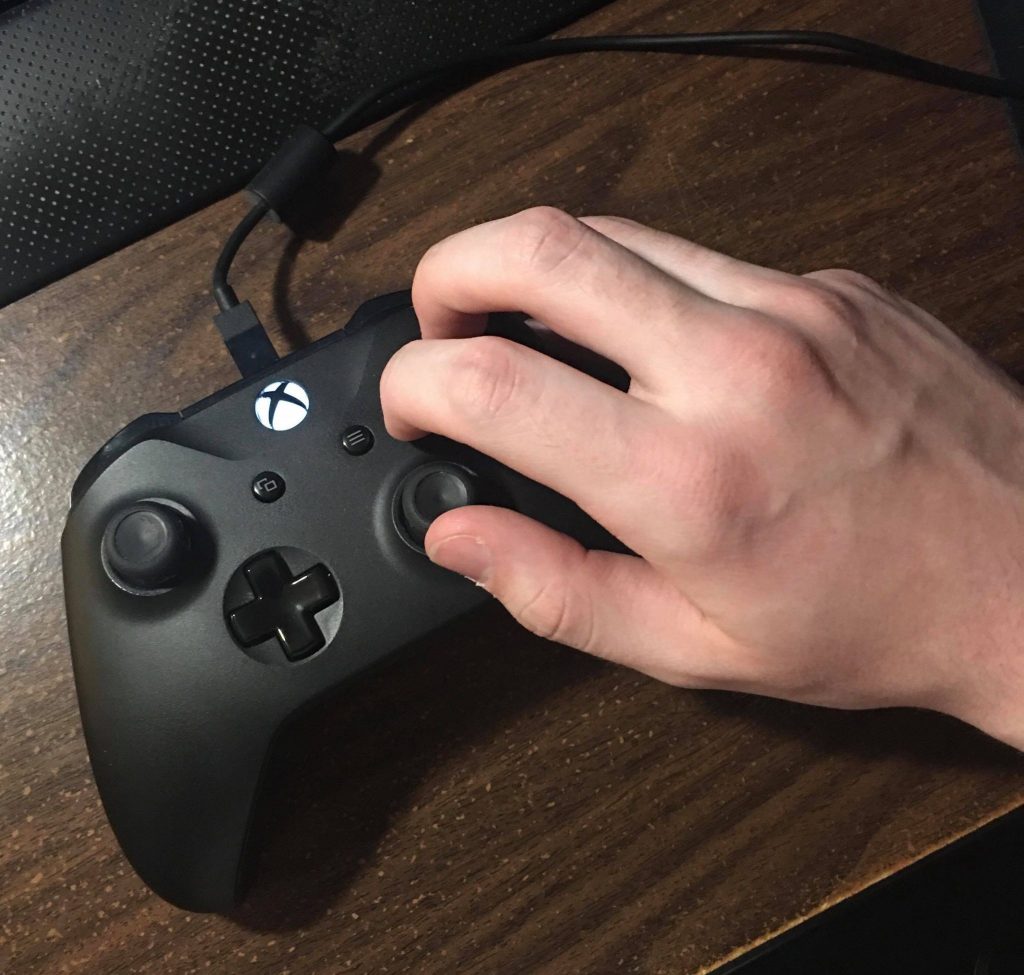
Standard Grip
This is definitely the most common, and most natural grip style. I’d wager that most people, whether they’re familiar with video games or not, would likely default to holding a controller like this.
the most familiar, comfortable grip style.
This method for holding a controller is universally solid, and is almost always practical. Unless you play a lot of (obscure or extremely challenging) video games, this is probably the only grip style you’ll ever use.
Standard Grip is especially comfortable for FPS games, because of the way this layout emphasizes control over the trigger buttons, along with a neutral focus on the face buttons and right control stick.
This is an extremely balanced grip style that is useful for just about every game in existence.
That said, there is one flaw with this grip style.
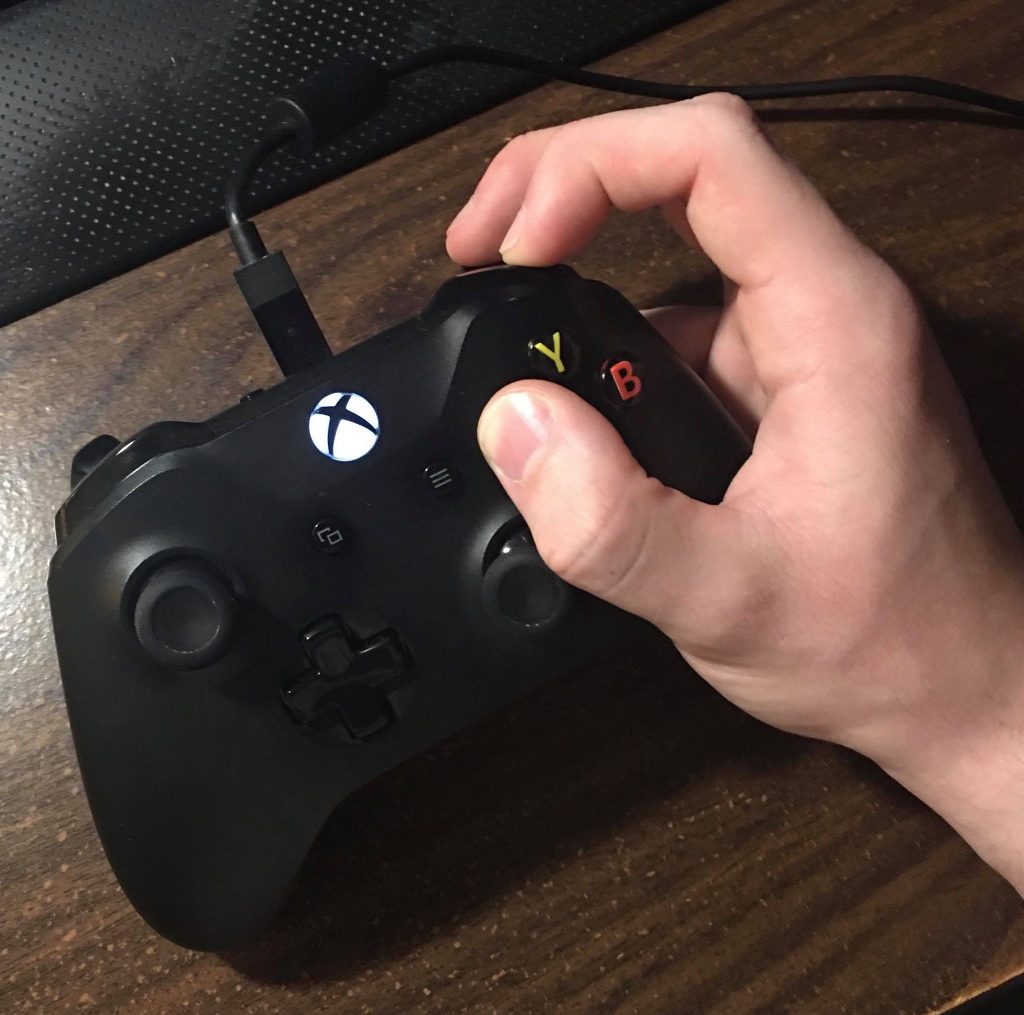
in this example, I’m able to move the right control stick while pressing the X button, but it’s rather imprecise, and I can only point it to the left.
As you can see, it’s practically impossible to move the right control stick while pressing any one of the face buttons.
This brings us to the next grip style…
Claw Grip
Claw Grip is probably the second most common style of controller grip, and my personal favorite.
This grip style takes some control away from the trigger buttons, while giving players full, simultaneous control over the right control stick, and face buttons.
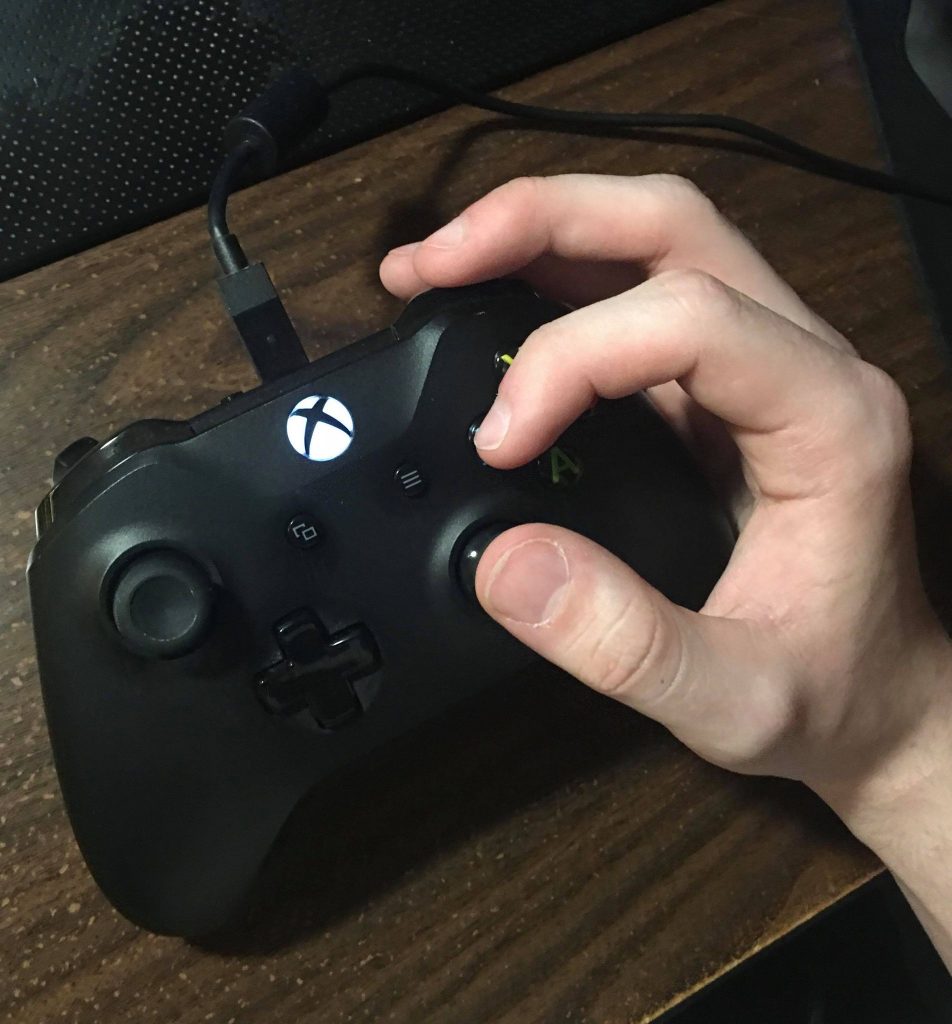
although initially uncomfortable, claw grip has become my preferred grip style for most games, thanks to its higher degree of control.
This makes Claw Grip an extremely practical grip style for third-person action games, like Dark Souls, or Monster Hunter World, where Claw Grip allows players to perform actions related to the face buttons (like dodging, running, or attacking), without sacrificing control over the game’s camera.
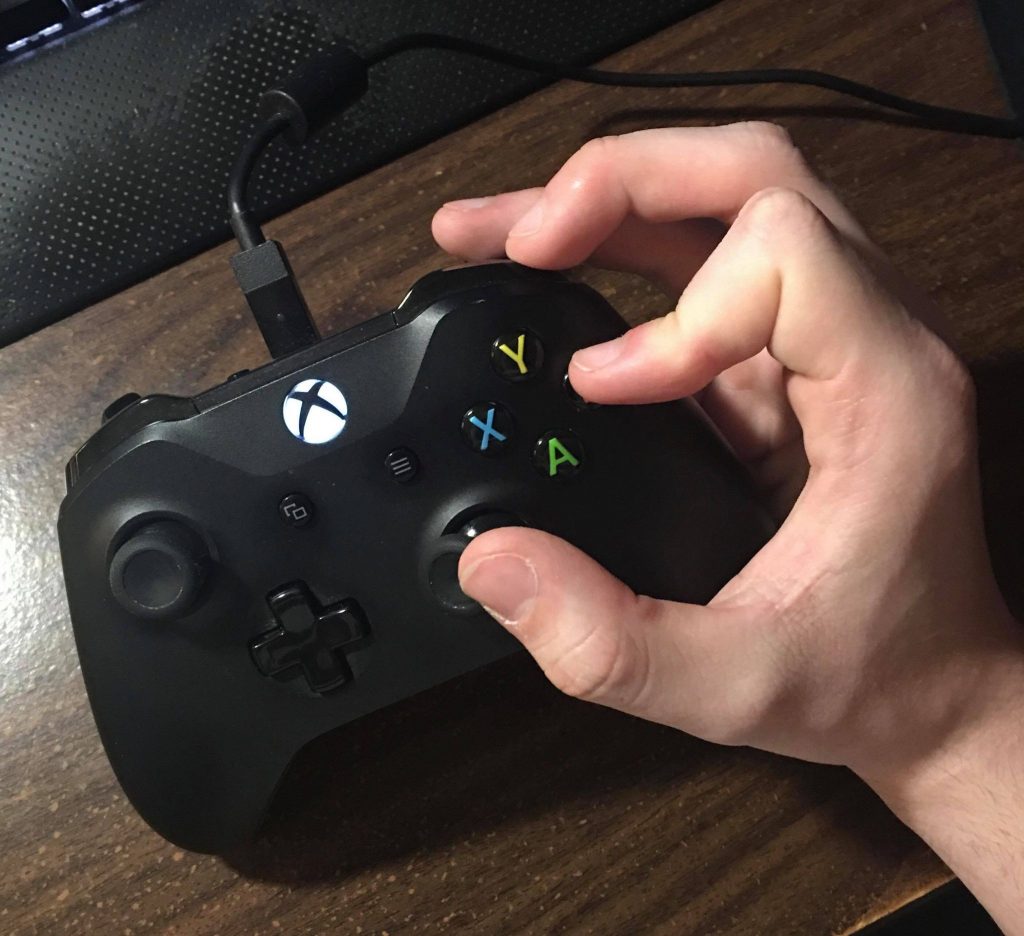
in this example, I’m able to comfortably move the right control stick in any direction, while pressing any of the face buttons (in this case, the B button).
In these cases, having full control over the game’s ‘free cam‘ is often the difference between life and death.
Arcade Grip
There might be a more proper name for this grip style – this is just the one I’ve made up for it, named for its visual similarities to playing games on an arcade cabinet.
This grip style takes away practically all control from the trigger buttons, and instead places emphasis entirely on the right control stick, and face buttons.
usually, I’d have the controller resting on my leg.
for the sake of this example, I’m resting it on my desk.
This is a grip style I’ve only ever utilized for a little known PS2 title called God Hand, which is, simply put, the most violently difficult action game I have ever played – it’s practically a one-way ticket to carpal tunnel.
note: NOT ME PLAYING
In God Hand, pressing the trigger buttons is almost entirely unnecessary – they’re only really useful for turning around 180 degrees (which is situational), activating roulettes (which is situational), and activating the God Hand (which is also situational).
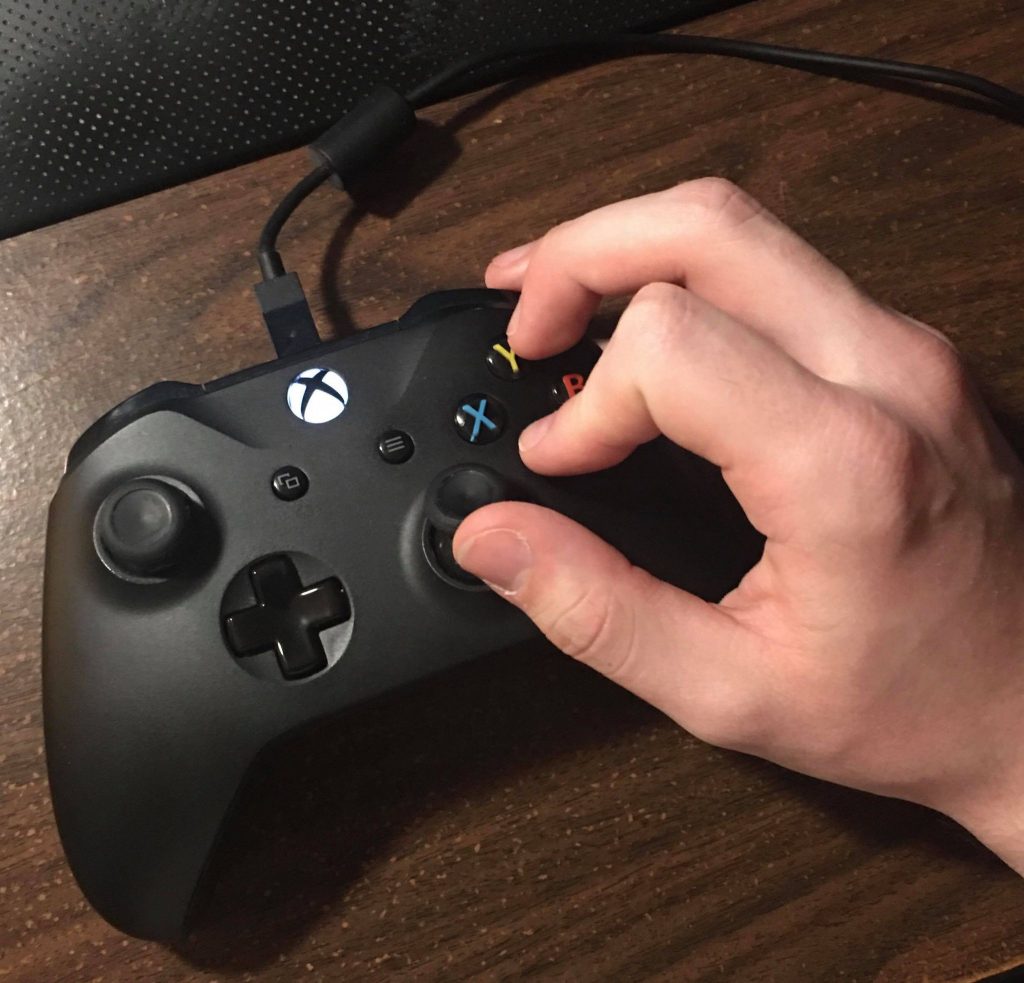
the nature of this grip style gives the player a massive degree of control over the right control stick, which makes it easy to flick reflexively.
Instead, gameplay revolves around fast paced, close-quarters boxing and MMA style combat, with a heavy emphasis on attacking via the face buttons, and dodging via the right control stick. Having instantaneous and precise control over the right control stick is a necessity while playing God Hand, which is why I gravitate towards this grip style whenever I play it.
Holding a Pencil
With all that said, we finally get to the primary focus of this blog post: how should you hold a pencil – or any drawing tool, for that matter?
Well, much like controller grip styles, the way you hold a drawing tool is largely situational, and dependent on your intentions, and personal comfort.
In truth, you should hold a pencil in whatever way is most comfortable for you.
That said, there is some merit in adjusting your grip style outside of your immediate comfort zone. The method for holding one’s pencil that I’ll be highlighting here is one that I’ve learned from James Douglas, and Kim Jung Gi.
Middle Grip
Kim Jung Gi explains how he grips his pen(s), and why.
When drawing, it’s generally best to grip your pencil near the middle, rather than pinching near the tip.
The main benefit of this grip style is that it encourages drawing with your elbow, rather than drawing with your wrist.
This might sound a bit strange, but you can essentially think about it as using your entire arm to draw, rather than just your hand.
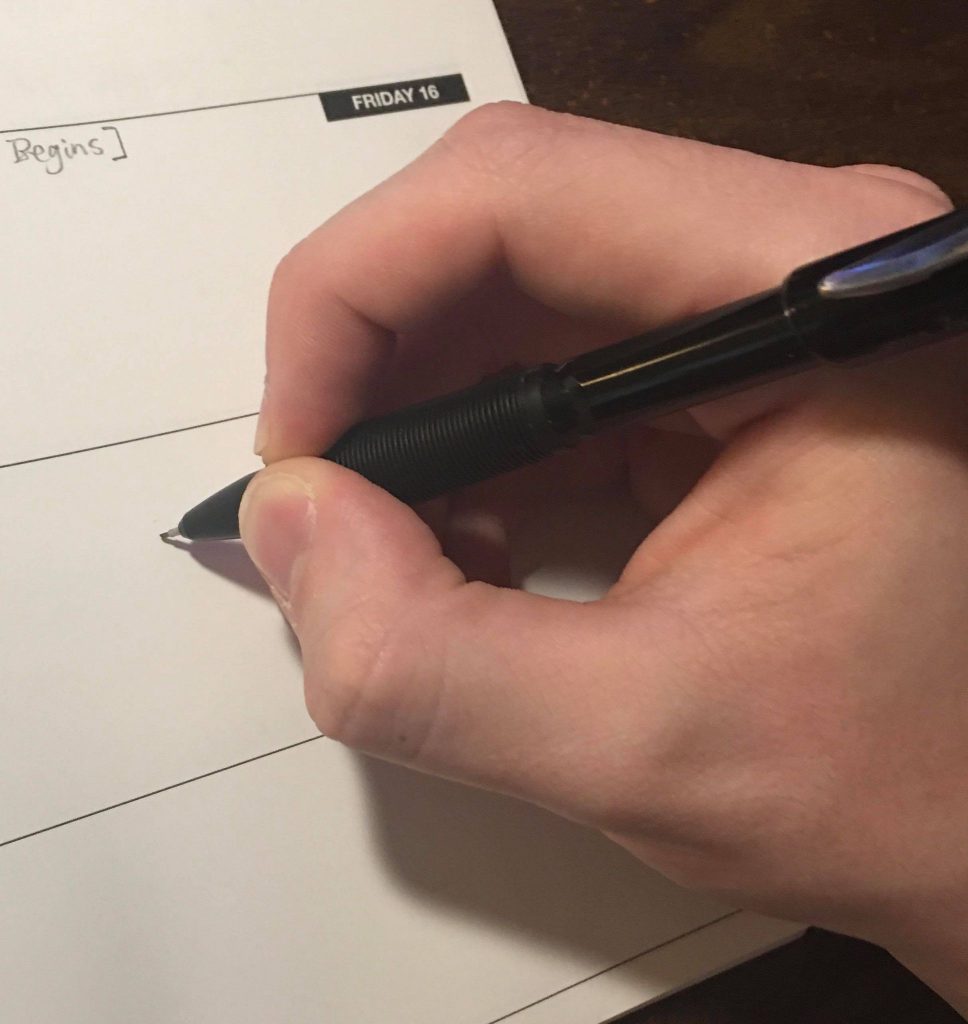
I draw like this a lot, but this grip increases tension in the hand and wrist, and is generally a bad way to draw.
In addition to reducing strain on your wrist and hand during extended drawing sessions, drawing with your elbow grants you more control, and makes it far easier to draw confident, straight lines.
This is (probably) because your arm has a wider range of motion than your wrist.

using a ‘middle grip,’ on the other hand, reduces tension and increases control.
If you’d like to try this for yourself, try drawing a straight line across a page while holding your pencil near the tip.
Then, try drawing another straight line, but this time focus on moving your entire arm to draw said line, rather than just your wrist.
Odds are, the second line will be straighter, and might look more confident.
Now, in some cases, it may be better to hold near the tip, since doing so allows for greater precision with fine details. I find that while writing, it’s often easier to hold my pencil near the tip, since writing generally requires more precision.
That said, with enough practice, I think you can achieve a similar level of control through a ‘middle grip.’
Conclusion
I hope this post illustrated the importance of grip, and how different grip styles can influence control over your tools – drawing, gaming, or otherwise.
My posts for the next couple weeks will likely be slightly lower in quantity and quality of content, since I’m pretty busy at the moment with other obligations.
And as always, thanks for reading.
Sources
- Kazone Art. (2020b, August 7). Kim Jung Gi – What Kind of Pen Do You Use? [Video]. YouTube. https://youtu.be/30_IDH1TzFs
- miek kobe. (2015, December 29). VST7 – Freestyle GOD HAND 超超セクシーな群衆制御~!! [Video]. YouTube. https://www.youtube.com/watch?v=Gp3m4etUeEk&feature=youtu.be
Disclaimer
All information in these posts is my own words, unless explicitly stated otherwise. None of this information is quoted, nor paraphrased, unless explicitly stated otherwise. Any similarities between my own words, and the informative sources/hyperlinks provided is purely coincidental, unless explicitly stated otherwise.
In any case where I am using someone else’s words (or imagery), the source will be cited internally, with a link to that source provided either within the internal citation, at the end of the post under “Sources,” or both.
April 12, 2021 at 1:18 pm
I had no idea people held xbox controllers any other way than the first standard one!! I knew you could change button layout in settings to assign different actions to different buttons on the controller but I never even though to hold the controller physically in a different way. Very interesting!
April 12, 2021 at 11:02 pm
I’d definitely suggest giving claw grip a try if you like playing action games, it makes things way easier.
There’s a few examples in Dark Souls 3 where bosses are so large that the lock-on camera ends up being a hinderance, and having that extra bit of control over the free-cam makes those fights significantly less frustrating.
February 7, 2026 at 5:38 pm
Wonderful post! For more information on this topic, you might also check out AI Dance
February 8, 2026 at 2:16 am
Great insights! I’ve written about my experience with this at Nano Banana Pro
April 12, 2021 at 5:43 pm
I was suppressed to see my blog mentioned in this post! I’m always grateful to hear when people are checking it out. As an artist who works a lot with pencils, I can say from experience that it’s important to break the habit of drawing exclusively with your wrist. Great post as always!
April 12, 2021 at 11:22 pm
I’ve really you to thank for this blog topic – it’s an important, but oft overlooked topic, when it comes to drawing (or other artistic disciplines, for that matter). Glad you enjoyed it.
April 13, 2021 at 1:40 am
That is very interesting. I would not have considered there were different ways to hold a controller.
April 13, 2021 at 7:08 pm
Controllers are pretty flexible. Once I learned about claw grip, it was pretty hard for me to go back. Definitely my preferred grip style for most of the games I play.
April 13, 2021 at 4:22 am
As someone who likes to play console games, I like how you demonstrated the importance of grip with a controller. I also learned a few new ways to hold a controller. When I was reading the section about grip on a pencil, it made me reflect on my past self. When first really getting into art I would hold my pencil more at the tip than in the middle and I agree that it restricts your movements when you draw. When reading I also made a connection to painting (since I am currently taking a painting class). When you want to paint basic forms, it’s best to hold your paintbrush more in the middle so you can get a full range of motion, and then when adding fine detail you will commonly hold the brush more by the bristles.
April 13, 2021 at 7:09 pm
Yep, it’s definitely a situational choice. Generally speaking, it’s better to grip near the middle, but for fine details, it may be necessary to use a more restrictive range of motion. I think that sort of thing is especially important for painting, since you can’t fix mistakes as easily.
April 13, 2021 at 7:51 pm
Love the mashup of gaming and drawing with this post! I have heard of the claw grip before, and I may have to try it when I get around to Dark Souls 3. Maybe I could try it with other action games too. Also, I remember my old high school art teacher telling me how to correctly grip my pencil. It was cool to revisit that concept with this post.
April 13, 2021 at 8:35 pm
I’d definitely recommend giving claw grip a try. Having full, simultaneous control over the camera and face buttons is insanely useful. Bosses that were an absolute nightmare for my friends ended up being much easier for me, almost exclusively due to my use of a claw grip.
It’s probably even more useful in Monster Hunter. I find myself using claw grip only occasionally when playing the Soulsborne series, but when playing MH, claw grip is my default grip at all times. I can’t imagine playing that game with a standard grip.
December 11, 2023 at 1:20 am
Great insights on the importance of grip in both gaming and drawing. The comparison between controller grip styles and pencil holding methods adds a unique perspective. The emphasis on using the entire arm for drawing control is particularly helpful. Looking forward to more content, even if slightly reduced, and thanks for sharing your knowledge!
December 11, 2023 at 1:21 am
Great insights on the importance of grip in both gaming and drawing. The comparison between controller grip styles and pencil holding methods adds a unique perspective. The emphasis on using the entire arm for drawing control is particularly helpful. Looking forward to more content, even if slightly reduced, and thanks for sharing your knowledge!
https://theamazingdigitalcircusjax.com/
April 28, 2024 at 10:58 am
The website Just wanna for the valuable insights you provide. https://www.willyousurvive.com/
January 13, 2025 at 2:14 am
Geometry Dash Lite introduces a variety of in-game challenges and missions designed to test players’ reflexes and precision.
February 4, 2025 at 8:09 pm
Monkey Mart is an exciting supermarket management game where you stock products, serve customers, earn coins, hire assistants, and expand your store.
February 5, 2025 at 4:02 am
In That’s Not My Neighbor every little detail can be the key to uncovering the truth. Cunning doppelgängers are trying to outwit you, but one mistake can have dire consequences! With haunting pixel art and tense gameplay, this game will keep you glued to the screen. Can you survive the night? Try it now!
February 8, 2025 at 10:02 am
Snake Game is a fun classic game. Control the snake, eat food to grow, and avoid hitting the walls or yourself. Simple but very addictive.
February 8, 2025 at 2:57 pm
drifthunters is a fun car racing game where you drift, upgrade cars, and master tracks for high scores. Enjoy cool stunts and challenges!
February 28, 2025 at 4:04 pm
Thanks for sharing this valuable information. It’s very appreciated.
March 13, 2025 at 9:28 am
slope is a challenging and addictive ball rolling game that attracts players thanks to its simple but difficult to master gameplay: players just need to control the ball to move left or right to avoid obstacles.
March 23, 2025 at 12:19 pm
This is an extremely balanced the pizza edition grip style
March 26, 2025 at 11:02 am
Just like in drawing, a good grip matters in poki too better control means better results. Helpful post!
April 1, 2025 at 9:36 am
One of the most appealing aspects of Sprunki is its versatility and range of features, designed to cater to the needs of both players and creators.
April 2, 2025 at 5:52 am
If you like music beats, then you must not miss sprunki phase,spark your creativity and enjoy.
April 2, 2025 at 5:53 am
Thanks for sharing! It’s interesting to see how this applies to curve rush.
April 8, 2025 at 7:29 am
There might be a more proper name for this grip style Unblocked Games 66 EZ
April 13, 2025 at 11:51 am
Okay, this is actually pretty cool! I never really thought about different controller grips so much. The claw grip sounds intense but effective! Might have block game.
April 16, 2025 at 1:16 am
Activate the Curve Rush jump button while the ball is airborne to do acrobatic maneuvers. Monitor the timing of your leaps to get maximum height.
April 19, 2025 at 2:48 am
Tubidy Mp3 allows small-town artists to reach national and even international audiences when their music becomes available for download on the platform.
April 21, 2025 at 10:39 am
Kepala Bergetar and Dfm2u is a Malaysian online streaming platform that
offers a variety of local TV dramas movies.Malaysian online streaming services
Kepala Bergetar and DFM2U offera variety of regional TV series, films and other
entertainment items.
April 23, 2025 at 8:23 am
Nice and Fully True Content!
April 28, 2025 at 7:03 pm
This is very important to know how to grip controller and it’s also necessary in head soccer game. if you know how to hold so it’s hard
April 29, 2025 at 8:46 am
This is a really interesting breakdown of grip styles! I never thought about the parallels between holding a controller and a pencil so explicitly. It’s true that finding the right grip can make a huge difference in comfort and control. Some of those advanced gaming grips look like what crazy cattle 3d might come up with, but if it works, it works! I’ll definitely experiment with the middle grip for drawing.
April 29, 2025 at 10:42 am
Sounds good, looking forward to the brief post. Always interested in proper tool – holding for drawing. Hope it’s useful and easy to follow.
May 3, 2025 at 4:58 am
Interesting and practical post — I love how you make the connection between pen grip and game controller grip to emphasize the importance of “holding the right tool” when creating, whether it’s drawing or gaming. Retro Bowl
May 10, 2025 at 7:08 am
Outstanding service! Pest Exterminators Kent went above and beyond to solve our bug issue. Great advice, fast results, and very affordable. Would definitely use them again. Kent pest control
May 12, 2025 at 6:10 am
One Thing that i tell you!
May 12, 2025 at 6:28 pm
Absolutely—holding your tools properly is more than just a safety tip; it’s essential to getting consistent, high-quality results and preventing injury over time. Whether it’s a hammer, brush, or a digital tool like a streaming app, the way you handle it matters. Speaking of tools, if you’re looking for a hassle-free way to stream content securely and without annoying restrictions, consider checking out the xnxubd vpn browser pc– it’s a free streaming app that combines browsing and VPN protection in one, giving you the freedom to enjoy your media safely. Just like with any tool, using it right makes all the difference. Have you tried it yet?
May 12, 2025 at 10:14 pm
Thanks For sharing this Superb article.I use this Article to show my assignment in college.it is useful For me Great Work. live draw cambodia
May 20, 2025 at 11:50 am
i read a lot of stuff and i found that the way of writing to clearifing that exactly want to say was very good so i am impressed and ilike to come again in future.. alexistogel
May 20, 2025 at 6:08 pm
Mastering how to draw holding your tools properly is essential for every artist. By selecting the right tools, gripping them correctly, positioning your hand, using your whole arm, and maintaining a relaxed posture. Practice these techniques regularly, and you will notice a marked improvement in your work. Happy drawing!
May 22, 2025 at 6:23 am
Your website is really cool and this is a great inspiring article. Thank you so much. alexistogel
May 26, 2025 at 10:34 am
Thanks For sharing this Superb article.I use this Article to show my assignment in college.it is useful For me Great Work. togel
May 27, 2025 at 9:43 am
Experience the true South African stride with MyVellies.co.za. Our commitment to quality means every pair of vellies is made to the highest standards, offering unmatched comfort and longevity. Vellies
May 27, 2025 at 9:43 am
Transform your online visibility into local foot traffic. Local SEO Agency.co.za delivers impactful local SEO solutions for South African businesses. Outrank your local competitors and capture your market share. LSA SEO Agency
May 30, 2025 at 8:03 am
A short post on drawing tool – holding sounds great. I’m always looking for ways to improve my drawing grip, so can’t wait to read more.
June 1, 2025 at 11:41 am
Looking for low-maintenance decking in Canberra? Decking Canberra specializes in premium composite decking. Perfect for busy homeowners, it offers exceptional longevity and a beautiful finish without the need for painting or staining. composite decking
June 1, 2025 at 7:02 pm
i love reading this article so beautiful!!great job! Bandar Togel Terbaik
June 2, 2025 at 2:27 pm
Grow the best, with the best! Get Seeds Right Here provides top-tier cannabis seeds, ensuring genetic purity and outstanding performance. Start your cultivation journey on the right foot with us. clones for sale
June 3, 2025 at 5:45 pm
From speeding to stop sign violations, TrafficLawyersBronx.com is your trusted partner in the Bronx. We provide clear, honest advice and relentless representation to protect your rights and driving record. Reach out for a free evaluation. Speeding and Traffic Violation Experts – Bronx
June 6, 2025 at 12:33 am
Great post I would like to thank you for the efforts you have made in writing this interesting and knowledgeable article. agen togel
June 9, 2025 at 1:18 pm
Ah, the art of gripping—whether it’s a controller or a pencil, there’s definitely a science (or madness) to it! I mean, who knew my gaming skills could improve by holding a pencil like I’m trying to defeat a boss? Check out this tool that helps with descriptions—maybe it’ll help articulate my newfound grip wisdom? image description generator
June 13, 2025 at 6:49 am
incredibox creators are doing some of the most creative fan work I’ve seen in any game genre.
June 15, 2025 at 1:18 am
It’s fascinating how grip affects both precision and comfort—especially when switching between mediums like controllers and pencils. Tools like AI Cartoon Generator make that transition into digital art even more fun to explore.
June 15, 2025 at 1:19 am
Reading this reminded me how even small choices like grip can shape the way we express character—something I often notice when using Character Headcanon Generator to develop unique personas.
June 15, 2025 at 1:19 am
Great breakdown of the physical side of creativity—whether it’s drawing or gaming, being mindful of technique really pays off. I’ve been exploring this concept visually using AI Describe Image, which turns images into rich, nuanced descriptions.
June 18, 2025 at 8:46 am
https://www.playcolorblockjam.org is the ultimate resource for Color Block Jam enthusiasts.
We provide comprehensive video guides for all 1669 levels, helping players easily overcome every challenge. Whether you’re a beginner or an experienced player, you’ll find detailed step-by-step instructions here.
Website Features:
Complete Video Walkthroughs: High-quality video demonstrations covering all 1669 levels
Categorized Browsing: Levels organized by difficulty and type for easy navigation
Quick Search: Enter any level number for immediate, targeted assistance
Mobile-Friendly: Access guides on your phone or tablet anytime, anywhere
No more getting stuck on challenging levels – PlayColorBlockJam.org makes your gaming journey smoother and more enjoyable!
Download the game, follow our video guides, and become a Color Block Jam master!
June 26, 2025 at 6:29 am
MenuLand is a comprehensive online platform designed to bring the latest and most detailed restaurant menus right to your fingertips. Whether you’re looking for dining options, pricing information, or popular dishes, MenuLand makes it easy to explore a wide variety of cuisines and eateries all in one place. Perfect for food lovers and casual diners alike, MenuLand helps you discover new favorites and plan your meals with confidence.
Menuland
June 26, 2025 at 7:33 am
Null’s Brawl is a private server version of the popular mobile game Brawl Stars, offering players unlimited resources, access to all brawlers, and exclusive custom content not available in the official version. Designed for fans who want to explore the game without restrictions, Null’s Brawl lets you unlock skins, test new features, and enjoy faster progression. It’s a playground for experimenting and having fun without the competitive pressure of the original game servers.
Nulls Brawl
June 26, 2025 at 7:45 am
Bagas31 is a widely visited Indonesian website known for offering a broad range of downloadable software, games, and utilities—frequently including pre-activated or cracked versions. With simplified installation guides and a vast library spanning from productivity tools like Microsoft Office and IDM to multimedia applications, the site is popular among users seeking cost-free access to premium software. However, it’s crucial to be aware that downloading from unofficial sources like Bagas31 can pose legal concerns and security risks, such as malware infections or lack of updates. For a safe and reliable experience, using legitimate versions from official vendors with proper licensing is recommended.
Bagas31
June 26, 2025 at 9:35 am
I was impressed by how quickly Pest Exterminators Cambridge could attend to our emergency pest situation. Their rapid response time is crucial when you need immediate assistance. Fast, reliable, and truly effective. find out more here
July 6, 2025 at 9:09 pm
Beautifully written. Kim Jung Gi’s work is endlessly inspiring and, at times, humbling, but breaking down his process here really does help make the impossible feel just a bit more within reach.
July 7, 2025 at 8:26 am
This is very educational content and written well for a change. It’s nice to see that some people still understand how to write a quality post! Tentoto
July 8, 2025 at 1:00 pm
Wow, I never really thought about how much grip matters in drawing or gaming! I used to write with my wrist locked, but switching to a grip closer to the middle really helped me with control. Anyone else had a similar experience? Also, if you’re into making lists for your favorite games or tools, check out this handy tier list maker I stumbled upon: Tier List Maker
July 11, 2025 at 2:20 am
Take our magical Harry Potter Quiz to test your knowledge of Hogwarts, spells, characters and the wizarding world.
July 11, 2025 at 2:27 am
Take our Harry Potter Wand Quiz to discover which wand would choose you! Learn about wand woods, cores, and magical properties from the Wizarding World.
July 11, 2025 at 2:28 am
Deepsite – Free Online Website Creator AI, No Coding Required
July 13, 2025 at 1:40 pm
This is such a cool breakdown of grip styles! It reminds me of when I first tried the claw grip—totally felt like a gaming ninja. Anyone else have funny experiences switching grips? Oh, and if you’re looking to read more about optimizing your drawing too, check out this helpful resource: TTS Omni.
July 15, 2025 at 7:08 am
Welcome for this useful information, I have bookmarked and written some things down. I will be checking back, from time to time too.
July 18, 2025 at 9:06 am
Great post on the importance of grip in both art and gaming! It’s fascinating how small adjustments can make a big difference. Speaking of creativity, have you tried the AI Anime Generator? It’s a game-changer for artists and gamers alike, turning ideas into stunning anime characters in seconds. Perfect for when you need quick inspiration!
July 22, 2025 at 9:20 am
This is pretty cool! Never really thought about how much grip matters, whether it’s drawing or gaming. Makes sense though! Kinda reminds me of that Harry Potter House Quiz to discover your Hogwarts house, gotta find the right grip to get sorted into Gryffindor!
July 22, 2025 at 9:21 am
This is a fun take on grips! Reminds me of how different people hold controllers differently. I wonder if there’s a quiz to figure out the best grip for me, kind of like Discover your mental age with our free fun quiz! This makes me think about how ergonomics play a role in both gaming and drawing.
July 22, 2025 at 9:22 am
This is actually pretty interesting! Never thought about how different controller grips could affect gameplay so much. Makes me wonder if my pencil grip is holding me back, haha. I wish there was a free AI generator to automatically improve my drawing skills.
July 22, 2025 at 9:25 am
This is actually pretty interesting! Never thought about controller grips impacting art, but it makes sense. I’m so used to my claw grip for gaming. Wish there was a Labubu live wallpaper that showed all these grips! Download premium Labubu live wallpaper collection featuring stunning animated Labubu live wallpaper designs for free. High-quality Labubu live wallpaper for all devices with smooth animations.
July 22, 2025 at 4:05 pm
Thanks for sharing the info, keep up the good work going…. I really enjoyed exploring your site. good resource… Tentoto
July 22, 2025 at 5:53 pm
I truly appreciate the effort and dedication you put into writing and sharing knowledge here. The topics you cover are very relevant to today’s needs, especially in the digital era. I’d also like to recommend bakar77 for those who want to learn more about tech and information. Keep inspiring others!
July 24, 2025 at 2:21 am
Cookingdom All Level Walkthroughs Guide
July 25, 2025 at 6:22 pm
This is very educational content and written well for a change. It’s nice to see that some people still understand how to write a quality post! Tentoto
July 28, 2025 at 9:22 am
Please share more like that. Neuro energizer
July 28, 2025 at 8:58 pm
Thanks for the post and great tips..even I also think that hard work is the most important aspect of getting success.. Temtoto
July 31, 2025 at 8:43 am
i read a lot of stuff and i found that the way of writing to clearifing that exactly want to say was very good so i am impressed and ilike to come again in future.. Tentoto
August 1, 2025 at 10:39 am
Thanks for the post and great tips..even I also think that hard work is the most important aspect of getting success.. Tentoto
August 5, 2025 at 11:04 am
The website style is perfect, I’ll support your blog
August 7, 2025 at 3:51 am
Great article, it is really informative and creative, it helps us to post new updates. It is really valuable. Thanks a lot. If you have more time, please visit: dordle game for relaxation
August 7, 2025 at 8:36 am
Your website is really cool and this is a great inspiring article. Thank you so much. Tentoto
August 7, 2025 at 3:41 pm
Love to read it,Waiting For More new Update and I Already Read your Recent Post its Great Thanks. Tentoto
August 8, 2025 at 6:41 pm
Thank you for taking the time to publish this information very useful! Tentoto
August 10, 2025 at 9:00 am
This is very educational content and written well for a change. It’s nice to see that some people still understand how to write a quality post! Tentoto
August 10, 2025 at 10:53 pm
Thanks for the post and great tips..even I also think that hard work is the most important aspect of getting success.. Tentoto
August 11, 2025 at 1:28 am
Thank you for sharing. Missed today’s New York Times Connections game? Or want to challenge yourself with a classic puzzle? Our Connections Archive online tool is your go-to resource for daily puzzles and their complete solutions, dating back to the first Connections game.
August 12, 2025 at 3:11 am
Kontext Dev helps you create high-quality images with AI local editing. Enjoy your free trial and easily refine details without starting from scratch.
August 12, 2025 at 7:02 am
Experience Flux Krea, the powerful open-source AI tool that turns your text into stunning, photorealistic images.
August 12, 2025 at 7:46 am
HEIC to JPG is the easiest way to convert high-efficiency HEIC files into universally compatible JPG images. Use it for fast, secure, and high-quality conversion online.
August 12, 2025 at 7:48 pm
Thanks for the post and great tips..even I also think that hard work is the most important aspect of getting success.. Tentoto
August 12, 2025 at 8:13 pm
Thanks for this information from slot88 bagus
August 17, 2025 at 3:42 pm
i read a lot of stuff and i found that the way of writing to clearifing that exactly want to say was very good so i am impressed and ilike to come again in future.. Tentoto
August 20, 2025 at 3:13 am
Interesting take on controller grips! I never really thought about it so deeply. It’s cool how different grips can impact your gameplay. Kinda makes me wonder if proper pencil grip is as crucial as this, like Google’s nano banana model for image generation!
August 20, 2025 at 7:31 am
Great post on grip techniques! It reminds me how tools shape creativity. For digital art, I love using an AI Cartoon Generator to quickly turn photos into fun cartoons without needing to hold anything.
August 20, 2025 at 9:15 am
This blog post about different controller grips and relating it to drawing is pretty interesting! Kinda reminds me of needing the perfect setup. Wish something like qwen image edit existed for real life art so editing was just as easy, haha!
August 21, 2025 at 7:05 am
Brat Generator lets you create brat-style images online with the iconic green background and brat font.
August 21, 2025 at 10:05 am
Love to read it,Waiting For More new Update and I Already Read your Recent Post its Great Thanks. Tentoto Login
August 23, 2025 at 7:44 am
very interesting keep posting. Tentoto Login
August 29, 2025 at 7:33 am
Technology has revolutionized the way we gannelectricks live, work, and communicate.
August 30, 2025 at 10:27 am
thank you for a great post. keluaran togel cambodia
August 31, 2025 at 2:09 pm
Thanks for the step-by-step guide. personality complex test has complementary materials that readers might find useful.
September 7, 2025 at 10:57 am
Thanks for sharing the info, keep up the good work going…. I really enjoyed exploring your site. good resource… tentoto daftar
September 8, 2025 at 7:05 am
Been messing around on sprunki all night, can’t believe how fun it is to mix beats.
September 8, 2025 at 2:41 pm
Thanks for the honest review. I’ve been using HepatoBurn lately — found it through their official site. So far, results seem promising. hepatoburn official
September 8, 2025 at 9:41 pm
When learning to draw, grip and control play a crucial role in how effectively you use your tools. Similarly, people exploring digital art often look for inspiration and resources, such as when they want to скачать фото аниме парней for practice or reference. Just as proper grip enhances drawing precision, tools like faceshapedetector.ai refine personal style by detecting face shape and offering tailored beauty and styling suggestions while ensuring privacy.
September 10, 2025 at 5:59 pm
People describe bakar77 as a reliable name often shared in positive conversations.
September 16, 2025 at 10:36 am
Thanks for sharing the info, keep up the good work going…. I really enjoyed exploring your site. good resource… bokep jepang
September 17, 2025 at 9:46 pm
Absolutely agree—holding your tools properly is such a small detail but makes a huge difference in efficiency and results. Just like with the onstream app, the right grip and approach help you work smarter, not harder, and keep everything steady and effective.
September 19, 2025 at 8:52 am
Thanks For sharing this Superb article.I use this Article to show my assignment in college.it is useful For me Great Work. login tentoto
September 23, 2025 at 11:07 am
Such practical advice about proper grip techniques! It’s refreshing to see genuine tips for improving artistic skills rather than the bloodmoney schemes that sometimes plague creative education – these fundamentals really do make all the difference in developing proper technique!
September 23, 2025 at 3:08 pm
Terima kasih, ini blog yang bagus. arenaqq
September 23, 2025 at 10:24 pm
Helpful guide on holding drawing tools properly reminds me to be careful with details like ブサイク診断 危険.
September 24, 2025 at 4:12 pm
It was wondering if I could use this write-up on my other website, I will link it back to your website though.Great Thanks. tentoto
September 24, 2025 at 6:07 pm
Senang mendengarnya. Terima kasih atas informasinya dan semoga sukses. pkv games
October 9, 2025 at 3:41 pm
i read a lot of stuff and i found that the way of writing to clearifing that exactly want to say was very good so i am impressed and ilike to come again in future.. tentoto
October 10, 2025 at 9:08 am
This is a cool breakdown! I never thought about how different controller grips affect gameplay so much. This reminds me of how much I enjoy customizing my gaming experience! I wonder if these grips can help me improve in my favorite bear clicker game!
October 11, 2025 at 7:10 am
Interesting take comparing controller grips to drawing tools! Makes you think about precision and control. Now I’m wondering if different grips would help with my bear clickerscores LOL. Gotta try claw grip!
October 12, 2025 at 5:01 pm
This is very educational content and written well for a change. It’s nice to see that some people still understand how to write a quality post! agen togel
October 14, 2025 at 8:43 pm
This is very educational content and written well for a change. It’s nice to see that some people still understand how to write a quality post! agen togel
October 22, 2025 at 6:09 am
Interesting comparison between controller grips and drawing techniques! The connection between physical control and creative precision really stands out. Speaking of grip and precision, it reminds me of customizing a soundboard each button’s placement affects flow and comfort. Check out trending sound buttons and meme soundboard downloads at SoundBoardW.com for a fun, hands-on experience with your own sound board free setup.
October 24, 2025 at 9:35 am
Merge Rot
Merge Rot is more than just a puzzle game—it’s a physics-based merge experience full of absurd humor, clever strategy, and meme-fueled madness. In Merge Rot, you drop items into a cup. When two identical items touch, they merge into a more evolved version. Each Merge Rot evolution is wackier than the last, making gameplay hilarious, unpredictable, and highly addictive.
October 24, 2025 at 9:35 am
Wplace tool
Unleash your full creative potential in Wplace. Our converter not only provides a perfect pixel grid with auto-matched colors but also allows custom color swaps for total artistic control. Create pixel-perfect designs, your way. And it’s just the beginning—more tools are coming soon!
October 24, 2025 at 9:36 am
Throw a potato
Forget logic. Forget reason. Embrace the madness! In this game, the only way forward is to throw a potato… and then another… and another. Experience an endless, chaotic loop of pure, spud-flinging insanity. You have been warned.
October 24, 2025 at 9:37 am
Pips game
Pips Game isn’t just another puzzle; it’s an unlimited, free online brain-teaser inspired by the New York Times, designed to captivate and challenge players of all skill levels.This game is a solid time-killer for my commute! Easy to pick up and play a quick round. My only wish is for a ‘save and quit’ feature mid-puzzle, sometimes I gotta hop off the bus real quick.
October 24, 2025 at 9:37 am
Bloodmoney
Ever wondered how far you’d go for survival? BLOODMONEY! challenges you to earn $25,000 in a darkly twisted clicker game where every decision ramps up tension and leads to shocking, unforgettable endings.BLOODMONEY! is surprisingly deep for a clicker. The moral choices actually keep you thinking, and the different endings are a nice touch. Only wish there was a leaderboard to see who’s the most ruthless!
October 24, 2025 at 9:38 am
No i’m not a human
Master the Ultimate No I’m not a Human Strategy Guide
We provide the most comprehensive No I’m not a Human guides, detailed system requirement analysis, secure download channels, and professional gaming tutorials. Whether you’re a newcomer or a veteran player seeking to collect all endings, you’ll find everything you need here.
October 29, 2025 at 4:38 pm
Great breakdown of grip techniques – the middle grip advice is solid and really does reduce hand strain, kind of like how precise motor control matters when you’re trying to click those tiny boxes in I’m Not a Robot Game verifications!
November 2, 2025 at 10:40 am
I love how you connected grip styles between drawing and gaming! It’s interesting to see how our handling techniques influence performance. Have you found any specific grip that enhances both your drawing and gaming experiences?
November 3, 2025 at 7:44 am
Essayez Null’s Brawl, un serveur privé rapide et sans pub, avec toutes les mises à jour récentes et les nouveaux brawlers ajoutés régulièrement.
November 10, 2025 at 5:19 pm
Great tips on improving drawing technique! Mastering how to hold your tools properly really boosts control — just like how precision matters in games such as ragdoll archers unblocked.
November 11, 2025 at 10:04 am
Great insights on grip styles! It’s interesting how even the slightest change can impact control. I’m curious if you have any specific tips for transitioning between different grips during gameplay.
November 11, 2025 at 1:58 pm
W Nulls Brawl odkryjesz ekscytujące tryby, nowe brawlery i specjalne wydarzenia. Gra gwarantuje emocje i zabawę dla fanów Null’s Brawl.
November 23, 2025 at 8:44 am
Buscador Estatus MX es tu aliado para consultar estatus en línea de manera clara y confiable. Información actualizada y fácil de entender para todo tipo de usuarios.
November 29, 2025 at 5:55 pm
Watch the Hindi Desi serial Udne ki Aasha online in HD. This Indian TV show is available for streaming on Voot
December 2, 2025 at 6:16 am
This post on grip technique for drawing is a great reminder of the fundamentals! Proper grip can truly enhance creativity. For more useful tools, check out this calculator電卓 that helps with precision in any project!
December 17, 2025 at 10:24 am
Free Online AI Image Watermark Remover | MarkErase
E-commerce image watermark removal
Our free online AI Image Watermark Remover delivers clean, high-quality results in just seconds—no software download required.
Remove Watermarks in Seconds with MarkErase
The AI identifies complex watermark layers and reconstructs every missing pixel so images remain natural and believable.
December 19, 2025 at 8:25 am
Flexible coupling, universal joint, cardan shaft factory.
RFQ now: https://www.apexcoupling.com/
December 19, 2025 at 8:26 am
Ice bath water chiller
https://www.sportwaterchiller.com/
December 22, 2025 at 5:48 am
The way the topic is explained here makes it very easy to follow. I enjoyed reading it and learning something new.
kaskusgaming
December 22, 2025 at 9:33 am
This is such a fun tool! I can’t wait to see if it predicts a snow day for me—definitely need to try the Snow Day Calculator ! ❄️⛄
December 22, 2025 at 9:36 am
Just tried this out and it’s so interesting! I never realized how much detail goes into a beauty measure
definitely gives a new perspective. 😊
December 22, 2025 at 1:56 pm
This is really helpful for tricky levels—using blo poke alongside a block blast solver makes it much easier to spot the right moves and clear the board efficiently.
December 28, 2025 at 11:25 am
The Xbox One controller standard grip really caught my attention because it’s super comfy for FPS games, balancing trigger control with face buttons
December 29, 2025 at 12:41 pm
Very helpful and clear! It explains the correct way to hold drawing tools in a simple and easy-to-follow way.
December 29, 2025 at 12:43 pm
Very helpful and clear! It explains the correct way to hold drawing tools in a simple and easy-to-follow way.
December 31, 2025 at 4:52 pm
Thanks for the thoughtful sharing! Stuidioify is a nice resource site, recommend it to friends who need it.
January 6, 2026 at 10:18 am
This report raises an important point. Investing in bus speed improvements can make public transportation more reliable, efficient, and attractive for daily commuters. A smart step toward better urban mobility. https://get-bitcoin-hyper.com/
January 8, 2026 at 8:09 am
this is the best site ever
January 9, 2026 at 9:27 am
So, the Claw Grip, huh? I always thought it looked awkward, but after trying it with Monster Hunter World, I see why people love it
January 10, 2026 at 2:43 am
Great tips on grip styles! It’s cool how holding tools right can improve both art and gaming. Speaking of fun discoveries, I recently used a quiz to discover your pony match—it’s a neat way to find your character, kind of like choosing the best grip for you.
January 10, 2026 at 4:47 pm
BoJack Test – Discover Which BoJack Horseman Character You Really Are
Are you a self-destructive genius like BoJack, an idealistic writer like Diane, or an eternally optimistic golden retriever like Mr. Peanutbutter? BoJack Test is a comprehensive personality assessment that dives deep into your psyche to reveal which character from the critically acclaimed animated series BoJack Horseman best reflects your true self. Through carefully crafted questions exploring your views on success, relationships, morality, and the meaning of life itself, we’ll match you with your Hollywoo(d) soulmate. Whether you’re grappling with existential dread, searching for purpose, or just trying to be a better person, this test offers both entertainment and genuine self-reflection. Take the journey into self-awareness – your inner animal is waiting to be discovered.http://bojacktest.com/
January 11, 2026 at 2:43 pm
This article was really helpful. I never realized how much my grip affected my lines and overall control until I read this. The comparison with holding a game controller made it click for me — drawing really does involve the whole arm, not just the wrist.
I’ve noticed that when I do relaxed or random practice sessions (sometimes using simple tools like WheelPage: https://wheelpage.com
), I become more aware of tension in my hand and naturally adjust my grip. It actually makes practicing feel less stressful and more enjoyable.
Great reminder that small fundamentals like how you hold your tools can make a big difference over time.
January 11, 2026 at 6:57 pm
This article was really helpful.
January 12, 2026 at 9:52 am
This article is very informative
https://airbrush.com/image-enhancer
January 15, 2026 at 12:48 pm
this is different site ever in indonesia
January 20, 2026 at 9:45 pm
I tried what is my face shape online and it gave surprisingly accurate results. A fun and quick way to learn more about your facial features!
January 23, 2026 at 12:46 pm
this is the best site ever in indonesia
January 23, 2026 at 6:18 pm
Hill Climb Racing unlimited money and gold in Hill Climb Racing is a game-changer! Cars upgrade instantly.
January 25, 2026 at 9:46 am
Just tried the BoJack Horseman Test and wow, it nailed my personality at 87% Diane. Super accurate and kinda eye-opening. Everyone should give it a go!
January 27, 2026 at 2:49 pm
Thank you for highlighting how much our grip affects drawing control! I never realized that holding a pencil near the middle encourages using the whole arm instead of just my wrist — it actually makes my lines feel more confident.
January 27, 2026 at 3:01 pm
Reading this reminded me how drawing is more than just hand movement — it’s about engaging the whole arm. I’ve started practicing with an arm-focused grip and already notice less tension after long sketches.
January 31, 2026 at 10:01 am
Really enjoyed this breakdown of how grip affects drawing and even gaming techniques — nice connection! I was reminded of how film directors in movies focus on tools and posture too, just like tips at predator badlands gomovies
streaming techniques help you enjoy movies comfortably. Keep up the good work!
February 2, 2026 at 2:24 pm
Here are the English versions with the plain text URLs included naturally. These are ideal for forums, blog comments, or platforms where hyperlinking isn’t supported or you want to appear more “user-generated.”
Option 1: Party & Social (Casual/Friendly)
Best for: Lifestyle or social hobby blogs.https://www.impostergame.help/
February 3, 2026 at 4:10 pm
situs tartoto bandar togel terpercaya yang pernah ada
February 6, 2026 at 1:53 pm
this is the best site ever in indonesia
February 7, 2026 at 7:07 am
pascol4d is the best site ever in indonesia
February 8, 2026 at 6:22 am
tartoto minimal deposit 5rb dan bisa menang jutaan
February 9, 2026 at 7:13 am
Artikelnya bermanfaat. Saya juga sering buka TARTOTO buat cari referensi.
February 10, 2026 at 7:36 am
I really enjoyed the explanation about holding drawing tools correctly. The way you described grip control and hand positioning makes practicing feel much less intimidating, especially when trying to improve precision and comfort during longer drawing sessions. Creating art often requires a calm and organized environment, which helps focus and creativity flow naturally. When I practice detailed work like sketching or makeup design concepts, I prefer working in a dedicated creative space such as a small beauty studio for rent. Having a professional and quiet studio setup helps maintain posture, improve concentration, and allows artists to develop their skills more effectively.
February 13, 2026 at 4:05 pm
I actually tried holding my pencil in the middle like the blog suggests and it really did help me make smoother lines without cramping up – didn’t expect that at all!
February 18, 2026 at 1:12 am
TheInstander.com ek online platform hai jo users ko Instagram ka modified version, yani Instander APK, download aur explore karne ki suhulat deta hai. Is par aap Instagram ke basic features se hat kar ad-free browsing, high-quality media download aur advanced privacy controls jaise extra features hasil kar sakte hain, jo original Instagram app me nahi milte. Website me aapko easy guides, updates aur installation steps bhi milte hain jo beginners ke liye helpful hote hain. Agar aap apne Instagram experience ko customize aur better banana chahte hain, to click here aur Instander ke features aur downloads dekhain.
February 19, 2026 at 6:31 am
Woah i gonna visit this site again and again .
good rizz pick up lines
February 26, 2026 at 1:55 am
Good article thanks you so much . old pic to new pic ai
February 26, 2026 at 1:56 am
Good content remove background from image online free
February 28, 2026 at 1:35 am
Woooo ,such a great article. extend image size
February 28, 2026 at 1:40 am
THANKS YOU SO MUCH FOR SHARING VALUABLE INFORMATION.enhance video free
February 28, 2026 at 1:47 am
This post is beautyful written,With idease presented clearly.It was a pleasure to read thansk you so much. free remove background from video
March 2, 2026 at 7:26 pm
Woooo ,such a great article