Heatless waves

When it comes to hair there are plenty of tools that are way to expensive and the heat can damage your hair. I only have a straightener and a curling wand that I hardly touch because I like to do my favorite hair trick which is heatless waves. using this trick it will save your hair from daily damage and tons of time.

Step one: take a shower at night before bed and wash your hair.

step 2: once your hair is wet from the shower, towel try your hair a bit so it lightly damp still.

Step 3: brush through the hair to make sure there are no knots.

Step 4: add any product that will give your hair more hold but its optional.

step 5: Split your hair into two sections and braid both halves. once both sides are done you can go to bed with the braids in and when you wake up your hair will have nice beachy waves.

here is a video to further explain.

Setting Spray! The holy grail product

Like the title states, Setting Spray is the underrated holy grail product that you need everyday. Setting Spray has recently become popular among the beauty community and it has good reason to. I have been using setting spray for about two years now and it has completely changed my makeup. After you finish your whole face of makeup giving a nice mist over the face that locks your makeup in all day and will not move. the setting spray also makes your makeup (mostly foundation) set into your face making it look like your actual skin. Overall it truly finishes off your makeup look and everyone should invest in buying one. They are really nice High-end setting sprays that do the job but I found my favorite drug store product that does the same job. It is the Maybelline “Master Fix” ‘wear-boosting setting spray’. This product only cost $8 which isn’t bad considering setting sprays can run near the $30 range. Another face spray that I absolutely am in love with is the Mario Badescu “facial spray with aloe, herbs, and rose water”. This stuff helps with my skin compaction and overall hydration of the skin. What I like to do is spray it on my face before my makeup as an extra primer and moisturizer. This product also cost around $8. If there is one product you need its this one!

2209889

Are you Blushing?

To me blush is one of the forgotten beauty products. It is something you don’t need to have but when you use it, it can bring your whole make up look together. Blush is also something that can bring your face back to life when having a little color. Since Blush is not a extremely needed product it also doesn’t have to be something you spend a lot of money on. I have found and tired many blush products that work just great and are under $5! My personal favorite would be E.L.F cosmetics blush in ‘mellow mauve’. It is only $3! Looking online I noticed this E.L.F blush could even be a dupe for NARS ‘orgasm’ blush that cost around $20. Blushes should never cost that much! Another blush from E.L.F would be more of a summer shade. It is a nice bight pink/ coral called “Candid Coral”. All these products are worth testing out yourself since they are so cheap with such a good color pigmentation.

1750217


Tips on how to apply:

1) once you have finished the rest of your makeup, one of the last things you want to do is add blush.

2) the proper place to add the blush is on the apples of your cheeks, near the rounded part.

3) a tip to add the color throughout your face would be to add a bit on the tip of your nose.

4) always remember to have a light hand when applying you can always add more but you cant take color away once it is on.

Favorite Drugstore Foundation

When it comes to finding the right foundation for your skin type it can be extremely difficult. I have tried BB creams, light coverage- high coverage foundation, liquid and stick. Through all the ones I have tried from the drugstore I have finally landed on a product that satisfies all my needs in a foundation product. That product is the L’Oréal Paris Infallible Pro‑Matte Foundation. This is a little on the pricy side in my eyes but it is much better than most foundation products while actually doing what you want a foundation to do. This product cost around $10 depending on where you buy it. Overall it does exactly what it says in the name. It keeps your skin matte all day. You don’t feel greasy halfway through wearing it. It is a medium to full coverage foundation but it is for sure buildable. Personally, I like to mix two shades ( Classic Ivory 101 and Natural Buff 103). I like mixing and creating my own shade that truly matches my skin tone is because I do self tan so my skin color is forever changing. Therefore with these two shades I know I can always create the right color that will match the rest of me.

lorealinfalliblepromatte1

The Best Drugstore Mascara

Throughout my many years of wearing makeup, I have always been someone to always be changing up which mascara I try. Once I used up a tube I was ready to move on to the next to see if it could beat the last. After testing many of different brands and products that claim to do a range of things, I think I have personally found a combo that is the best. Not to mention they are drugstore products which makes them super affordable. Mascara is one of those beauty products that I don’t think you need to spend more then eight dollars on. Some of the high end products I see in Ulta can cost over thirty dollars. I think this is unbelievable. This combo that I have found cost less then that and you are buying two products. Those products are Covergirls lashblast fusion and Maybelline lash sensational. Both of these products cost around $7 depending on where you buy it from.

13071607_Alt15 2282877


Some tips on how I like to apply these products are:

1) start with the covergirl Lashblast fusion mascara and apply this to your top lashes. Mainly focusing the product close to your eye lid and not as much on the ends of the lash. We will be coming back to that.

2) once you have done the top lashes on each eye, take the Maybelline lash sensational mascara and apply this to the bottom lashes.

3) lastly, go back to the top lashes with the lash sensational mascara and just apply this to the tips of the lashes.


by doing this application in this order and with these products it will make your lashes long and full looking.

Image result for eyelash gif

Festival Glitter Trend

This past weekend was the oh so trendy music festival Coachella. During this concert festival it comes with the unique fashion looks people come like to create. After seeing the looks most Coachella goers rocked, I noticed a lot of people were adding glitter to their makeup looks. Personally I see this trend carrying on to the summer months. Therefore, here are some tips to achieving the look:

fe8e1c4f0ae14c45c4769203440ae6e1


1) Apply your normal highlighter to the high points on the face (see my previous post for more directions)

2)Next take any type of glitter products you want with the glitter size varying.

some products that I thought would work best for recreating this look would be the NYX face and body glitter along with the NYX glitter glue so everything stays on your face once you apply it. Each of these products only cost $6 and if that is still too much for glitter in your mind you can always go to the local craft store or Walmart and find all different types of glitter in different colors for a little bit less.

75d63e377fdf2bd63e705bc86575ac012297561


3) Lastly, apply the variety of glitter on the apples of the cheek the gradient of small to larger glitter will give the most magical and natural look. As natural as glitter can really be.

Hair dye DIY

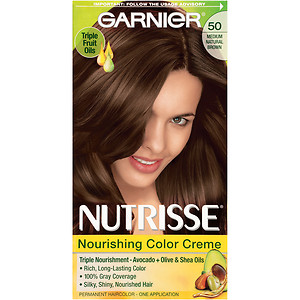
Recently, I have been in a major need for a dye job on my hair. It was about a little less than a year since I dyed my hair. I wanted to give it a break plus it can be very expensive getting it done by a professional. When I would get my hair cut and colored it would run me $80-$100 dollars at the salon because I have such long hair. Back in high school I dyed my hair with a box dye so I thought I’ll turn to my old favorite way of doing my hair. It was pretty simple so I don’t know why I stopped using box dyes from the drug store. Therefore, this past weekend I randomly decided that enough was enough and I was going to dye my hair myself. I went to Ulta and they were having a sale on hair dye. It was about 15% off each box and they were originally about $7 each. I got four knowing that I will for sure need three and the fourth will be extra when I need to do touch ups on my roots in a few months. I got the Garnier Fructis HairColor in “50-Truffle- Medium Natural Brown”. This was perfect because my hair is naturally a couple shades lighter than this color so it wasn’t a dramatic change.

300


Some tips to dying at home would be:

1)make sure that you didn’t wash your hair for a few days because hair dye attaches to the hair better when oily.

2) I mentioned this earlier, but it is extremely important to buy more than one box of dye for your depending hair length.

3) read the directions in the box completely because dyes can differ from box to box. Also you don’t want to miss a step and mess up.

Image result for hair gif from bride wars blue

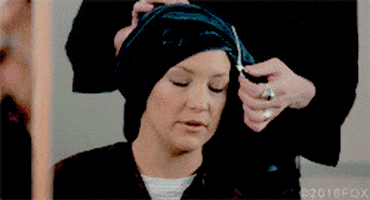
4) make sure to wear old clothes and use old towels just in case you get the dye on them.

5) before dying make sure that you brush through your hair and section off the part you want to start with from the rest of the hair.

6) I recommend using a brush while dying so you can evenly cover your hair.

7) final and most important even when you think you have enough hair dye on your head keep adding! make sure your hair is completely covered so you don’t have any patches with no dye.

Below is an after picture of my hair. It is darker and the color is even throughout my hair.

Facebook-20170418-053536

Summer Glow

Since it is spring break season everyone is going on vacation to a warm location. Which means many will be going to the beach and coming back with that sun kisses glow. Tanning in the sun may look good after but the effects of sun damaged skin can last for the rest of your life. Same when laying in a tanning bed. Overall it can lead to skin cancer and actually make your skin look older later adding more wrinkles. Therefore fake tan or spray tan is a much healthier option. But this healthier pick can be pretty pricy. A typical spry tan can be 60 to 100 dollars. This is crazy for many especially as a college student looking to get a quick fix to a summer bronzey look.

0001910011062_500X500


jergens-natural-glow-instant-sun-deep-bronze-sunless-tanning-mousse-6-fl-oz_235390


I have found a few products from Jergens. The two products I like the best would be Jergens natural glow lotion and Jergens natural glow instant sun mousse. Both products range from about $8-$12. This is much more manageable compared to the spray tan or getting sun damaged skin. I have personally used these products and love them. They also don’t make you look orange!

Image result for tanning gif from bride wars
Some tips on how to apply the self tanner would be:

1) Take a shower so you have fresh and clean skin to apply the product onto.

2) Shave and exfoliate your skin. By getting the dead skin off of your body this will insure not having spotty patches that the tanner will cling to.

3) Put normal lotion on the spots that are normally dry. For example, elbows, knees, hands, ankles…etc. this will also make sure there is no dry patches that the product sticks to.

4) Apply a layer of the tanner on with a tanning glove or with your hands. If applying with your hands make sure to wash them after so they aren’t stained with the tanner.

Eyebrows on Fleek

When it comes to eyebrows the latest trend is to have them filled in with sharp lines. There is even a slang made up for having your brow looking prefect, “on fleek”. Brows can be tricky to make them look on-point but with some practice and the right product it can be easier. A way to make them look more natural is to have a light hand of filling them in and using a makeup wand to brush through them. When you brush through them it helps prevent them from looking like they are brushed in or too heavy.

maxresdefault


A highly raved product among the beauty community and makeup fans everywhere is the “Anastasia brow wiz”. This high-end product is double ended. One side has the colored wax that is used to fill in the eyebrows. Then on the other end is the spooley that is used to brush the brow hairs down and in the right direction. I agree this is a really nice product but it cost $21. A dupe for this product is the “NYX Micro Brow Pencil” that is half the price of the Anastasia product, it cost $10. The “NYX Micro Brow Pencil” has the exact same double ended pencil and wand as the “brow wiz”. It last all day with no smudges. It comes in eight shades for many different hair colors.  

51X4QbT1QhL__SY355_

Bronzed Beauty

Summer is just around the corner and if you are like me, I am still as pale as the winter snow. To get ready for the warmer weather I think it is nice to add a little glow to your makeup look. Adding bronzer adds more color and detention to the skin. A big trend for makeup is doing crazy contouring. This is not really necessary to do all the time and I personally don’t think it looks super natural either. A better way to give your face shape is a nice blended, overall bronze. A tip on how to apply the bronzer around your face is in the “E3” shape. This basically means that on the left side of your face you will create an “E” and on the right side a “3”. What you will do is take your brush and go around the boarder of the forehead (by the hairline and temple). Then bring it around to the hollows of your cheek bones (From your ears outward to the middle of the cheek). Finally take your brush and drag it underneath the jaw line. This will give the jaw line more definition. After this you simple repeat on the other side of the face.

How to apply bronzer 3 or E method

Another little trick that I like to do is to place a little bronzer on each side of my nose and leaving the middle untouched because that is where the highlighter will be. This tip will make the nose look smaller but also the most important thing, giving the nose more contrast to the rest of the face so it does not get lost in the rest of the face.

Some products that are highly raved about is the ‘Benefit Hoola’ bronzer. This product cost $29.00. Like every high-end product that is pretty outrageous. I have found that the ‘NYC Smooth Skin Bronzing face powder’ in color ‘Sunny’ is a major dupe for the ‘Benefit Hoola’ bronzer. The NYC bronzer is only $3! This is a $26 dollar difference. It is insane to me that someone would pay that much when there is the exact same product for more than half the price.

8d555e4461a6673d64f155682c7ab365