Are you Blushing?

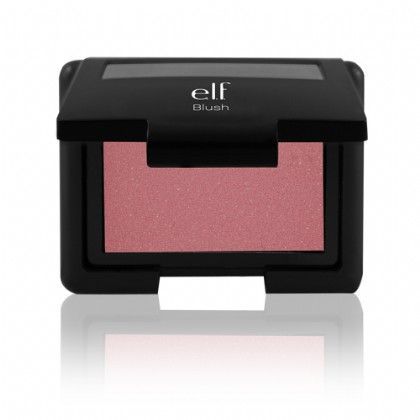
To me blush is one of the forgotten beauty products. It is something you don’t need to have but when you use it, it can bring your whole make up look together. Blush is also something that can bring your face back to life when having a little color. Since Blush is not a extremely needed product it also doesn’t have to be something you spend a lot of money on. I have found and tired many blush products that work just great and are under $5! My personal favorite would be E.L.F cosmetics blush in ‘mellow mauve’. It is only $3! Looking online I noticed this E.L.F blush could even be a dupe for NARS ‘orgasm’ blush that cost around $20. Blushes should never cost that much! Another blush from E.L.F would be more of a summer shade. It is a nice bight pink/ coral called “Candid Coral”. All these products are worth testing out yourself since they are so cheap with such a good color pigmentation.

1750217


Tips on how to apply:

1) once you have finished the rest of your makeup, one of the last things you want to do is add blush.

2) the proper place to add the blush is on the apples of your cheeks, near the rounded part.

3) a tip to add the color throughout your face would be to add a bit on the tip of your nose.

4) always remember to have a light hand when applying you can always add more but you cant take color away once it is on.

Hair dye DIY

Recently, I have been in a major need for a dye job on my hair. It was about a little less than a year since I dyed my hair. I wanted to give it a break plus it can be very expensive getting it done by a professional. When I would get my hair cut and colored it would run me $80-$100 dollars at the salon because I have such long hair. Back in high school I dyed my hair with a box dye so I thought I’ll turn to my old favorite way of doing my hair. It was pretty simple so I don’t know why I stopped using box dyes from the drug store. Therefore, this past weekend I randomly decided that enough was enough and I was going to dye my hair myself. I went to Ulta and they were having a sale on hair dye. It was about 15% off each box and they were originally about $7 each. I got four knowing that I will for sure need three and the fourth will be extra when I need to do touch ups on my roots in a few months. I got the Garnier Fructis HairColor in “50-Truffle- Medium Natural Brown”. This was perfect because my hair is naturally a couple shades lighter than this color so it wasn’t a dramatic change.

300


Some tips to dying at home would be:

1)make sure that you didn’t wash your hair for a few days because hair dye attaches to the hair better when oily.

2) I mentioned this earlier, but it is extremely important to buy more than one box of dye for your depending hair length.

3) read the directions in the box completely because dyes can differ from box to box. Also you don’t want to miss a step and mess up.

Image result for hair gif from bride wars blue

4) make sure to wear old clothes and use old towels just in case you get the dye on them.

5) before dying make sure that you brush through your hair and section off the part you want to start with from the rest of the hair.

6) I recommend using a brush while dying so you can evenly cover your hair.

7) final and most important even when you think you have enough hair dye on your head keep adding! make sure your hair is completely covered so you don’t have any patches with no dye.

Below is an after picture of my hair. It is darker and the color is even throughout my hair.

Facebook-20170418-053536

Summer Glow

Since it is spring break season everyone is going on vacation to a warm location. Which means many will be going to the beach and coming back with that sun kisses glow. Tanning in the sun may look good after but the effects of sun damaged skin can last for the rest of your life. Same when laying in a tanning bed. Overall it can lead to skin cancer and actually make your skin look older later adding more wrinkles. Therefore fake tan or spray tan is a much healthier option. But this healthier pick can be pretty pricy. A typical spry tan can be 60 to 100 dollars. This is crazy for many especially as a college student looking to get a quick fix to a summer bronzey look.

0001910011062_500X500


jergens-natural-glow-instant-sun-deep-bronze-sunless-tanning-mousse-6-fl-oz_235390


I have found a few products from Jergens. The two products I like the best would be Jergens natural glow lotion and Jergens natural glow instant sun mousse. Both products range from about $8-$12. This is much more manageable compared to the spray tan or getting sun damaged skin. I have personally used these products and love them. They also don’t make you look orange!

Image result for tanning gif from bride wars
Some tips on how to apply the self tanner would be:

1) Take a shower so you have fresh and clean skin to apply the product onto.

2) Shave and exfoliate your skin. By getting the dead skin off of your body this will insure not having spotty patches that the tanner will cling to.

3) Put normal lotion on the spots that are normally dry. For example, elbows, knees, hands, ankles…etc. this will also make sure there is no dry patches that the product sticks to.

4) Apply a layer of the tanner on with a tanning glove or with your hands. If applying with your hands make sure to wash them after so they aren’t stained with the tanner.

Bronzed Beauty

Summer is just around the corner and if you are like me, I am still as pale as the winter snow. To get ready for the warmer weather I think it is nice to add a little glow to your makeup look. Adding bronzer adds more color and detention to the skin. A big trend for makeup is doing crazy contouring. This is not really necessary to do all the time and I personally don’t think it looks super natural either. A better way to give your face shape is a nice blended, overall bronze. A tip on how to apply the bronzer around your face is in the “E3” shape. This basically means that on the left side of your face you will create an “E” and on the right side a “3”. What you will do is take your brush and go around the boarder of the forehead (by the hairline and temple). Then bring it around to the hollows of your cheek bones (From your ears outward to the middle of the cheek). Finally take your brush and drag it underneath the jaw line. This will give the jaw line more definition. After this you simple repeat on the other side of the face.

How to apply bronzer 3 or E method

Another little trick that I like to do is to place a little bronzer on each side of my nose and leaving the middle untouched because that is where the highlighter will be. This tip will make the nose look smaller but also the most important thing, giving the nose more contrast to the rest of the face so it does not get lost in the rest of the face.

Some products that are highly raved about is the ‘Benefit Hoola’ bronzer. This product cost $29.00. Like every high-end product that is pretty outrageous. I have found that the ‘NYC Smooth Skin Bronzing face powder’ in color ‘Sunny’ is a major dupe for the ‘Benefit Hoola’ bronzer. The NYC bronzer is only $3! This is a $26 dollar difference. It is insane to me that someone would pay that much when there is the exact same product for more than half the price.

8d555e4461a6673d64f155682c7ab365